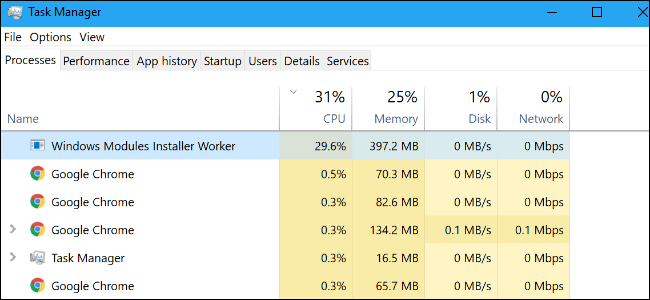
Windows Modules Installer Worker – Fix Windows 10 High CPU & Disk Usage: One of the recurring problems that everyday computer users encounter is the unusually high usage of CPU resources and that of disk usage consumption, though apparently not at their part still, due to whatever reason this may show, it puts a pause at all the activities and slows down the system entirely.
Often this is due to the system carrying out some background system tasks or running some maintenance checks without the user’s knowledge. Windows Modules Installer Worker is another system process that often does this, its a part of windows itself and runs to check for updates and patches online. Normally, when left on its own, it will finish it due course in not more than a couple hours at max and return the system to its original state.
At times though, this Windows Modules Installer Worker process can become faulty or may need to be interrupted to ensure smooth operation of the system again. Most people attempts are often to disable it or to set the windows connection settings to metered which are not suggested. Disabling it will only prevent windows from updating itself and installing critical patches and fixing security vulnerabilities. Setting the network connection to metered will prevent it from activating as windows won’t be able to download and install updates on its own. You can install updates manually always but this process runs its due course even after you update manually, so it’s best to let it be.
Read Also:
- Download Facebook Videos
- Download SNES Emulators
- Download Bluestacks 2
- How to make Windows 7 Genuine
- Download Directx 12
Windows Modules Installer Worker: Fix Windows 10 High CPU & Data Usage
However, If you have any reason to think that this Windows Modules Installer Worker process might be taking too much time than its usual or that something is wrong with it, then you can take a measure of steps to resolve it including running the windows troubleshooter and/or a deep antivirus scan just to be sure.
Antivirus & Antimalware Scan
Not to be confused as same, antivirus scan is different than malware scan and very often malware scan can found out deeply hidden malware affecting your pc that antivirus scan can’t. You can use Malwarebytes or any other tool for the purpose of it along with your preferred antivirus. Be sure to run a deep thorough scan preferably boot scan if your antivirus has got that feature and not just a quick system scan.
More than often this will only speed up your system and free the clogged up space on your hard drive and get you back to working as smooth as before.
Scan Disk using Command Prompt
If the antivirus scanning doesn’t show any results, then you need to check your disk for any issues with it. You can do so easily via the command prompt. You need to access system file checker tool via command prompt line with the help of command sfc. Do that via these steps:
- Search command prompt on the search bar on your PC. Right-click it and select ‘Run as an administrator’.
- Once opened, type this command exactly as it is and press enter- SFC /SCANNOW.

- Now the tool will perform a check of your disk and if any error is found, it will attempt to fix it altogether.
- Restart the system once the checking is done and see if the error is still occurring.
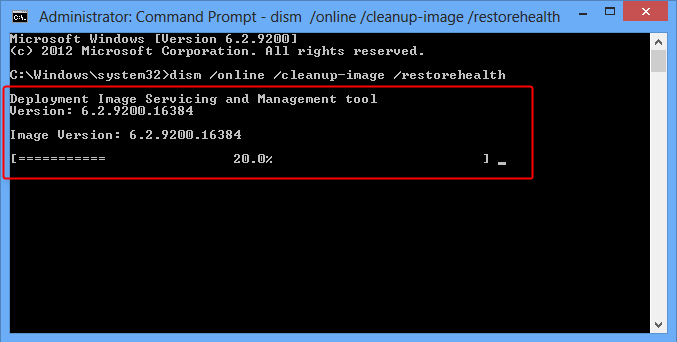
Deployment Image Servicing and Management Tool
This is an advanced tool which you can use to fix all the tiny windows errors. It also checks whether if the windows modules installer worker tool is working correctly.
- To access and run this tool, you need to first open the command prompt in admin mode which you can do via steps mentioned above.
- Once you have opened the command prompt in admin mode, input this exact command and press enter(without quotes).
“Dism.exe /Online /Cleanup-Image /Restorehealth”
- Now it will scan your device for all the corrupted components and then repair them on your behalf on its own.
 Once it’s done, you need to restart the system and then check to see if the error is still there.
Troubleshooting System Processes & Tasks
The system file associated with windows modules installer worker is TIWORKER.EXE. If and when tiworker.exe is causing issues, you can fix it by simply running the inbuilt system troubleshooting.
- Goto control panel and locate troubleshooting option and open it.
- Once opened, expand the view and find the system maintenance icon.
- Open that and it will only take a few minutes to perform a check and then apply the necessary fixes.
- Same as above, once done reboot the system and then check for the error.
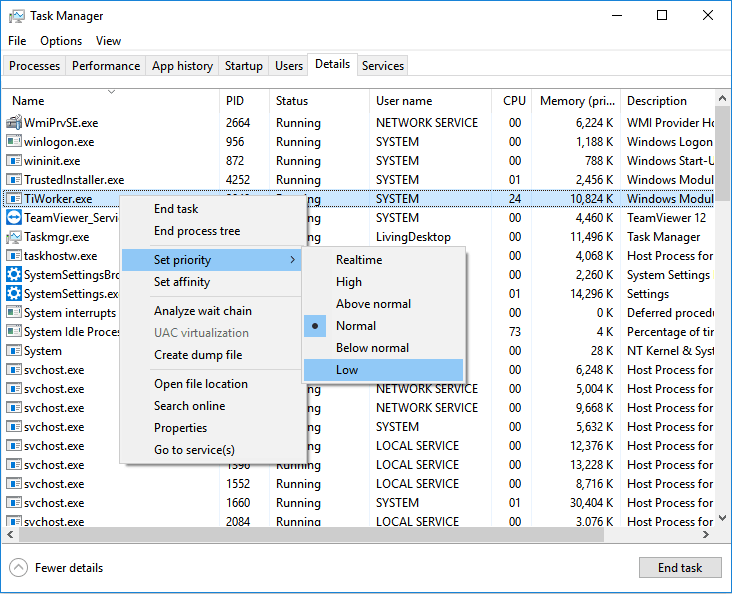
Lowering the Priority of TIWORKER.EXE
You can lower the priority and send Windows Modules Installer Worker much down the system tasks that run and consumer CPU and disk usage. To do this you need to open task manager.
- Open task manager either by searching in search console or right clicking on windows bar at the bottom or using the assigned shortcut for it in your operating system.
- Goto more details in the bottom left and open it.
- Select the details tab and then locate the TIWORKER.EXE.
- Right click on tiworker.exe and hover to set priority option.
- You can also select end task/ end process tree if you want to end the current instance of the process or kill the process altogether.
- Now from the drop-down menu that comes when you hover to set priority option, select low.
Disable Automatic Update
Lastly, if none of the above method works and this error is causing too many problems to you then we advise you to disable automatic updates. Take this step with caution and keep checking manually on a regular basis for security fixes and updated patches releases amongst others. You can either do it by going to Windows Update and changing the settings to Manual or you can take the below steps and direct change the startup method of the windows modules installer worker.
- Open the run console on your device by pressing Windows + R together.
- In the run window type ‘services.msc‘ and press enter.
- Now from the window that opens, locate windows modules installer worker.
- Open it by double-clicking it and then in the properties window that opens, you will find an option named startup in general tab. Set it to manual.
- Now exit by saving the changes using the apply button and then closing the window by pressing ok.
Restart and check to see if the error is resolved.
Perform a Clean Boot
Irrelevant to whether your problem is solved or not, we recommend you to do this as a safety precaution and as a sort of cleaning check. Using the Microsoft configuration tool inbuilt in windows, you can clean up unwanted and temporary files from your disk thus freeing up space and also rid the CPU of unnecessary services and tasks and this can easily shift the Windows Modules Installer Worker process to much lower CPU usage.
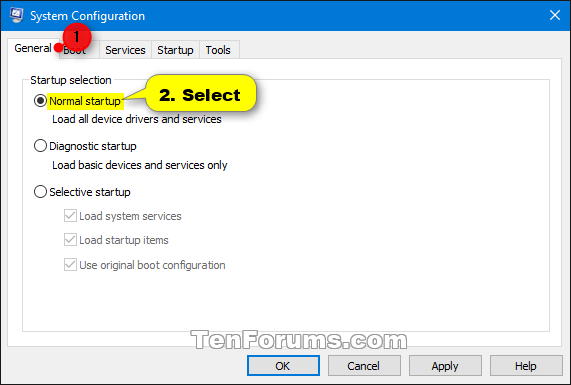
- Open msconfig.exe either by searching ‘msconfig‘ in the search console or by opening it through the run console by entering ‘msconfig.exe‘.
- Once opened, select normal startup from within general tab.
Now restart the system and see the changes.
Read Also, How to fix following Windows Errors:
- Vulcan Runtime Libraries
- PFN List Corrupt error
- Memory Management BSoD
- VIDEO TDR FAILURE
- Clock WatchDog Timeout
After going through all the above steps, your problem should have been solved and Windows Modules Installer Worker now must be consuming low CPU and data usage. If for any reason it shows then it is due to hardware and software incompatibility. You either need to upgrade your hardware or ease down on your system usage.