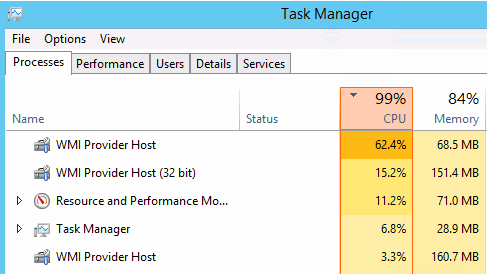
The WMI Provider Host is an inseparable part of the Windows operating system. Applications cannot actually run or function without WMI Provider Service running in the background. Applications make use of it to acquire information about your system. Although it does not consult many resources, it can sometimes substantially increase the CPU usage. As a matter of fact, quite a lot of people have been reporting this issue on Windows 10. Along with WMI Provider Host, Service Host: Local System and Windows Modules Installer Worker also appears in the task manager of our windows.
In this article, you will not just get to know the solution to fix this problem but also information regarding WMI and what it actually does. Along with these things, preventive measures for future will also be mentioned.
Contents
What is WMI Provider Host?
WMI is the abbreviated form for Windows Management Instrumentation. It’s an embedded feature in Windows, through which administrative and software script request information involving the condition of your operating system, as well as some data stored on it. This work is handled by WMI providers. This feature is immensely helpful for centrally managed PCs as controllers can acquire standardized information through scripts. But this does not mean your PC doesn’t make use of WMI Provider Service; many software that requires information about your OS to function efficiently.
WMI can be used by you as well to find out things like health status of your hard drives, the serial number of your computer, etc.
Is it possible to disable WMI Service?
It is possible to do this, but as mentioned in the above paragraph, it’s a very important part of Windows. Some files like WMI are better left alone. Disabling WMI would complicate a lot of processes, so it is strongly advised not to mess with this file.
The Cause of the Issue
WMI doesn’t usually use the CPU much; however, there are times when multiple software or applications request information via WMI. Even in that case, CPU usage would increase but not by enough margin to create an issue. High CPU usage all the time indicates that there’s indeed an issue that needs to be resolved.
WMI Provider Host – Fix High CPU & Disk Usage in Windows 10
- Click on Start Menu
- Type in “Services.msc” and hit Enter
- Search for WMI on the list using its full-form, and then right-click on it, and choose ‘restart.’
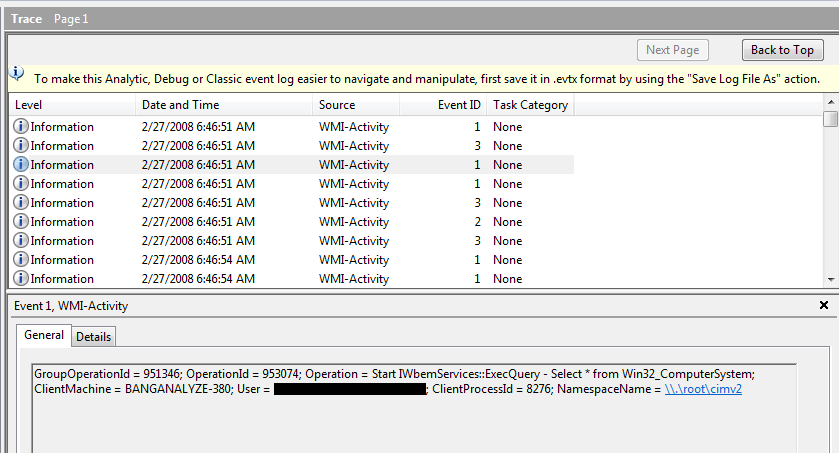
- If CPU Usage continues to remain high, go to Event Viewer by right-clicking the Start button
- On the left side of the window, you’ll find WMI Activity -> Operational
- Look for ‘Error’ events in the list. And by clicking each of them, you’ll find the number of processes which caused this issue, right next to ‘ClientProcessID.’
- Next, go to Task Manager and click on the Details tab
- Click ‘PId’, which stands for Process ID number. Now try to find the error event you located above, using its ProcessID.
- Close that process, i.e., if it’s still running
- Or you can right-click on that process and go to its location to see the software it’s a part of. If you don’t need that software package, by all means, go ahead and uninstall it
If this doesn’t work, which is very unlikely, you’d have to do a proper diagnostic system scan, to pinpoint the exact problem. There are two ways to do this:
- System File Checker (SFC) Scan
- Press Windows button and X keys simultaneously and then click on command prompt to open it
- Type this in the command prompt (admin) and hit enter: sfc /scannow
- DISM Tool
- This step is the same as Step 1 for SFC Scan
- Type these commands on your command prompt:
DISM.exe/Online/Cleanup-image/Scanhealth
And then, DISM.exe/Online/Cleanup-image/Restorehealth
This would help you find the issue. If no issue is detected, you’d have to perform a clean boot.
How to Perform a Clean Boot on Windows 10
- Go to start
- Search msconfig
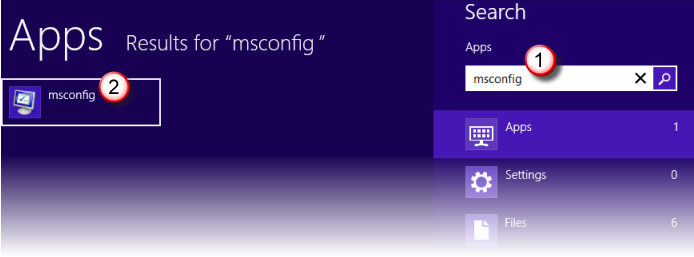
- Click on Select Configuration
- Go to the Services tab, and then click on Disable All option
- Go to the Startup tab right next to the Services tab
- Click on Open Tab Manager
- Select each item from the Startup list and then disable it, if it’s not already disabled
- Close the Task Manager box
- Finally, click OK on the system configuration box, and proceed by restarting your PC
Preventative Measures
There might be various relatively unimportant processes trying to acquire information via WMI at the same time. In that case, you need to prioritise processes on your PC. Maintenance is really crucial to stop these issues from arising in the future. But unfortunately, very few people are aware of this. It’s not as difficult as it sounds; there are pre-embedded tools on your PC which allow you to maintain the health of your PC with ease.
How to Prioritize Tasks & Processes on PC
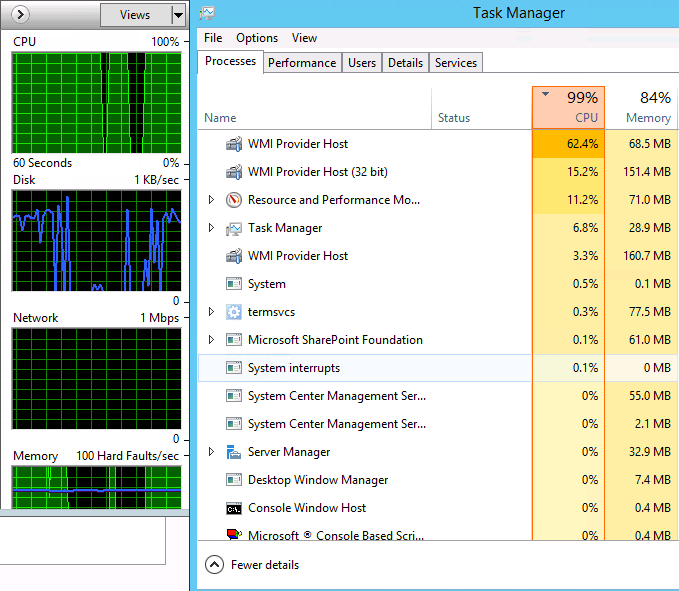
- Press Ctrl+Alt+Del, which is a shortcut to open Task Manager on your Windows, or simply right-click when on the taskbar and select Task manager
- Right-click on the application you want to close and click ‘End Task’. 9 out of 10 times this is enough to end tasks. However, some applications are really stubborn and won’t close even after you’ve ended the task (virtually) multiples times
- So, you need to click on the ‘Processes’ tab right beside the Applications tab. This provides detailed information about each of the application running, even those running in the background
- Right-click the process you suspect of being the culprit and click on ‘End Process.’
- Even better, click the ‘End Process Tree’ below it. It will not just kill the main process but also sub-processes started by it
If your PC has been hanging for more than a couple of seconds, you need to end unimportant tasks immediately. You can also choose to expand your memory if it exceeds 75% at all times. You should keep track of allocation of your resources and employ them the way you like.
Also Checkout, How to fix following errors in Windows 10:
Hope this article has helped fix the issue efficiently and provide insights into proper maintenance for your PC.