Fix 100 Disk Usage on Windows 10: Amongst the latest operating system released by Microsoft, one error has always been prevailing, and that is of high 100% disk usage on Windows 10. More than due to genuine heavy processing and multitasking, 100 disk usage can also be contributed by numbers of other factors including but not limited to hardware limited efficiency and software incompatibility.
- One of the major issues that cause it is driver incompatibility, due to which hardware can end up consuming much more resources then they are entitled to and may create high disk usage on Windows 10.
- Background running tasks are often behind this as some applications not really exit completely and keep on executing minor processes in the background while running silently without your knowledge especially some system processes and may consume all 100% of hard drive or CPU Usage on your Windows.
- The registry is often modified and updated by some external applications and software to function properly. Repairing it is must if you don’t want to experience further trouble which will only increase with time.
- Many other minor issues which can arise due to not properly cleaning and maintaining of your system which can be taken care of once you’ve properly identified them and singled them out.
Solutions & Fixes for 100 Disk Usage on Windows 10
Amongst the various causes & reasons responsible for causing high disk usage, some of the most frequently occurring reasons we have listed below along with the suggested method to repair them so that they may not occur anytime again in near future.
These are just the methods that you can take themselves and not require much technical knowledge or experience in fixing 100% Disk Usage on Windows 10. However, if the problem persists or you’ve been experiencing heavy trouble then we suggest you get technical help and support.
Contents
- 1 Solutions & Fixes for 100 Disk Usage on Windows 10
- 2 Disable High/Medium Impact Startup programs
- 3 Uninstall extra programs
- 4 Defragment Hard Disks
- 5 Update System Drivers
- 6 Antivirus Software
- 7 Disable Flash
- 8 Configure Windows Update settings
- 9 Disable Windows Search
- 10 Reset Virtual Memory
- 11 Disable Diagnostic Tracking in Windows
- 12 Disable BITS & Superfetch
- 13 Disable Runtime Broker
- 14 Run SFC, CHKDSK, and DISM command
- 15 Fix Registry issues
- 16 Resolve PCI-express firmware bug
Configure your system for high performance and see if it shows any lasting changes. You can also try adjusting it for Best performance via performance and appearance setting in Control Panel.
If none of the above basic tweaks and troubleshooting works, then proceed further.
Disable High/Medium Impact Startup programs
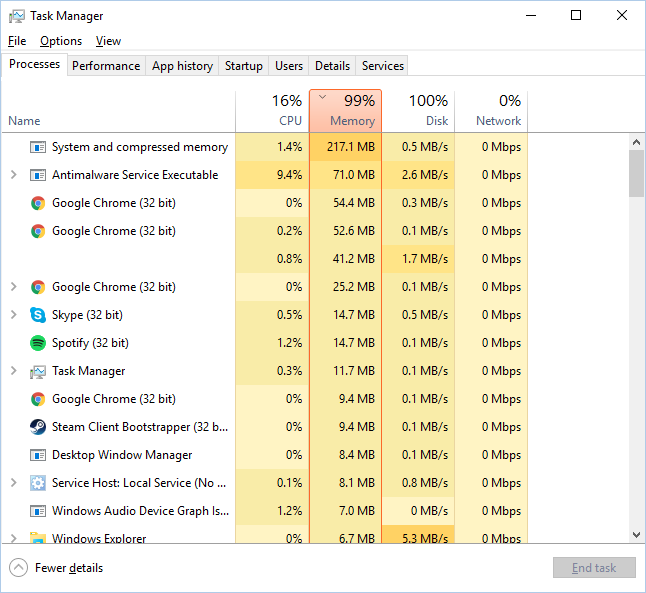
Many third-party programs and even some system processes make it in their settings to start themselves up with the system boot process itself. It is beneficial for programs such as antivirus etc but can often prove very tedious otherwise. Not just boot time, they can slug the otherwise smooth performance of the system as well. You should disable as many startup programs as you can without affecting the working of your system, preferably the ones with which are shown having a high/medium impact on startup.

You can disable them via Task Manager.
- Press Ctrl+Alt+Del to access task manager, you can otherwise right click on system taskbar and select task manager from the menu that comes.
- Among the various tabs in the task manager, access the tab ‘Startup’.
- Perform a quick scan of the list of startup programs listed and disable all the unnecessary ones.
Do a quick reboot, your system performance should improve and issue of 100% usage should be either resolved or occurring less than before.
Uninstall extra programs
Windows by default come pre-loaded with many programs and features, most of them are not required by mass users. Also, many times we install some specific program for one-time or a short use but then forget to remove it. Either of both can end up using otherwise dedicated system resources thus slowing the system and increasing the usage, often ending up in the 100% disk usage much more often than usual.
- You can remove third-party programs as well as system features of preloaded software from the programs and features option in the control panel.
- You can either access it via control panel or open directly by typing ‘appwiz.cpl’ from the run window.
Read Also:
- How to Check Memory/Disk/CPU Usage on Linux?
- WMI Provider Host
- Windows Modules Installer Worker
- Service Host Local System
Defragment Hard Disks
Fragmentation can result in more than required consumption of hard disk as well as system resources. Defragmenting at a regular interval ensures that the full efficiency of system resources, especially of the drive having windows installation as well as your most regularly accessed data.
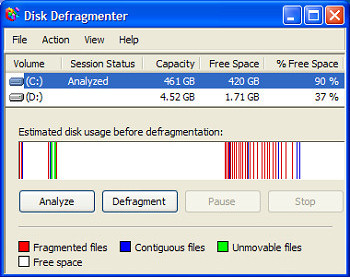
- Open Run Window using ‘Win+R’ and type ‘dfrgui’ and hit enter.
- A new window will open with a list of hard-drives contained within your system.
- Analyze them one by one and then select the defragment/optimize option to perform a maintenance check.
Update System Drivers
Having connected hardware with no installed drivers can cause an issue sometimes as well as wrong or outdated drivers too. To make sure you are not getting the 100% usage due to any of these, make sure to update your drivers from time to time via the right sources as well as to scan the system for any hardware changes too.
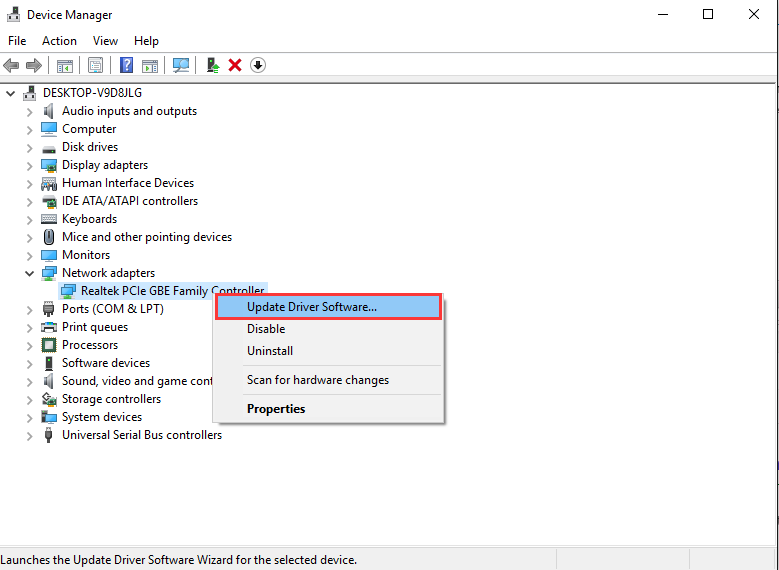
- Open Device Manager from the search console in Windows and then scan for any hardware changes, it should show any new hardware that was installed recently and show the option to install it, driver, either manually or automatically.
- On the other hand, checking for system updates at a regular interval via Windows Update can make sure that most of your system drivers are updated.
- For the other drivers that are not covered in Windows update, you can update them from their respective manufacturer’s websites.
- Open Device Manager for the same purpose, and then right-click on each of the hardware listed and select the update option.
- Otherwise, you can visit the manufacturer website and update manually too if you know the device id and other required details which you can get by opening the properties window in the right-click menu of the hardware in the device manager.
Antivirus Software
Malware infections, as well as spy programs, can cause a high amount of consumption of disk as well as memory resources. These kinds of programs run in the background without being detected and require a large number of resources. Perform a thorough scan with a reputed antivirus of your choice to make sure that your system is clean and free of any infections.
You should also try disabling your third-party antivirus/antimalware software for some time as these software often take up heavy system resources and at times due to conflict with windows security provisions can cause a chunk of load on the system as well as memory.
Disable Flash
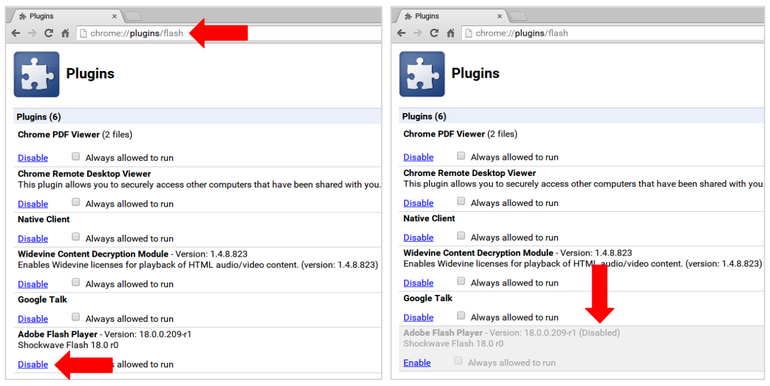
Flash is often the culprit for many things and for the same reasons, it is being encouragingly discontinued. It is also a very susceptible target for hack attacks. For the specific error of 100% disk usage, it is one of the most found reasons behind this especially if you are using Google Chrome browser.
For older versions prior to version 57 of google chrome, follow these steps.
- Enter chrome://plugins in the address bar of your chrome browser.
- A list of installed plugins will be displayed, from the list scroll to the flash plugin option, it will be there if installed, skip this step otherwise, disable the flash plugin after locating it in the list.
For versions including version 57 and later, steps may differ for as such.
- Goto Menu>Settings>Show Advanced Settings and scroll to the Privacy section.
- Open Content Settings from here.
- Out of the options that are shown select either ‘Block sites from running flash’ or ‘Ask first before allowing sites to run flash’, depending on your need.
Check the system for any changes, and restart your chrome browser and system for further ensuring.
Configure Windows Update settings
Depending on your windows update settings, you can encounter this error due to it as well. Often at times due to background update check and installing, windows update can bound to eat up otherwise allocated system resources.
It can also cause high disk usage due to some file which is stuck for downloading. You can resolve this issue by either disabling windows update completely or selecting the option ‘Check for updates but let me choose whether to install them or not’.
Disable Windows Search
Not particularly due to windows search, rather owing to a bug in windows related to it which results in some sort of ‘search loop’ increasing the load on disk as well as system resources. You can either temporarily or permanently disable the windows search, but we recommend disabling it temporarily first and permanently only if really necessary.
Temporarily disable this via these steps.
- Open the command prompt with administrator privileges by searching it amongst the installed programs.
- Enter this exact command – net.exe stop “Windows Search”.
- This will temporarily disable the search option, check to see if it has any effect on performance and move to permanently disable it if so, otherwise skip to further steps.
To permanently disable windows search, in case of windows search bug is the culprit behind your error, you can do the following.
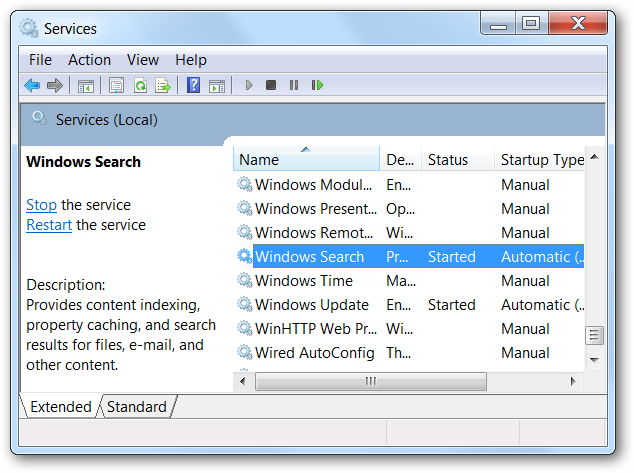
- Open run window by using ‘Win+R’, and then type services.msc and hit enter.
- Now in the window the comes, find windows search option from the list of services that are listed.
- Click twice on it to open its properties window. From here, under General tab, there is an option named Startup type, select the disabled option from the drop-down menu.
- Further, you can stop the service from below if its current status is running.
This will prevent windows search from automatically executing every time your system boots, and you can start it manually later when needed.
You can also control the indexing of the folders during windows search from the options within it.
Read Also:
Reset Virtual Memory
Virtual memory is essentially your ram, hard disk space is used to supplement it when ram proves to be less than needful. From the disk space, required data is then transferred to the ram as per the needs.
- Open system properties by right clicking on ‘My computer’ icon. From the window that opens, select the Advanced System Settings option from the left panel.
- In the window that opens, go to advanced tab then from the performance section located select the settings from within it.
- Now in the performance options windows that open, go to advanced tab again and in that located below in the virtual memory section, there is an option named ‘change’, select it.
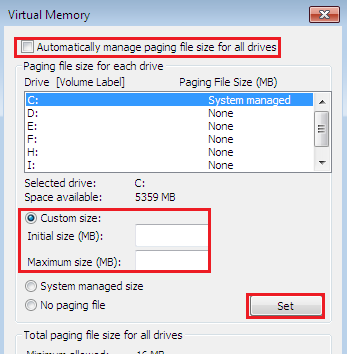
- There is an option located at the top named ‘Automatically manage paging file size for all drives’, uncheck it if it’s checked and then proceed further.
- Now select the system drive from the list of drives which are shown.
- For the custom size option shown below, go with the recommended value shown in the ‘Initial size’ section and 1.5 times the value of your ram for ‘Maximum size’ section.
- Next step, after you have applied these changes is to clear all the temporary files that may have been previously stored.
- Do this by opening the directory where temporary data is stored by system namely ‘temp’ from the run window. Select all the files from it and delete them.
Disable Diagnostic Tracking in Windows
A new feature added in Windows 10 named diagnostic tracking has turned out to be the main factor behind 100% disk usage in many systems. Most users have disabled it for reasons concerning their privacy. Those who haven’t can try disabling it further to ensure that it is not the reason behind the error that they are getting.
- Open the command prompt as admin by running it from the start menu.
- Enter these commands exactly as given below.
sc config “DiagTrack” start= disabled
sc stop “DiagTrack”
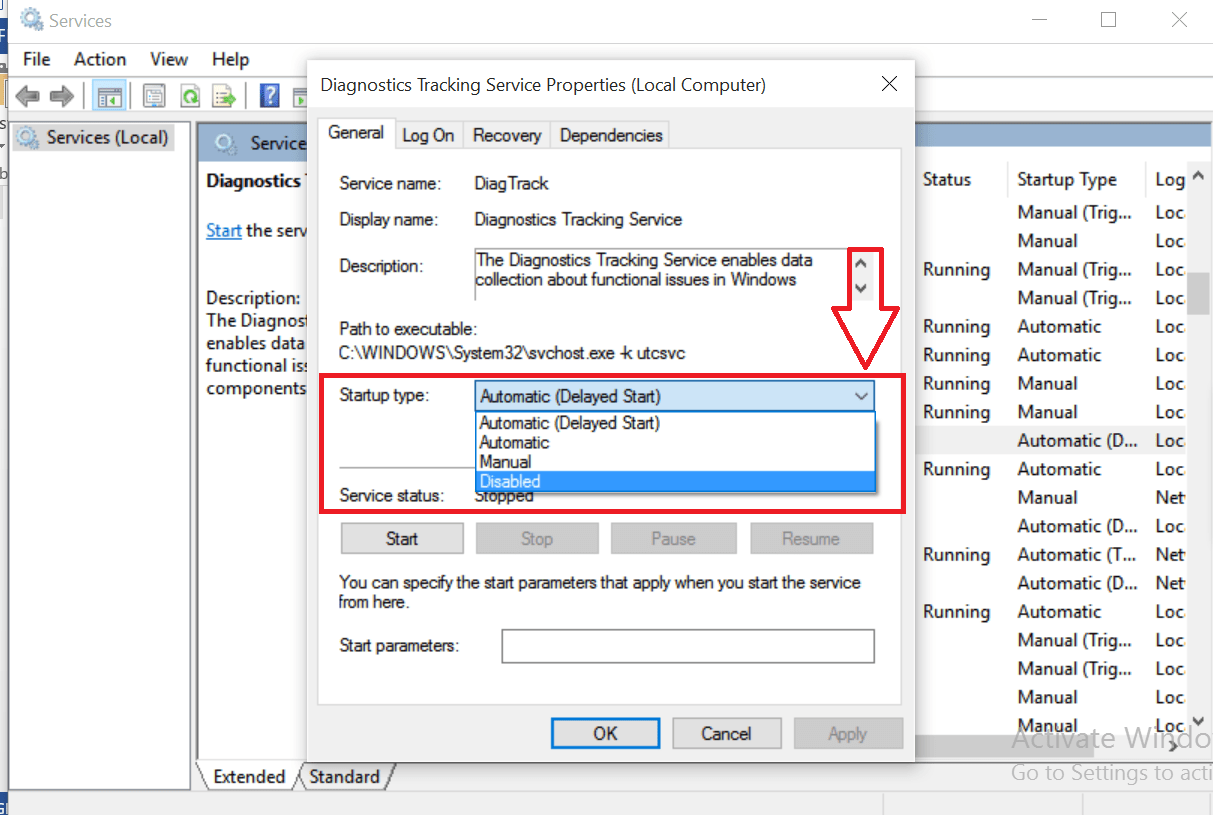
You can also stop it from the services.msc as shown above.
Additionally, you can also disable the ‘Get tips, tricks and suggestions as you use Windows’ from Settings > System > Notification & actions in control panel.
Disable BITS & Superfetch
Superfetch is a service embedded in windows which makes sure that the ram contains all the most frequently visited data which whenever needed can be directly and quickly accessed via it. Disabling it results in a considerable decrease in Disk usage. True with some other services namely BITS as well.
You can either stop the service via command prompt windows( run as an admin), by the following command.
net.exe stop superfetch
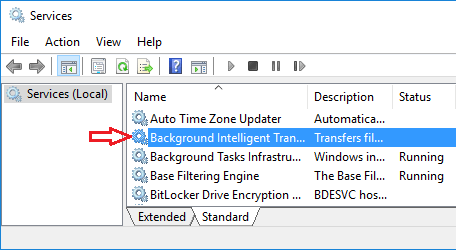
Or you can do that via opening services.msc through Run window.
In the services window that opens, scroll down to the name of the service that you want to disable and then double click on it to open its properties and then disable it from startup type and further stop it if it’s running in the present.
Disable Runtime Broker
Runtime Broker is a system process which manager permissions between windows apps and controls and limits their behavior. Usually, this service has very low cpu load but for some reasons owing to some faulty driver or third-party program, this can consume 100% disk usage.
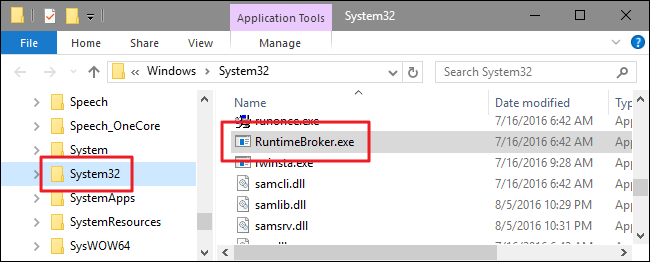
Disabling it requires making modifications to registry entries so we recommend making a registry backup from proceeding further.
- Open registry editor by typing regedit in the windows run the console.
- Locate the following entry.
HKEY_LOCAL_MACHINE\SYSTEM\CurrentControlSet\Services\TimeBroker
Now in the right side preview pane, double tap on start and change the date value from 3 to 4. Reboot the system to confirm the changes.
Run SFC, CHKDSK, and DISM command
If your windows installation has been corrupted or some system files are missing then you can check and repair it using sfc command and dism command.
System file checker is a utility which scans the system for missing or corrupted files and then restores them from a cache folder in the windows which stores necessary system files.
- Open command prompt window and run as an admin.
- Type sfc/scannow and hit enter.
- Now, this utility will scan and automatically replace the system files when found missing or corrupted.
- In case sfc is not able to perform system maintenance, in that case, enter the following command to start the dism utility which repairs the system image and further helps the sfc in doing its job.
DISM /Online /Cleanup-Image /RestoreHealth
You can also try running check disk utility which runs at windows startup to fix the hard disk errors.
You can try running it with extra parameters to perform a full system check.
Find the complete parameters and its running syntax here.
Read Also:
Fix Registry issues
For the 100% disk or ram usage, this is the most effective solution to date. For this you need to tweak registry database, so make sure to take a registry data backup before proceeding further.
- Open registry editor by typing regedit in the run console.
- Goto this location.
HKEY_LOCAL_MACHINE\SYSTEM\CurrentControlSet\Control\Session Manager\Memory Management
Open Memory Management key, and in the middle pane find the dword key named ‘ClearPageFileAtShutDown’ and change its value to 1 by double-clicking it and making changes in the window that opens.
Restart your system to make sure that these changes take place.
Resolve PCI-express firmware bug
With the windows 10 update, there have been lots of bug with it recently, one of them being a problem with the proper functioning of storahcl.sys driver which is been known for causing 100% disk usage error.
Go to IDE ATA/ATAPI controllers in the device manager. If the above-said driver is listed then double-click it to open it. Select the driver tab and then goto details.
If the driver location is listed as C:\Windows\system32\DRIVERS\storahci.sys, then you might be affected by this bug. Close the window and then open the details tab, select the device instance path from the drop-down menu. Right-click where the value is listed and then select copy.
Open notepad and paste the contents into it. Now open registry editor by typing regedit in windows run the console.
Find the following location in that.
HKEY_LOCAL_MACHINE\System\CurrentControlSet\Enum\PCI\
Use the pasted string above to open correct AHCL controller, and follow it up with any random number.
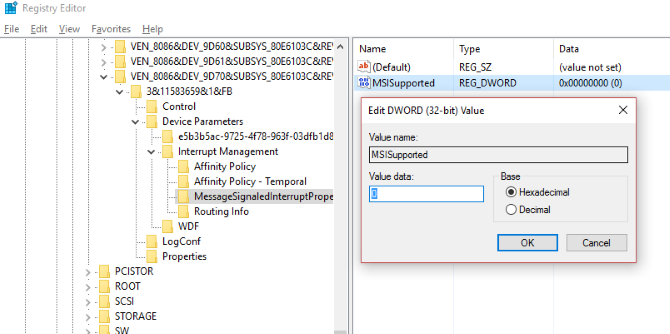
Further, expand
Device Parameters\Interrupt Management\MessageSignaledInterruptProperties
There you will find MSIsupported listed in the right side pane. Double tap to open it and then change the value to 0. Restart the windows afterward following the instructions.
We hope that one of the methods must have fixed high or 100% Disk Usage on your Windows 10. If none of the above works, then you can try running windows in ‘High Performance‘ mode. You can also try disabling Google Chrome prediction services as well as tweaking changes in Skype settings.
For further troubleshooting and tweaks related to windows and other stuff, you can check out our other posts as well where we have covered a detailed knowledge base of everything ranging from basic to advanced and expert stuff.