Chrome is one of the most popular browsers throughout the world. Many of us use this application regularly. That’s why we want to use it without any interruption. But Sometimes when we want to search something or browse a website or other things, it can appear before us with “err_network_changed” interface. Then we don’t know why it shows error and what can we do to solve this problem? We feel disgusted for such kind of error in our favorite browser.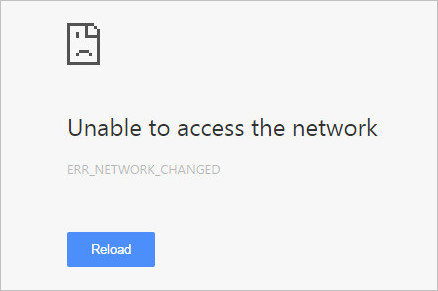
So, here we are going to give you some effective solution to fix “err_network_changed” error in chrome. Before giving solutions, we want to clarify the causes of the error issue before you. It can occur if your connection settings on your system are set incorrectly or if Malware or a Virus has hacked the settings or if broadband internet connection creates something wrong. Whatever it is you can fix it easily following our given solutions. If one option doesn’t work, you can try the other.
Contents
Fix ERR_NETWORK_CHANGED error in Chrome
There are huge numbers of fixes for this kind of problem. Here we will try to give you easy and highly effective solutions to resolve ERR_Network_Changed error while browsing through different websites on your browser. Before implementing the solution steps, you have to make sure that your device is properly connected to the internet. You will not get your expected result if you don’t follow our instructions word by word. So, be careful using any solution’s steps and execute it properly.
Reset your IP/TCP
Resetting IP/TCP is one of the most useful way to be able getting interrupt free browsing Google Chrome. Here are the steps of resetting IP/TCP:
- Open the Start menu by pressing windows button with keyboard or clicking on Start menu.
- Go to the search box, type cmd in the box.
- A desktop app Command Prompt will be found in the search result, Right-click on Command Prompt and select Run as administrator.
- A dialog box will be opened asking permission, Click yes button.
- Type “netsh” and press Enter and then type “interface ip show config” in the following line and press Enter
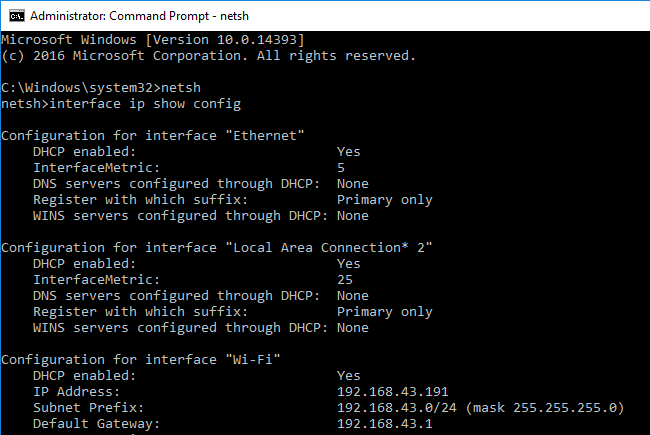
- Network interface of your device will be opened and there DNS address and network interface name will be found.
- Type interface ip set dns “your network interface name” static “DNS address” and press Enter
- After that you will see netsh appearing on the screen and then you have type winsock reset next to netsh.
- Press Enter and restart your computer. Then you can browse uninterruptedly with your chrome.
Or, alternatively to Reset your IP/TCP what you could do is, Open Run Command (Windows + R) and type “netsh int ip reset resetlog.txt” and press Enter.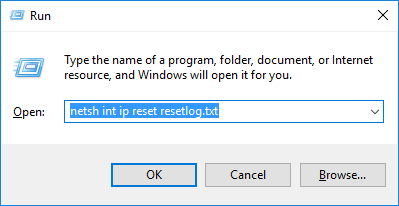
A Black Screen will just appear for a second or two to give you the indication of your successful command file execution. Restart your PC to observe the changes took place on your network. This solution also fixes DNS Address Could not be Found error in chrome.
Reinstall your network adapter software
Reinstalling network adapter software is another fruitful way to resolve Labyrinth. Here are the steps of reinstalling adapter software after uninstalling the old one:
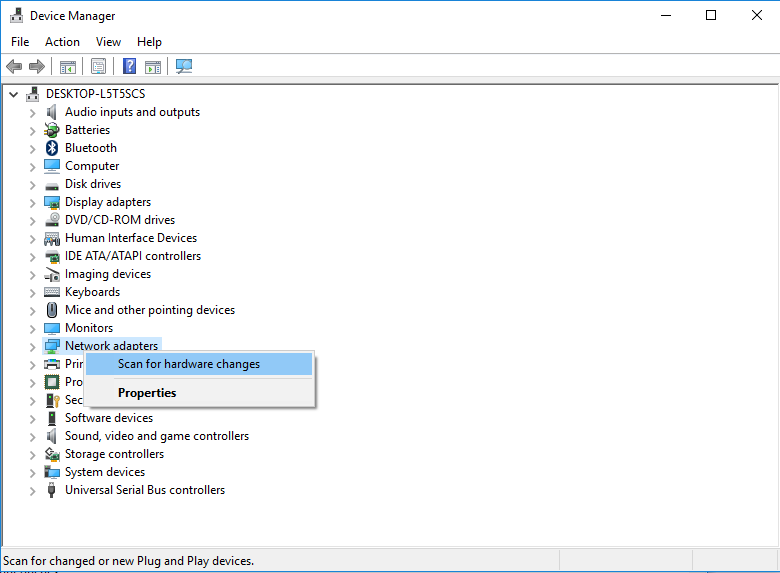
- Press windows+X key from your keyboard. Several options will appear on the screen.
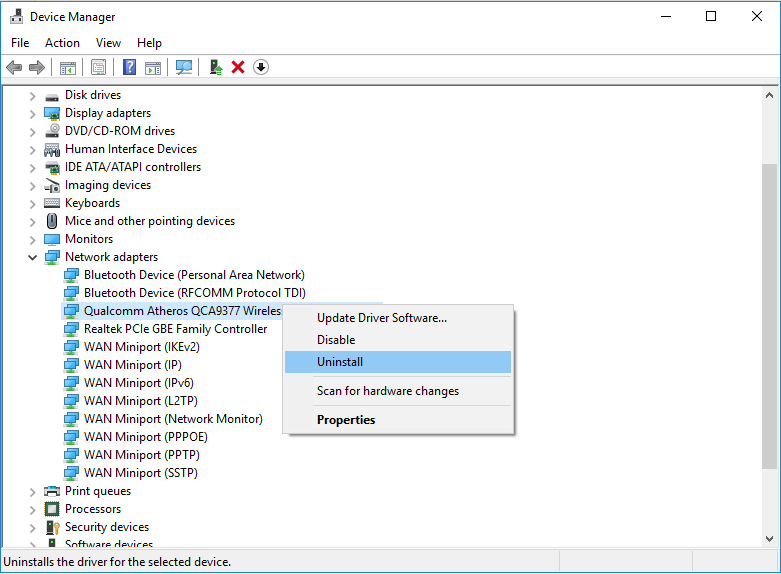
- Select Device Manager
- A dialog box will be opened and from there you have to expand the Network Adapters and then right-click on your network adapter software (through which you are using your internet) and then click Uninstall device.
- Now restart your computer and Again visit Device Manager, Right Click on your Network Adapter and Click on Scan for hardware changes to reinstall the Drivers automatically to your PC.
Alternatively, you can Download and install Driver Easy. Run the installed application and click on Scan Now. If there exists any problem, Driver Easy will detect that. Then in the next dialog box you should have clicked on Update Correct version of the driver will be installed automatically and then you won’t see your browser error.
Restart your modem or router
Restarting modem or router can be another workable way to fix ERR_NETWORK_CHANGED. Simply press the power button of your modem or router if you want to restart it. After restarting modem or router, you should restart your own device and check whether it works or not.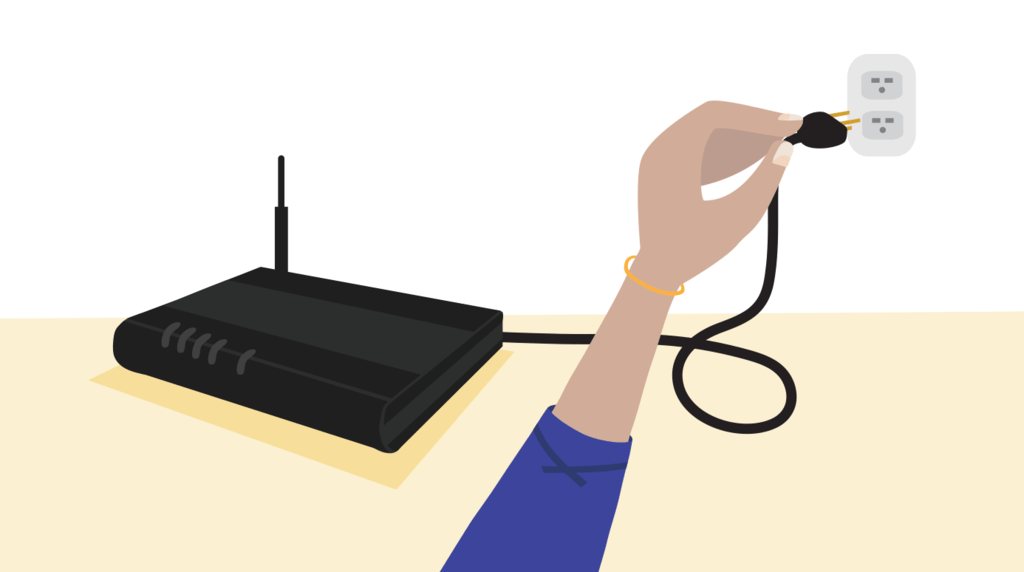
Clear browsing data in Chrome
Sometimes browsing data can create complication in the browser loading page. So, to fix error we can clear all types of browsing data. Here are the steps of clearing browsing data in Google Chrome:
- Open Google Chrome by double clicking on it.
- Press Ctrl+H to open browser history.
- From the left side, click Clear browsing data.
- From Obliterate the following items from option, select the beginning of time
- Checkmark the following options:
- Browsing history
- Download history
- Cookies and other site and plugin data
- Cached images and files
- Passwords
- Autofill from data
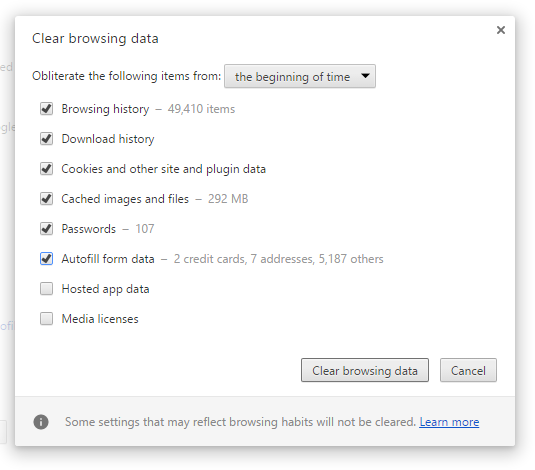
- Click on clear browsing data and after finishing action restart your computer.
- In this way your problem can see that your problem is solved.
Use Google DNS
We know that Google Chrome was developed by Google company. So, the browser suits efficiently Google DNS. We can try here using google DNS to get access in it. Here are the steps of using Google DNS:
- Press windows+X key from your keyboard and go to Control Panel.
- Select Network and sharing center and then click on Change adapter settings.
- Select your wi-Fi and then right-click on it.
- Go to properties
- Here select internet Protocol Version 4(TCP/IPv4) and then go to properties.
- Checkmark “Use the following DNS server addresses” and type:
- Preferred DNS server: 8.8.8.8
- Alternate DNS server: 8.8.4.4
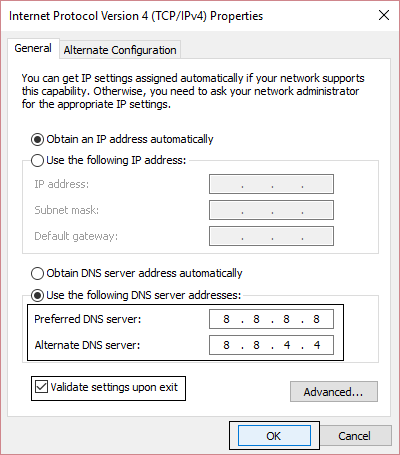
- Press OK and restart your PC. Then you may see there is no error in your browser.
Uncheck Proxy
Use a proxy server for your LAN can be liable for the error. We can browse without any LAN proxy server to resolve browsing restriction in chrome. Here are the steps of erasing checkmark from LAN proxy server:
- Press Windows+R.
- A “Run” dialog box will be opened and there you have to type cpl.
- Then click
- An internet properties dialog box will be opened and then you have to select Connections
- Here Go to LAN settings
- Erase the checkmark of “Use a proxy server for your LAN (These settings will not apply to dial-up or VPN connections)” which exist in Proxy server part.
- Then simply click OK and restart your laptop/PC.
- Now you may see there is no access problem in chrome browser.
Flush the DNS settings
Here we will describe the process of flushing DNS settings which can be a fixing way of ERR_NETWORK_CHANGED error in chrome. The steps of the method are mentioned below:
- Press windows+X key from your keyboard and select Command Prompt (Admin) from different options
- Administrator: Command Prompt window will be opened.
- Here you have to type ipconfig /flushdns and then press Enter
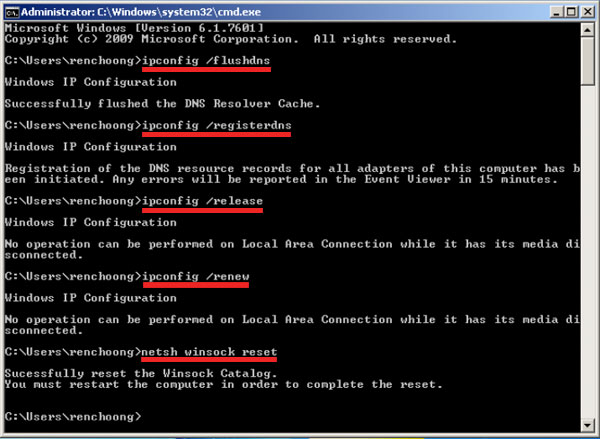
- After that DNS will be flushed
- Close the window and restart the computer
- Now you may see your problem get resolved.
Read Also, How to fix following Chrome Errors:
I assure you that you must get relief from your browser error pain through following one of our solution method. If one method doesn’t work, you should not be disappointed because you must get your desired solution by following any of the methods. Whatever, we recommend you to use updated version of your browser all the time. You should use strong anti-virus software in your computer to keep it secured and clean from different kinds of threats. Let’s follow our described solution methods and get interrupt free internet browsing in your Chrome browser.