Most of our readers have complained several times about slow Windows 10 performance. Even you might be facing hang issues on Windows 10 PC or laptop. You must have checked out the Task Manager to catch the real culprit behind the scenes, and the “Service Host: Sysmain” process might be using a 100% disk. The Sysmain is the system process to run important tasks and intended to improve your system performance but sometimes it occupies all the resources and even your computer won’t be able to perform the current task with ease.
The “Service Host: Sysmain” runs every time on startup but generally, it won’t come to your notice then how it suddenly started causing high disk usage on Windows 10. Unknowingly you might have made several changes to your system like installing the latest updates or playing heavy games or apps on your PC. The Sysmain process might consume high disk usage and CPU for several minutes and then it won’t make much difference. Waiting for your PC resources to get free for your work might feel stupid and rather you want to make difference by fixing this Sysmain Service.
Contents
What is Service Host: SysMain?
The Service Host Sysmain was launched as a Superfetch feature in Windows Vista. The Sysmain process preloads your most-used apps before you launch them and you will be good to go with preloaded apps. Most of your RAM remains idle on your startup and hence Windows 10 will start loading your favorite apps in the background. The Sysmain Service also runs the important Windows Defender Antimalware Service Executable, Windows Updates, Delivery Optimization, and Diagnostic Policy Services.
The SysMain Service Host (svchost.exe) keeps the track of your app usage by noting how often you launch the app and how much time you spend on the app. It perfectly adjusts with the idle condition of your computer and goes to null when you are on your work.
The Windows 10 system already requires good resources to operate properly. The SysMain will create problems if doesn’t stop or goes down when you launch the big apps on Windows 10.
Should you disable the SysMain Service?
The SysMain Service impacts in both ways either by improving your PC performance or will hang your Windows 10. It will work differently for users with different computer specifications so we will apply the try and test method. Firstly as you see the tremendous disk usage by SysMain service hence you must disable it and experience your PC performance. Simply disabling the SysMain and leaving it as it is without checking the other side will be a stupid decision. You must enable it for some time before making the decision.
Disable Service Host: SysMain (100%) High Disk Usage
Disabling Service Host: Sysmain process isn’t just disabling but we have included the solutions to fix the High Disk usage problem on Windows 10. You might have recently started using the resourceful app on your PC and SysMain Service might be loading it in the background. You can’t change the SysMain settings for individual apps, it’s on its own. Either you can allow the service to run and wait for a few minutes after every startup to let it run fully in the background or take its control in your hand. So let’s disable and fix the SysMain Service on Windows 10.
Edit Registry Editor Value
Registry Editor is the database for Windows operations. Windows refer to the Registry Editor to retrieve several data like hardware devices available for the system, logged in user information, apps installed on the computer, document settings, apps settings and folder, and the internet ports. Windows 10 will also refer to the Registry Editor to make a call to the Service Host: Sysmain process. You can deny SysMain Service from running simply by editing it from the Registry Editor. Let’s see the steps to disable SysMain from Registry Editor.
- Tap on the Windows Start key.
- Type and launch the Registry Editor, allow the Admin User Account Control permissions.
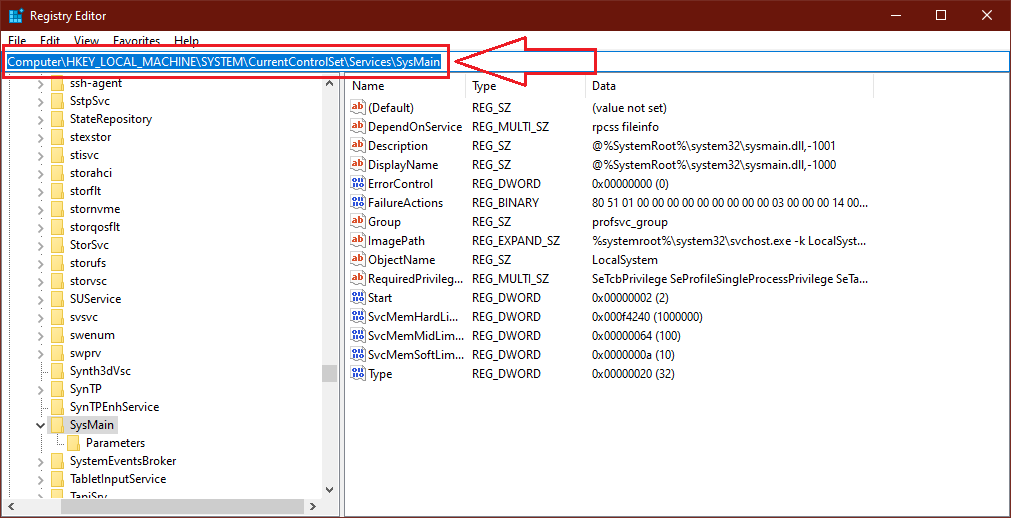
- Take your mouse cursor in the Address Bar below the File Menu.
- Copy and Paste the “Computer\HKEY_LOCAL_MACHINE\SYSTEM\CurrentControlSet\Services\SysMain” address without quotes.
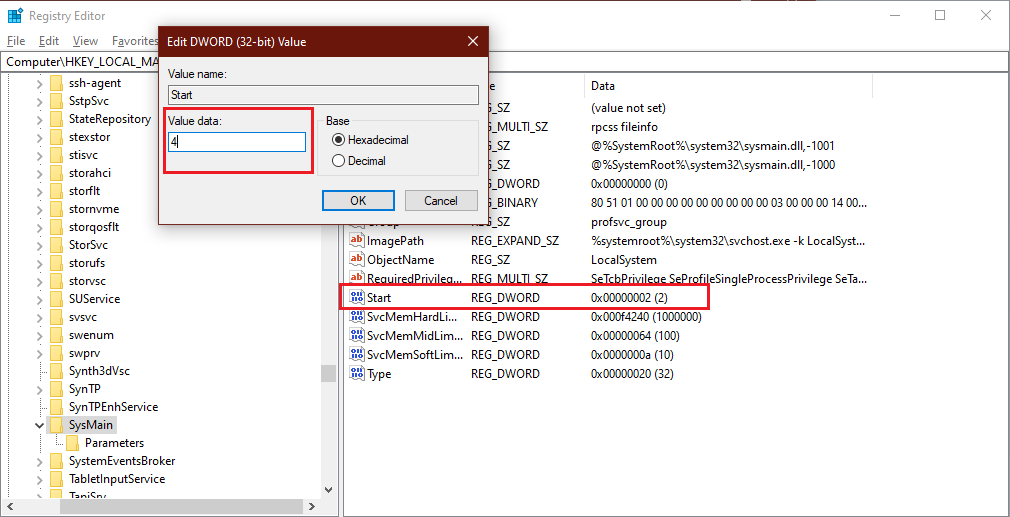
- Double-tap on the Start file and change the data value to 4 with a Hexadecimal base.
- Apply the changes effectively by Restarting Windows 10.
Now Service Host: SysMain process won’t appear in the task manager and indeed won’t show the high or 100 disk usage on Windows 10.
Execute from the Windows PowerShell
Just like the Command Prompt, Windows PowerShell also has access to all the utilities from the processes to the individual services. The NET commands can start or stop the services but it won’t be useful in stopping the SysMain service. We will use the SC (Service Controller) command, as it can Start, Stop, Restart, and Configure the services. The SC command’s format is “sc *operation [service_name]”. Where [service_name] is the actual name of the service, it will be SysMain in today’s situation. You can perform any of the four operations, we will Stop and Configure the service. Now let’s see the actual steps to execute it from the PowerShell.
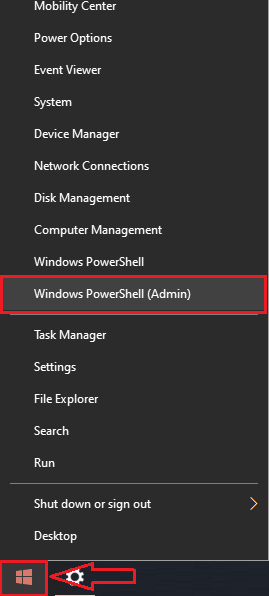
- Take your mouse cursor on the Windows Start Logo and tap on the right click.
- Click on the Windows Powershell (Admin) option in the list and allow the permissions.
- Enter the two commands one by one:
- sc stop SysMain
- sc config SysMain start=disabled
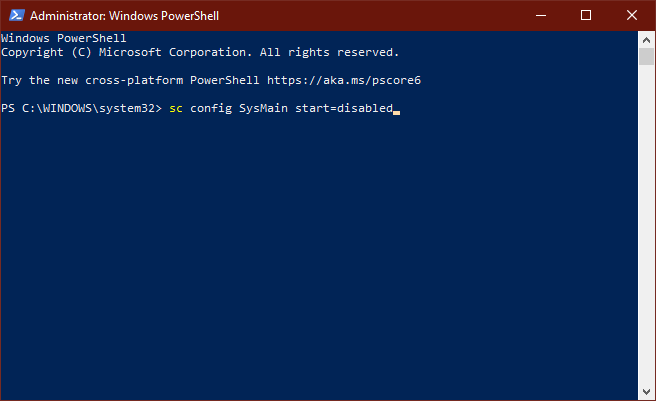
- That’s it, you will see the success message on your Powershell screen.
Do shut down your computer to experience the changes from the new boot. Hopefully, your computer resources are now available for your need and you won’t face any lag or hang issues.
Uninstall Recent Windows 10 Updates
The latest Windows 10 updates come with a few new features and plenty of bugs. These days updates are meant to create lots of ups and downs hence you must try reverting. If you have just finished installing the latest Windows 10 updates and Service Host: SysMain is showing in your task manager then do give it a couple of restarts before finalizing your decision. Sometimes new updates set up in a week so it’s always worth giving a chance before uninstalling them. Anyway, if the recent updates are making no good and rather creating more problems then just uninstall them.
- Launch Windows 10 Settings and navigate to the Update & Security option.
- Tap on the View update history to see installed updates on your device.
- Click on the very first Uninstall updates option.
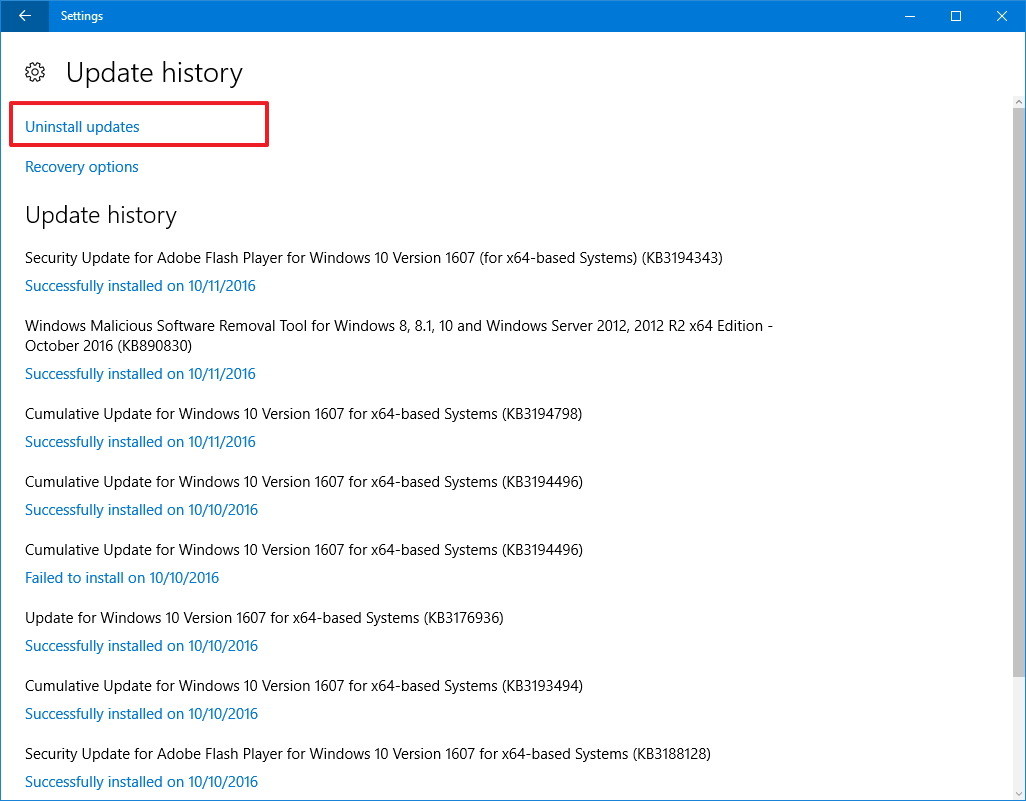
Do note that it will uninstall only minor updates till your current version. You can’t uninstall the shipped updates with your current version.
Update to the latest Windows 10 Version
You can avoid the smaller updates to your current version but it’s not at all recommended to ignore the latest version of Windows 10. The latest version is shipped with the best features and fixes to the most problem causing bugs. The Service Host: SysMain feature might be creating a High Disk problem with your current version and Microsoft might have fixed it in the next version. Minor updates also fix the bugs hence do try updating all the updates, later you can uninstall them. Let’s check and update to the latest Windows 10 version.
Press the Windows button and tap on the Gear icon in the left side icon menu. Open System Settings and scroll down to the last About option. Check your Windows 10 Version in the Windows specifications.
Now visit the latest Windows 10 release information page and make sure you have installed the latest update version as listed in the version row of the Semi-Annual Channel table.
If the Windows 10 version doesn’t match then you can check for updates in the Updates & Security settings. If it isn’t also updating your system to the latest one then install it using Windows 10 Media Creation tool.

System Restore to the Previous Point
Windows 10 automatically creates a restore point for future proof demands. You must create a restore point to exit the immobile conditions. System Restore will take your computer to the past points when SysMain services weren’t disturbing your workflow. All the new app and system updates will be wasted. You will even lose your files in the system drive so make sure to backup your important files. You can even undo the restore to the latest point hence it is a must-try solution.
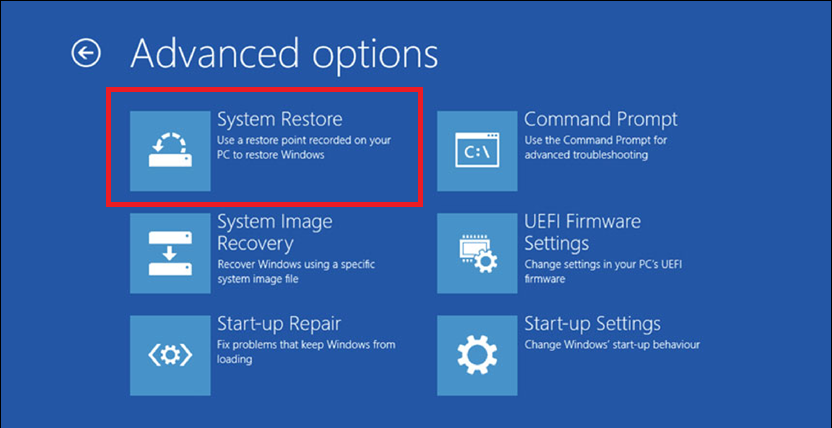
Restart Windows 10 to the Recovery by going into Settings, then to Update & Security, tap on the Recovery option and press the Restart now button in the Advanced Startup option. Then navigate to Troubleshoot, Advanced Options, and System Restore option. Select the restore point to begin the restoration.
Do know us in the comment section below that which solution fixed the High Disk usage due to Service Host: SysMain process on your Windows 10 PC.