The Service Host: Network Service is a set of Windows 10 system processes. It runs from the startup itself on all the Windows devices. Each process runs from the DLL files which are easy to code, execute, and update in the future. Microsoft develops the Network Services files, so you don’t have to worry about its development. Just the proper uninterrupted execution without high CPU, Memory, and Network usage will also work.
Many users are complaining about the high Network and CPU usage problems due to the Service Host Network Service processes in the task manager. Sometimes these services acquire the 100% CPU without leaving it available for the other important tasks. It is also responsible for the crashes and freezes of the Windows 10 system. High Network Usage is also expected by its processes in updating and installing the new data services.
The 100% and high CPU, Disk, Memory, and Network usage problems are quite common for Windows 10 users. There are a few test methods of troubleshooting the system host services. You can restart your device, install or rollback the latest updates, or disable Service Host Superfetch on Windows 10. These might work on an instance and give your system a quick relief but also comeback in the future. These are the important services so you can’t boycott them from running rather apply our solutions to settle it in the middle.
Contents
Track your Data Usage
Microsoft has included the data usage option on Windows 10 devices. It shows the last 30 days of data usage by the connected network. Your device must be connected with a network to see its data usage on Windows 10. It also lists the apps with their data usage along with the system. You can keep your eyes on the high network usage by the system processes like Service Host: Network Service and Local System processes. You will easily able to spot more data consuming apps and later troubleshoot the apps. Let’s see the steps to check data usage by different apps.
- Press the Start button and tap on the Windows Settings symbol.
- Select the Network & Internet settings with the Globe icon.
- Now in the very first Status option, it will show the connected network.
- Tap on the Data Usage option of the network after the Properties.

- The data usage window will list the apps with the most network usage.
- If the Windows Update services such as Service Host are using most of your internet bandwidth then it will show by the System.
Now apply the below measures to control the data usage beyond a few GB of data by your System.
Metered Connection
Metered connections are for stopping the data usage by the System processes. If you find the tens of GB bandwidth usage by your System apps then you must declare your network as a metered connection. It stops downloading the Windows, Security Updates, and peer to peer delivery optimization updates. You can manually download your System and Security updates so you won’t get into trouble with bugs or viruses in the future. This option is separate for each network, hence you have to enable it again for the new Network. Now let’s turn on the metered connection option for the network.
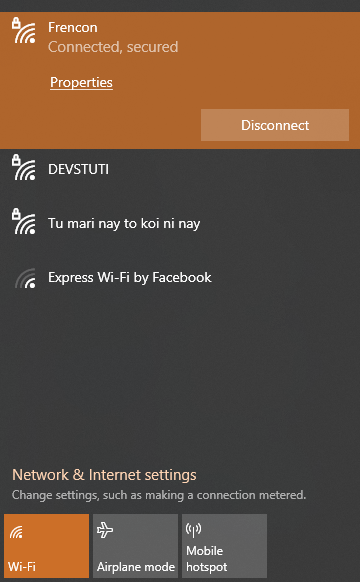
- Tap on the WiFi or network icon on the taskbar’s left side after the date and sound icons.
- Select the connected network and open its Properties.
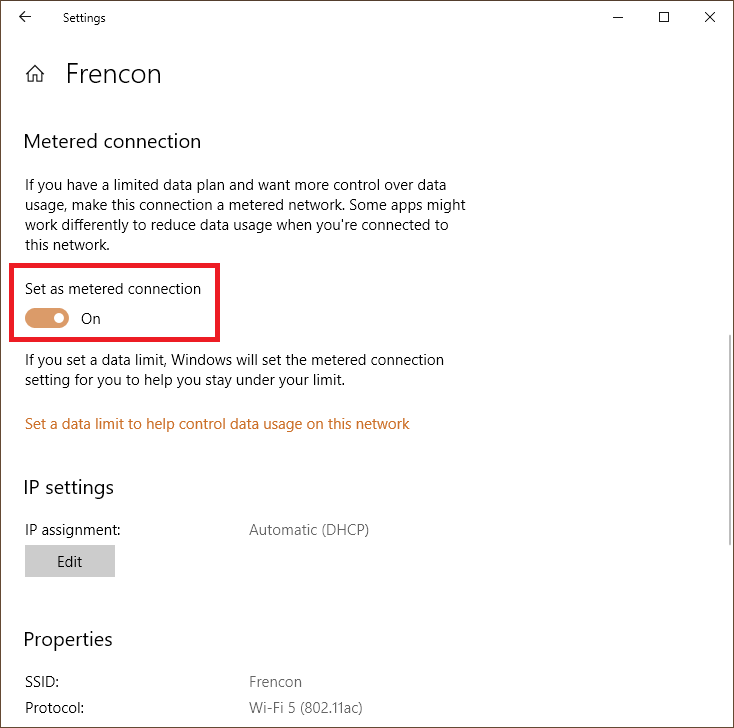
- Scroll down to the Metered connection section.
- Turn on the Set as metered connection toggle.
These steps will stop the high network usage by the Service Host Network Service’s Delivery Optimization process on Windows 10. Do restart your computer if it is still eating your network bandwidth.
Read Also, Fix: Service Host Sysmain 100 Disk
Turn off Delivery Optimization
The Delivery Optimization feature downloads the Windows Updates and Microsoft Store Apps updates from other computers over Local Network or the Internet. Along with downloading it also share your computer updates to other computers on the internet. It is not even safe nor a fast method for Windows 10. It might work just like the torent network of file sharing without any ultimate source. It can cause serious problems for users with the data limits, as it can keep uploading unlimited files in the background to other computers. You must keep checking the data usage by System apps and also set your network as the metered connection to do not exceed the data limits. Also, tweak the Delivery Optimization feature to control the high network and CPU usage on Windows 10.
- Press the Windows + S keys to open Windows Search.
- Search for the Windows Update Settings.
- Navigate to the second Delivery Optimization option on the left side menu.

- Turn off the Allow downloads from other PCs option.
It will stop downloading and uploading the Microsoft Updates from and to the other computers. You can also set the data limit on downloading updates in the foreground and background by tapping on the Advanced options link. Also, check the total data usage by Microsoft Updates from all the sources in the Activity Monitor option.
Install all the latest Windows Updates
The latest Windows Updates fixes lots of bugs with the last version and also bring new features to your fingertips. It will also stop the continuous network usage by the Service Host processes for the updates. The CPU usage is also caused by some of the resource-consuming processes, the latest version might replace those processes with the new one. Ultimately there is a hundred percent chance of improving your computer performance along with fixing bugs and errors on the Windows.
Check the latest released updates of Windows 10 from the Microsoft Official site as you also have to install the same updates on your device. You can update from the Settings or from the Microsoft Update tool, both are the safe known methods to most of the users. We will cover both methods so no stone remains unturned.
Update from the Settings
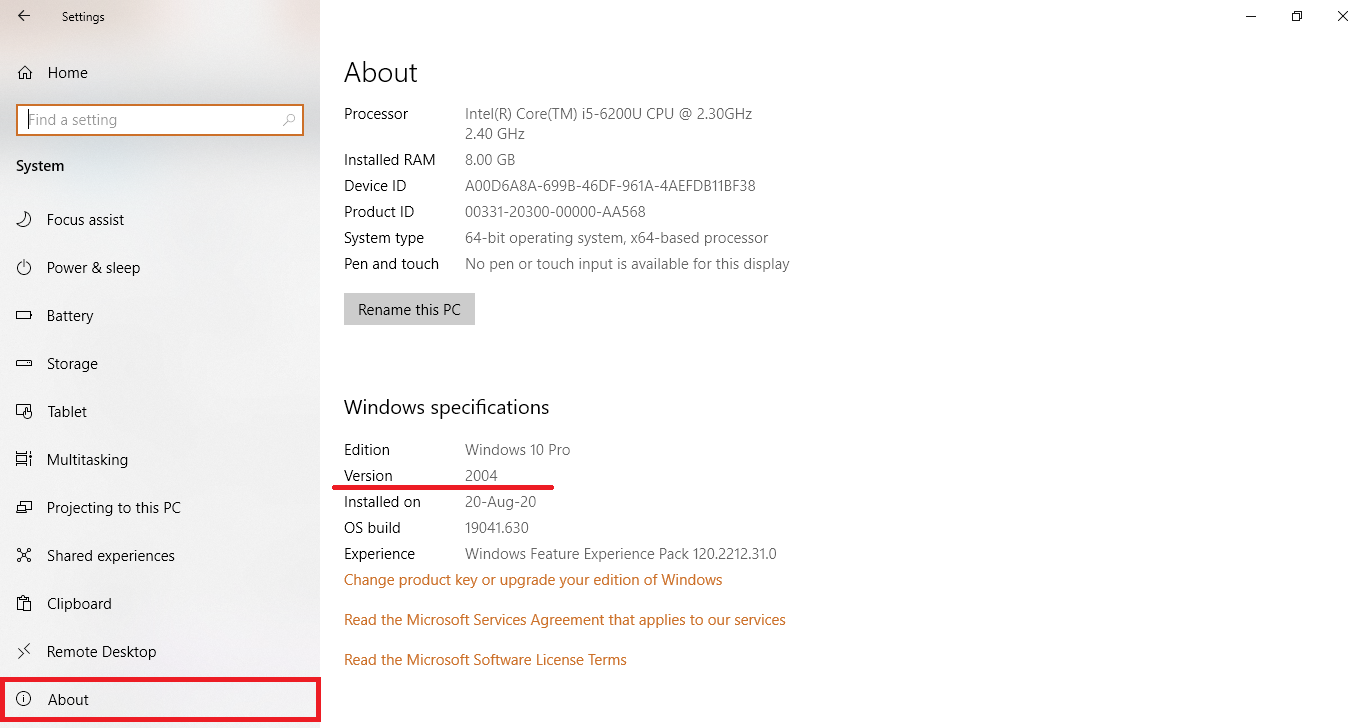
You can check your Windows 10 version by going into Settings, System, About, and scroll down to the Windows specifications with Version.
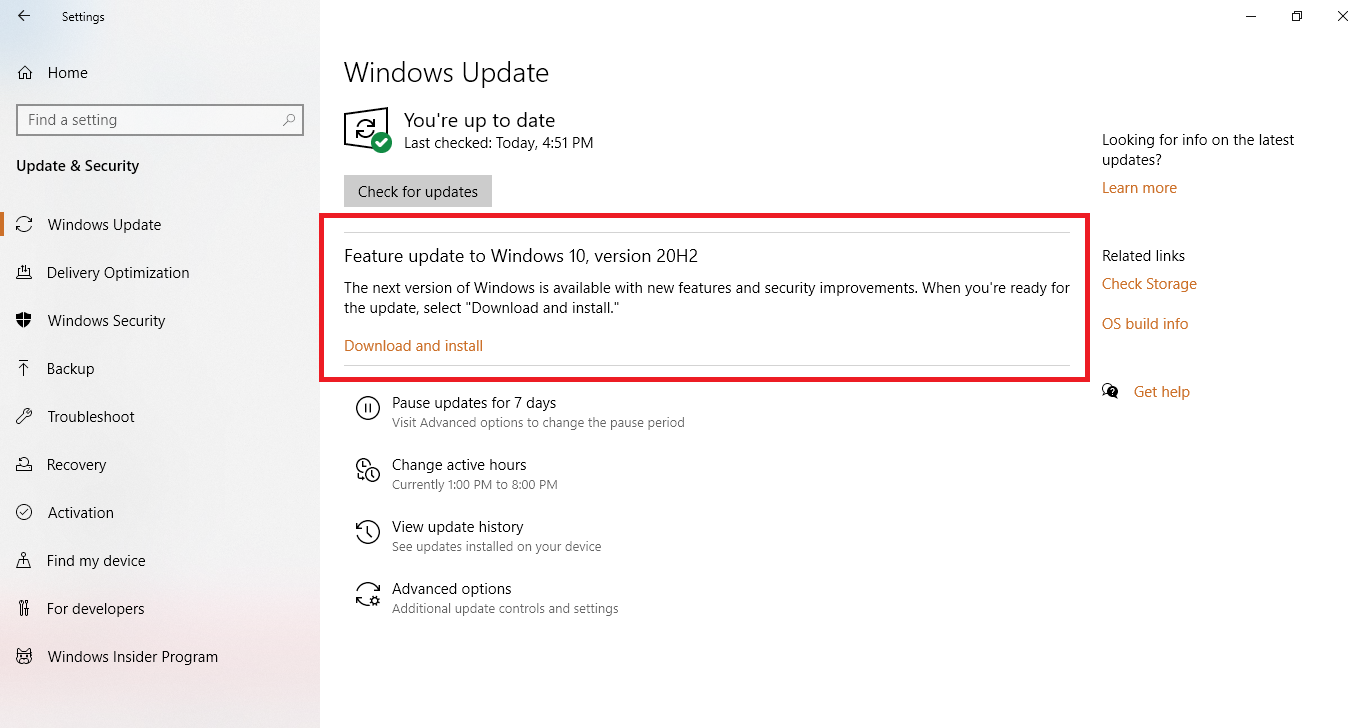
If it doesn’t match with the latest released version then the latest feature update option will appear in the Windows and Updates settings. Tap on the Download and Install the feature update. It will take time base on the update size and your network speed.
Let it fully download the feature update then install it by restarting your device. It will just take a few minutes if you are updating from the Windows 10 2004 version to the 20h2 version.
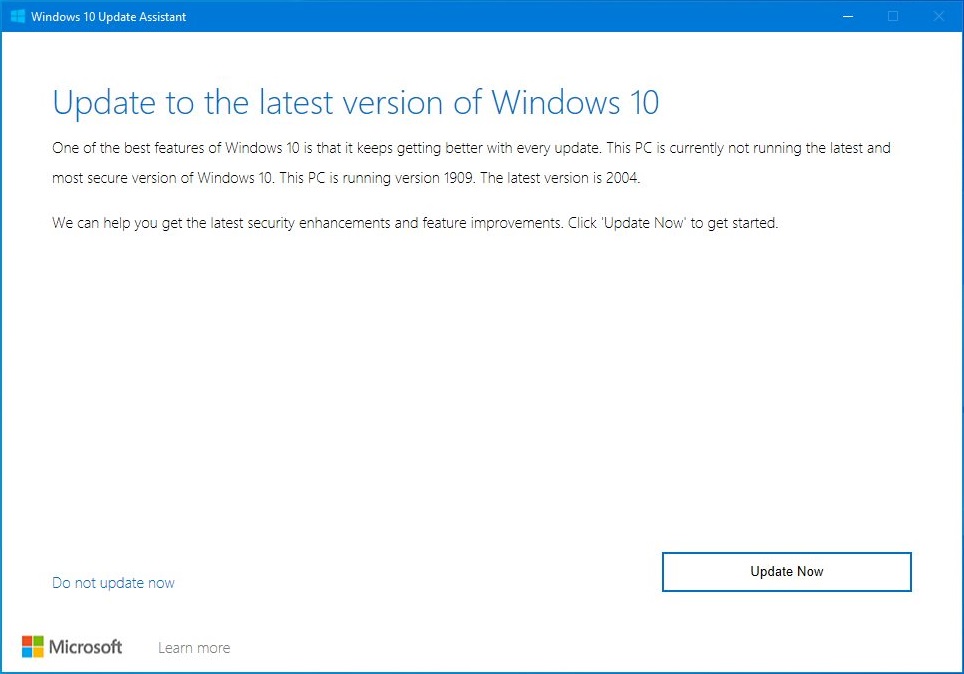
Windows 10 Update Assistant
Windows push the updates separately for different devices as per their compatibility and you might not see the Update option in the settings. If you are facing a High CPU and other issues then updating to the latest version through the Update Assistant might be the only option.
First, download the latest Update Assistant. At this time of writing and updating the article, it’s currently for October 2020 updates and it might have changed to the new one.
Run the Windows 10 Update Assistant, it will show the latest version it is going to update your device. Tap on the Update Now to download and install once ready.
Rollback the Updates
Sometimes the latest updates also cause problems with the system. If suddenly Windows 10 started behaving ill or performs slow then the recent updates might be causing the issues. You might be confused that if the updates might cause the issues then why previously we asked to install the latest updates if available. It is not a better option to stay without updates because it’s not only about new features but also about the security measures. If the current latest updates are causing bugs on your system then uninstalling the latest updates and rolling back is the best option, later you can skip the installed one to the future updates. You must have understood the point, now let’s uninstall the latest updates.
You can rollback updates in three different ways namely removing updates from programs and features, directly uninstalling updates till the latest installed build, and go back to the previous version of Windows 10. Apply them one by one until the problems are fixed on your device.
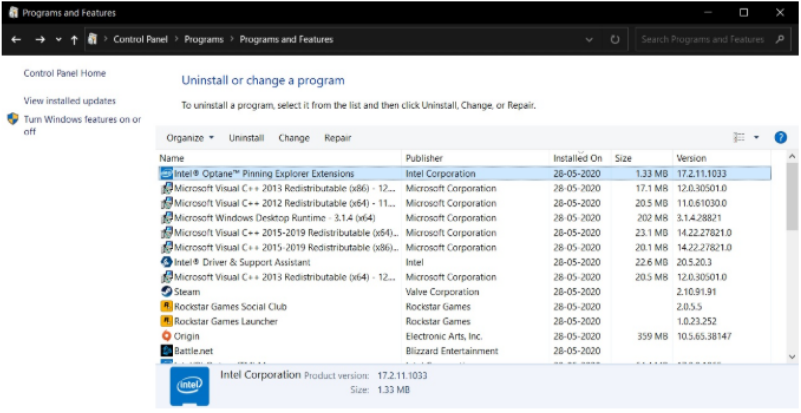
Remove Updates from the Programs and Features:
It is recommended to perform it in the Windows Safe mode for proper execution. You can boot Windows 10 into Safe Mode by restarting while holding the Shift key then navigate to the Startup options.
- Launch the Control Panel and select the Programs and Features. Tap on the View installed updates in the left menu.
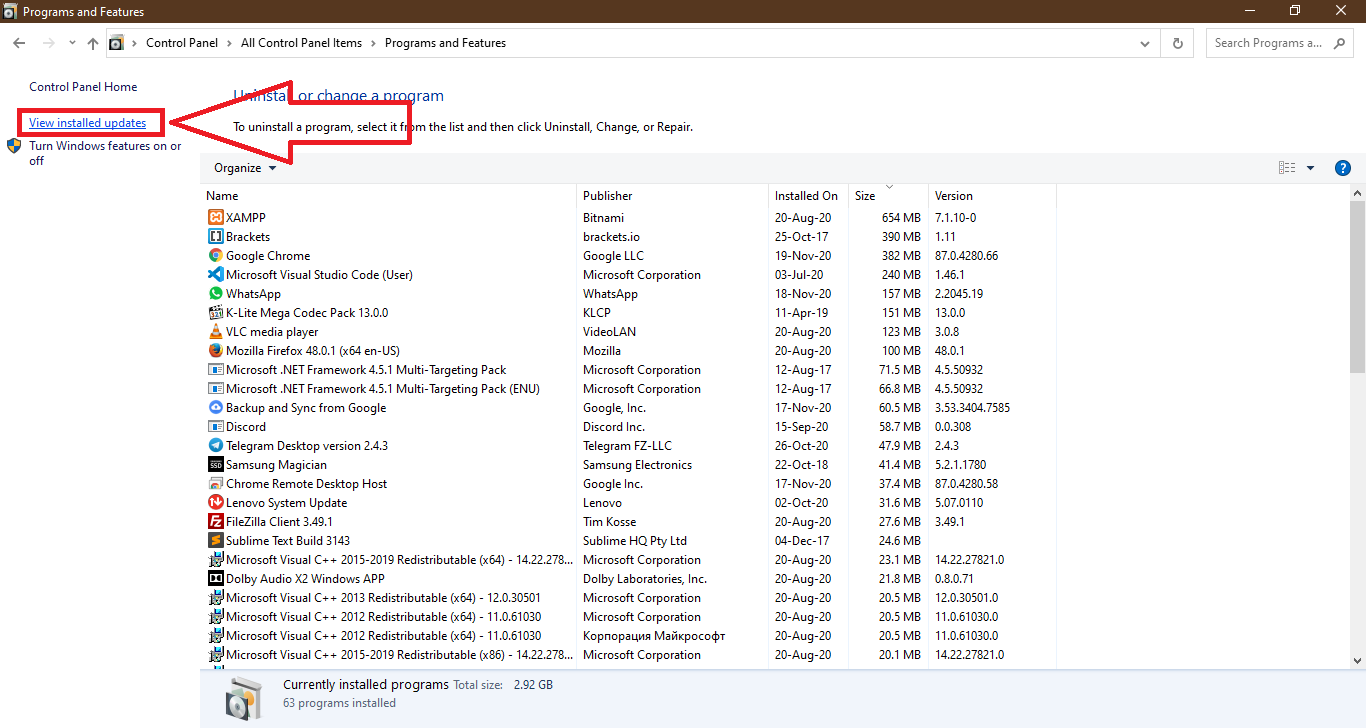
- Now look for the latest Update for Microsoft Windows excluding all the C++ and Security updates.
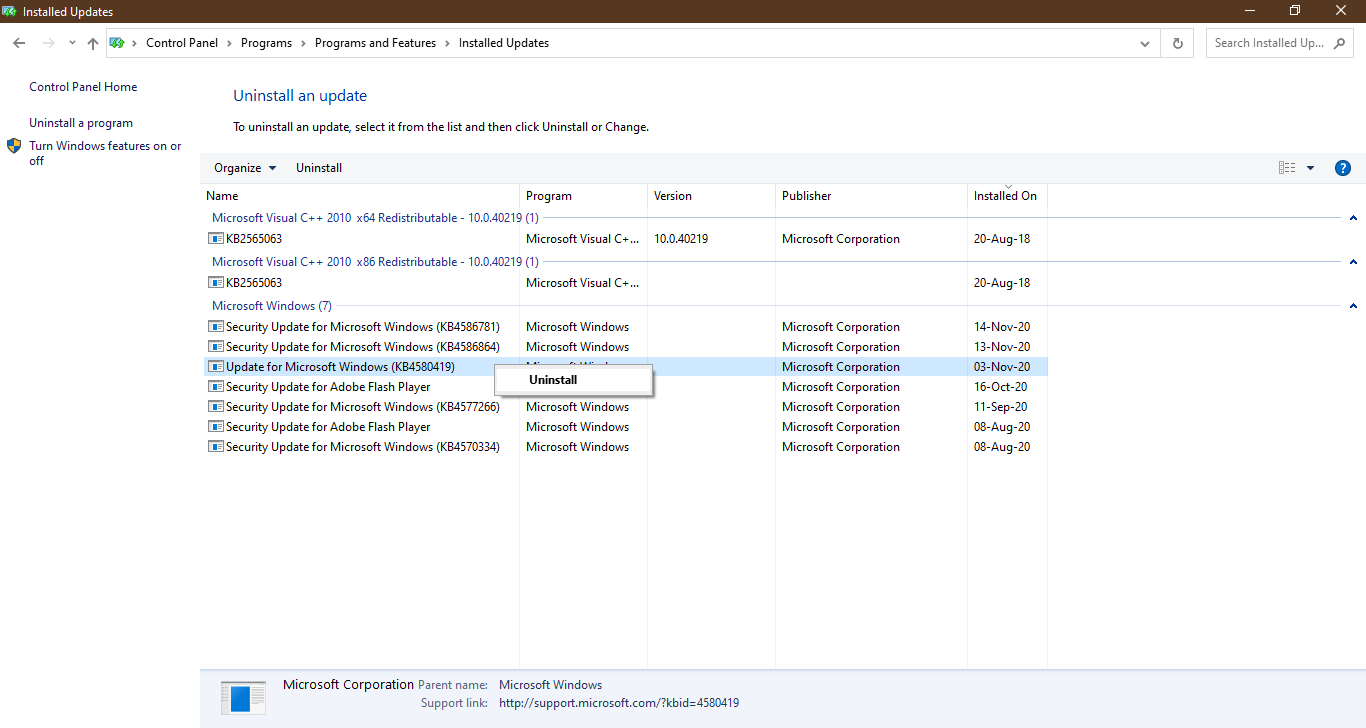
- Press the right mouse click and tap on the Uninstall.
Do Restart your computer to undo all the functions and reload the previous updates.
Uninstall updates till the latest installed build:
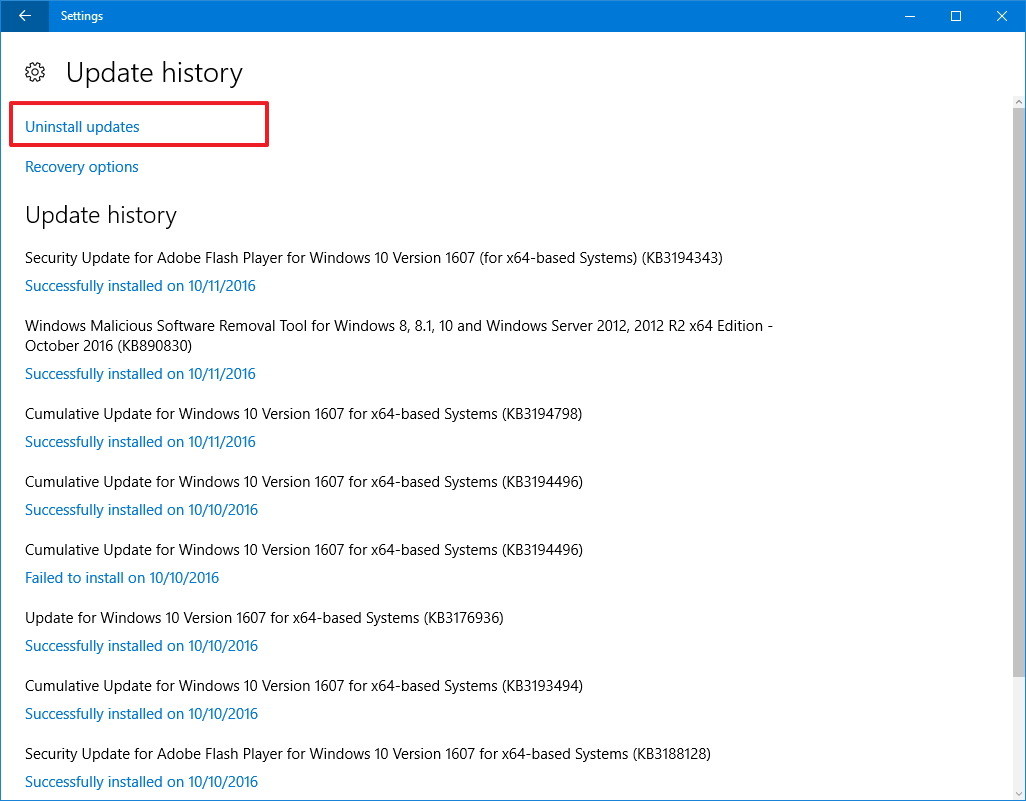
Open the Updates & Security settings, select the View update history option, and tap on the Uninstall updates.
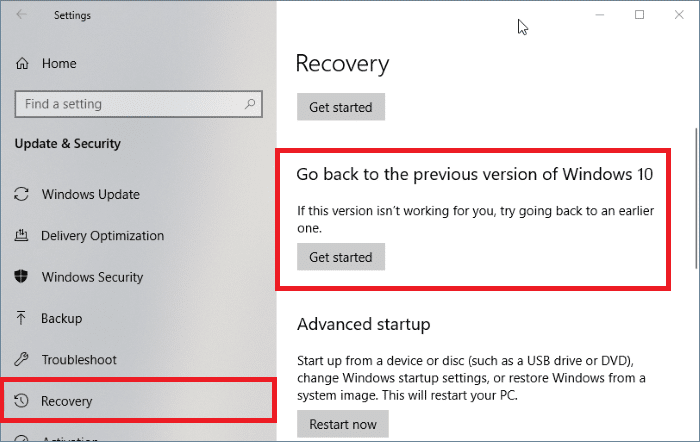
Go back to the previous version of Windows 10:
Navigate to the Recovery settings in the left menu of Updates settings and Get started for rolling back to the previous version. This option is only available if Windows 10 was updated within the last 10 days.
System Maintenance
By default, Windows run System Maintenance as a scheduled task once every few days. System Maintenance will check for the latest system, Microsoft store apps and security updates, disk fragmentation, scanning the computer for viruses and malware, and diagnosing the Windows system. It is also the must-try option for fixing the slow performic PCs. Follow the steps to perform the System Maintenance on Windows 10.
- Launch the Control Panel and tap on Security and Maintenance option.
- Expand the Maintenance tab and click on the Start Maintenance link.
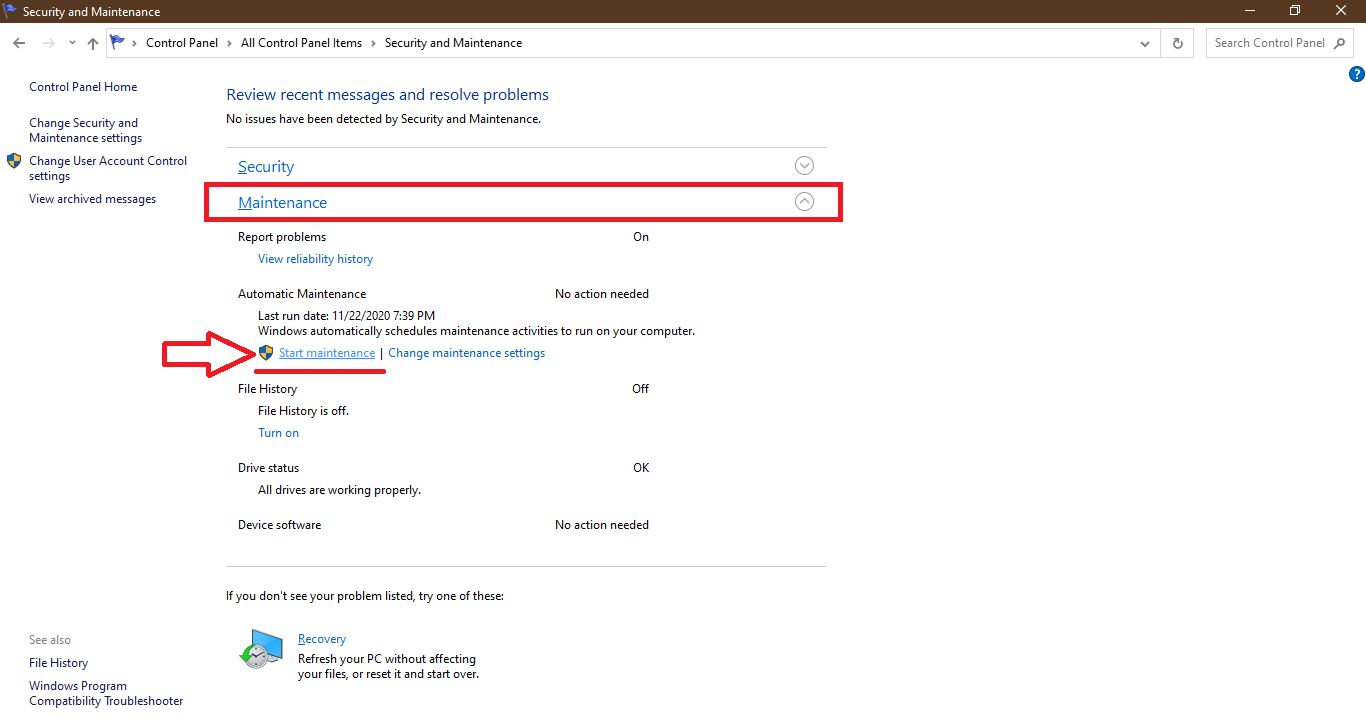
Windows 10 will automatically look for the flaw and bugs in the system and ask for your required inputs or repair on its own.
Hopefully, these solutions will surely fix the Service Host: Network Service high data usage and CPU usage on your Windows 10 PCs. Do share your queries and views in the comment section.