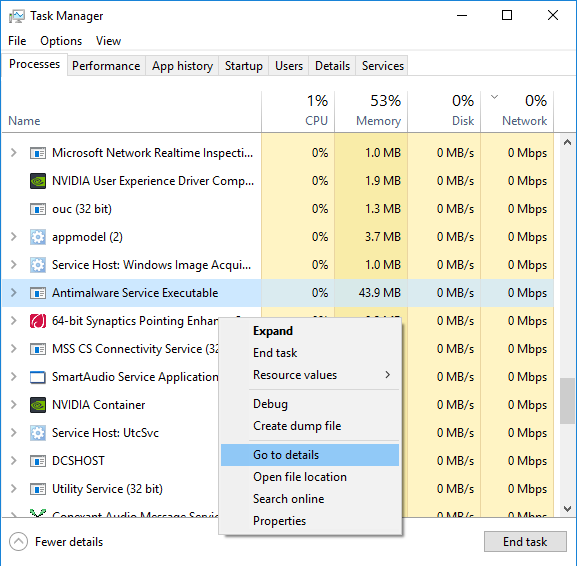
Did you notice high CPU or 100% Disk usage due to the Antimalware Service Executable in Windows 10? Actually, Antimalware is a background security process governed by the Windows Defender, an in-built Antivirus System in Windows. This process also appears as MsMpEng.exe in the Details tab of the task manager.
We are here to answer your all questions on fixing high CPU, DISK, RAM, and Memory usage by this process.
- What is it?
- Why it appears?
- How to Solve it?
Contents
What is Antimalware Service Executable?
The Antimalware Service Executable is a Windows Defender process that scans the files. It is responsible for detecting the viruses in Windows when the user downloads something from third-party sources. It also has a very important role in building the defense system of the windows defender that comes along with Windows 10 as an inbuilt feature. Well due to heavy load, it consumes a lot of CPUs and Disk Memory in the Task Manager. Search for MsMpEng.exe in the Process tab to analyze this process.
Microsoft Windows continuously keep running antivirus scans at very short intervals. Whenever the user installs or downloads from other sources, the windows defender automatically scans the files to check for viruses. The worst part of this process is that it’s directly attached to the defense mechanism of Windows 10.
Read Also: What is Mouso Core Worker Process
Fix “Antimalware Service Executable” – High Disk/CPU Usage
The windows defender is an inbuilt feature in Microsoft Windows 10. But, that doesn’t mean nothing can be done. You can easily solve this high CPU usage due to the Antimalware Service Executable by following given five solutions. antivirus anti virus.
- By Installing a legit Antivirus
- By Testing For Malware
- By Adding the “Antimalware Service Executable” to the Defender’s Exclusion List
- By Changing the Windows Defender’s schedule
- By Disabling the Windows Defender
By Installing a Legit AntiVirus
As, Windows defender is an inbuilt Antivirus System of Microsoft Windows, it can be easily replaced by a legal Antivirus Software. When you install an Antivirus software from any legal source, then the main process of defending viruses is transferred from the Windows Defender to that new antivirus software. And, Because of this the Windows Defender will automatically slow down its processes. As, the newly installed AntiVirus application will work as the default Antivirus for the windows, the processes run by Windows Defender automatically stops. There are many Antivirus softwares that can provide security to the operating system and can easily fix the issue of High CPU Usage in Windows 10. Some highly recommended, Latest and prominent AntiVirus Application for Windows are as follows:
- Bitdefender Total Security 2018
- Norton Security Deluxe 2018
- Avast Premier
- ESET Internet Security 11
- BullGuard Premium Protection 2018
By Testing For viruses
As windows defender is an inbuilt and free Antivirus system for Windows, it cannot detect viruses and malware that can hide themselves. It’s conceivable that something worse is making the Windows Defender to use that high amount of CPU Memory. To solve this issue, you have to run a full-time windows security check by any legit AntiVirus. It is to ensure that the is free PC from any malware that might influence the PC’s capacity to run easily, securely and efficiently. The Antivirus System will search for the Malware and will automatically kill the virus to fix this issue.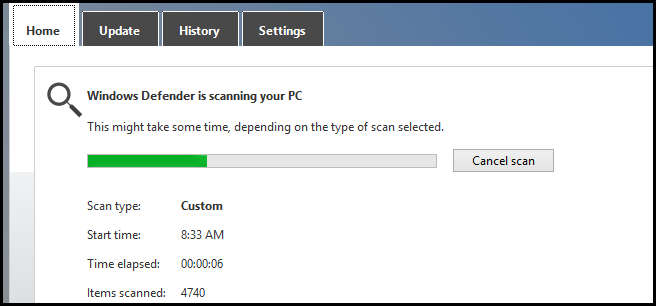
Add “Antimalware Service Executable” in the Windows Defender Execution List
- Open The Task Manager by pressing “Ctrl+Shift+Esc” Key simultaneously.
- Now, Click on the Processes Tab. In the running processes, do search the “Antimalware Service Executable” And right click on processes and click on the open file location tab to open its location.
- From the address bar, Select the whole path of the location and copy it.
- Now, Open Windows Defender’s Security Centre from the Start Menu or by Searching for it in Search Box.
- Then, Select ‘Virus and Threat Protection’ and click on Settings.
- Now look for the “Exclusions”. Now click on the “Add or remove exclusions”. After that, click on the “Add an exclusion” option and select Folder. Paste the copied path of the “Antimalware Service Executable” or (MsMpEng.exe) in that address bar.

- After this whole process, click on Open and then the folder will be finally excluded from the scan.
This solution works fine in most of the cases. If it doesn’t then, you can try other methods too.
By changing the Windows Defender’s Schedule:
In most of the cases of high CPU usage, the reason is full time security scan which runs in background. The very basic problem is that most of the people don’t have any idea about it hence it consumes a lot of CPUs Memory without the user’s knowledge. Thus, to solve this issue we can change the windows defender’s schedule according to our needs. Changing Antivirus Schedule to Scan for viruses also fixes high disk usage on Linux.To the change the schedule of Windows Defender follow below steps:
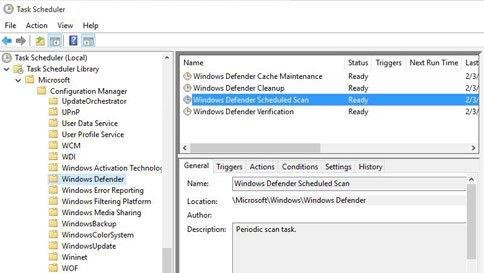
- On the keyboard, Press Win+R Key (Windows Key and R Key) Simultaneously to open the ‘Run Commander’.
- Now, Type “taskschd.msc” and select OK to open the Windows Task Scheduler.
- After the Windows Task scheduler opens you need to go to the Windows Defender’s folder to make changes. The path of Windows Defender’s is:
Task Scheduler Library >Microsoft >Windows >Windows Defender - When the folder is opened all you have to do is to find a service named “Windows Defender’s scheduled Scan”. Select it and then click on ‘Properties’ Tab.
- After that Windows Defender’s Scheduled Scan Properties will open. Now, Click on the Condition Tab and change it.
To change the setting, you just need to Uncheck the dialog Box that are checked by themselves. This will disable the full time scan and you can modify it easily according to your choice.
By disabling the Windows Defender
At last we are left with nothing so we will simply stop the thing that is causing this problem. As this issue is being created by the processes run by Windows Defender, We will simply disable the Windows Defender by registry edit to solve this issue permanently. Registry Edit actually deletes the Windows Defender’s files that makes Defender Disabled. It can be easily get back to normal by updating the windows. To disable Windows Defender Follow the steps below:
- Press Win+R Key at the same time to Open the Run Commander.
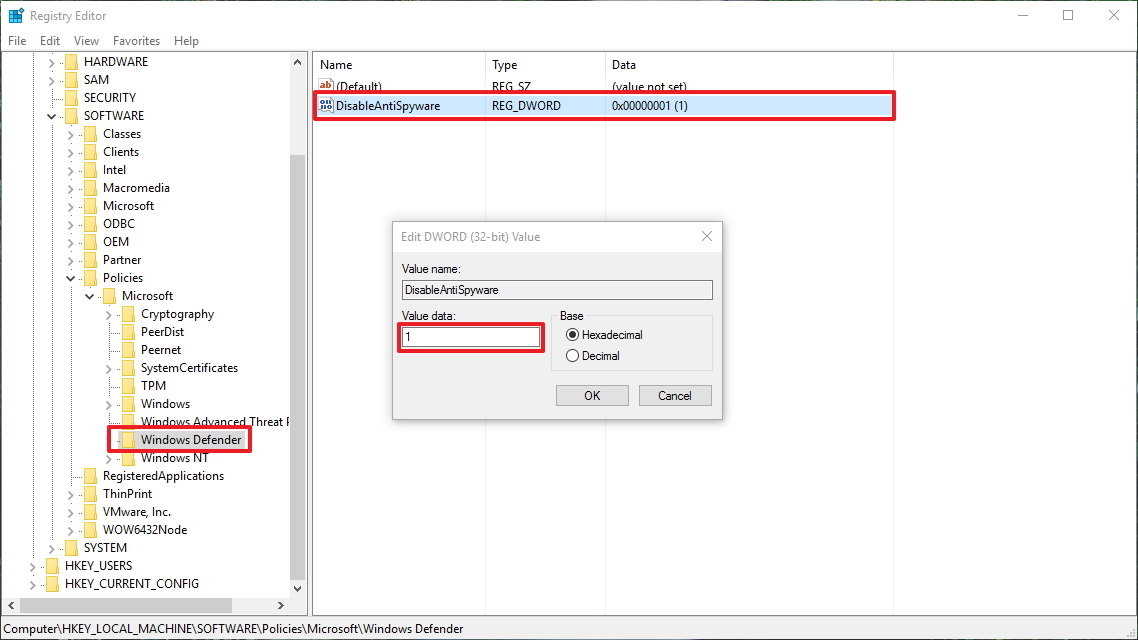
- In the run search box search for “regedit”. Click on OK to Open the Registry Editor Tool of Windows.
- After doing so, Now open the path in registry editor where the registry of the Defender is saved.
- The path that you had to follow is:
Open: HKEY_LOCAL_MACHINE\SOFTWARE\Policies\Microsoft\Windows Defender - Now, do a right click on the blank space in the right side of the screen and click on new. It will give you a little more options, now click on the “create the DWORD key”.
- Before doing anything please make sure that you had named the new key called “DisableAntiSpyware”.
- Now, just do a double click on that new key and after that set the new value to 1. It will disable the windows Defender System.
Read Also: WMI Provider Host CPU
The Antimalware Service Executable is a very important process and does its work prominently but it is also infamous for its High CPU Usage. If the problem still persists then please check for Windows Update. Not updating your Windows may cause high disk usage by the Waasmedic Agent Exe process.
My laptop use to hang a lot after installing Windows 10. I found Antimalware Executable Service a lot of time in the Task Manager. First, I ignored considering it as an antivirus process but it never was never gone from the list of processes. Finally, I have to disable it.