Well, just like Windows 10 users, now Windows 11 users are facing performance issues. As we have given a lot of solutions on, How to speed up Windows 10 PC? We are back with 11 ways to Speed Up your Windows 11 PC.

When we get a new update we feel exciting but after some time the excitement vanishes when you see your device performance is getting low. As compared to Windows 10 the Windows 11 is proved effective and efficient when it comes to smoothness and speed. This is because the new OS has come up with a number of new features and improvements such as memory management, app prioritization, disk usage, related to CPU, and battery which adds up to its performance enhancement. Even though users are finding ways to speed up Windows 11 PC. The good news is you have landed on the right platform.
One of the foremost and common reasons behind the slow performance is an old device running a new Windows version. It is also said that there may be an issue with the hard disk. Also, check out other reasons behind slow Windows 11.
Reading this guide you can speed up your Windows 11 PC by applying some of the settings and tricks.
Read Also: Windows 11 Performance Compared to Windows 10
Contents
- 1 11 Ways to Speed Up Windows 11 PC
- 1.1 Update and Restart
- 1.2 Disable Visual Effects
- 1.3 Change Power Plan
- 1.4 Disable Startup Apps and Programs
- 1.5 Enable Storage Sense
- 1.6 Defragment Hard Disk
- 1.7 Uninstall Unwanted Software
- 1.8 Disable Notification and Tips – Tricks
- 1.9 Disable Game Mode
- 1.10 Disable Start Menu Transparency
- 1.11 Run Performance Troubleshooter
11 Ways to Speed Up Windows 11 PC
Well, there are performance modifications including techniques to speed up Windows 11. It will enhance the performance as well. To have high speed and performance make sure you apply all the below settings and tricks.
Update and Restart
This trick is basic as you don’t need to go deep in settings. You just have to update and restart. For this, you have to check for updates. To do so follow the path as Settings menu > Windows Update > Check for updates. If you have an update then install the update and then make sure you Restart your PC. In case, there is no update then also restart your PC.
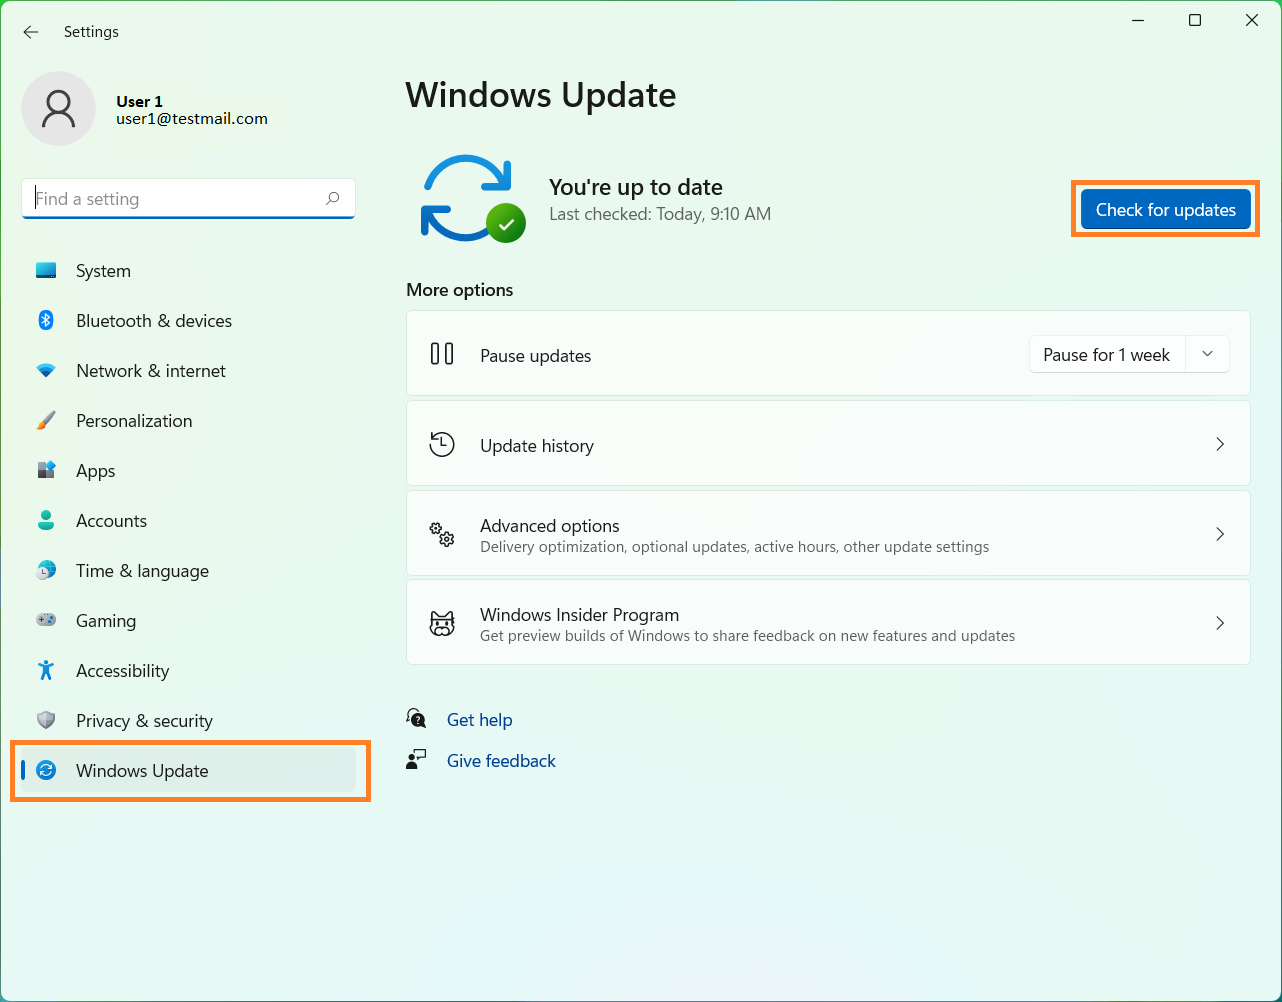
Recently Microsoft fixed the sluggish performance on Windows 11 and AMD devices with the cumulative update. Updating and Restarting will also fix random basic issues that cause a slow down of your PC. This fix is temporary. After this, it may occur again. If you want a permanent solution then you need to apply the settings tricks below.
Disable Visual Effects
The visual effects on Windows 11 slow down the system by affecting memory usage and performance. To enhance the speed of Windows 11 you need to disable it.
- At first launch Windows search bar screen. On it search for Advanced and then tap on View advanced system settings from the top result.
- Go to the Performace section and tap on Settings.
- Now it’s time to select the option which says “Adjust for best performance” and then ticks on the box which says “Show thumbnail instead of icons” and “Smooth edges of screen fonts”.
- To make, changes work hit on Apply and then on the OK button.
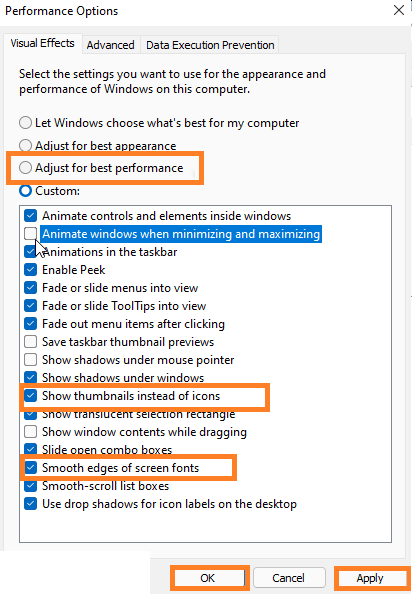
By doing this the visual effects will be reduced on your Windows 11 but at the same, it will speed up your Windows 11 PC.
Change Power Plan
The power plan is for controlling the power consumption of your PC. In order to speed up your OS, you need to change the Windows 11 power plan to High Performace. I must say that this power plan will consume more battery or we can say power. For high performance, you have to sacrifice the battery of your Windows 11 PC.
- Do tap on the Start menu and then search for Power Plan in it. Click on the upmost result which says “Choose a power plan”.
- On prompted screen look for the High Performace plan. Once you get it then select it. You can also select Driver Booster Power Plan if you are interested in gaming performance.
- After this tap on Change Plan Settings and then click on Change Advanced Power Settings.
- On the screen check that the Minimum and Maximum processor state is 100%.
This will consume high power and will give you high performance on your Windows 11.
Disable Startup Apps and Programs
There are apps and programs that start automatically on startup. This lead to more time on startup. To fix it you just have to disable or remove all Startup Apps and Programs.
Disable Startup Apps
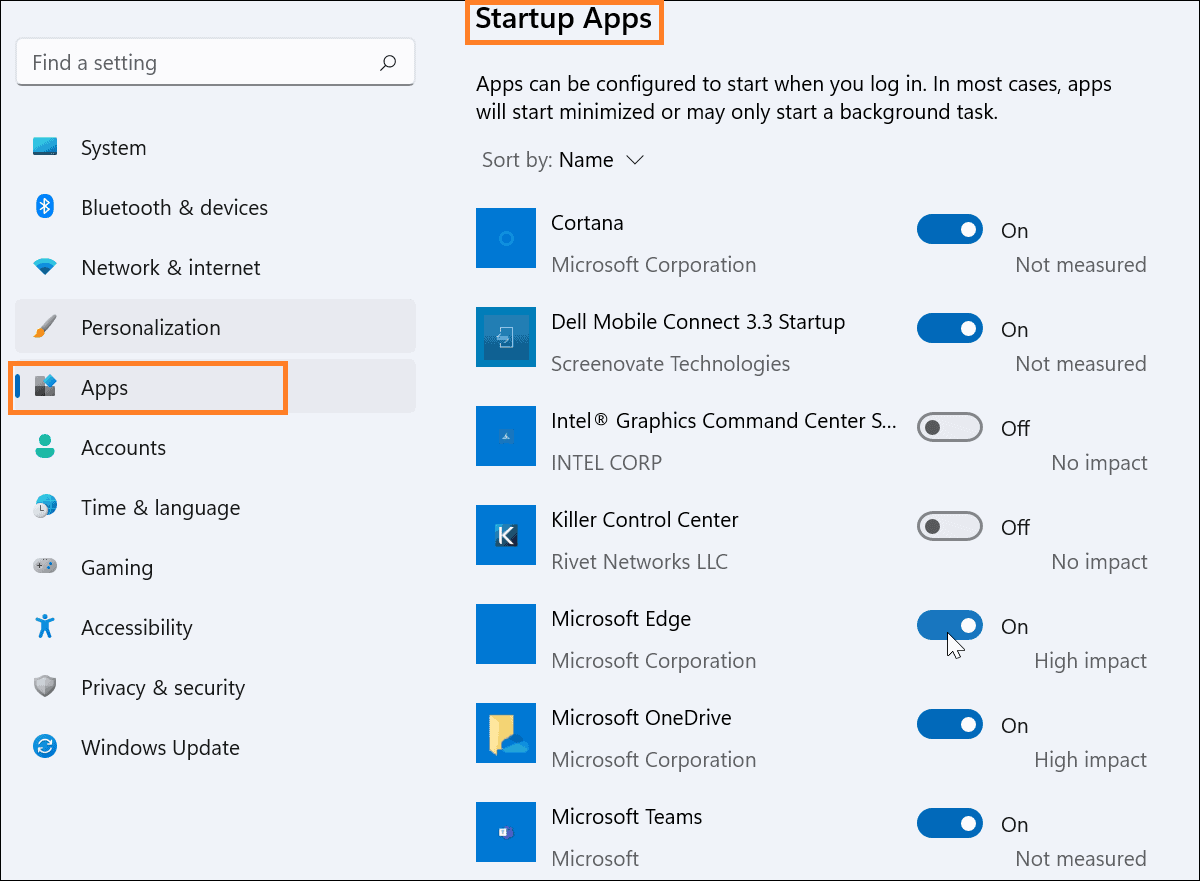
- Launch the Settings and then from the left pane tap on the Apps option.
- Now from the right side tap on the Startup option.
- After this from the prompted screen do the toggle off for the apps which you don’t want to start automatically on startup.
Disable Startup Programs
- For programs, you have to launch Task Manager. Do right tap on the Start button and then choose Task Manager from the open menu.
- Navigate to the Startup tab.
- Now do right tap on the program you don’t want to start automatically at startup and then hit on Disable option.
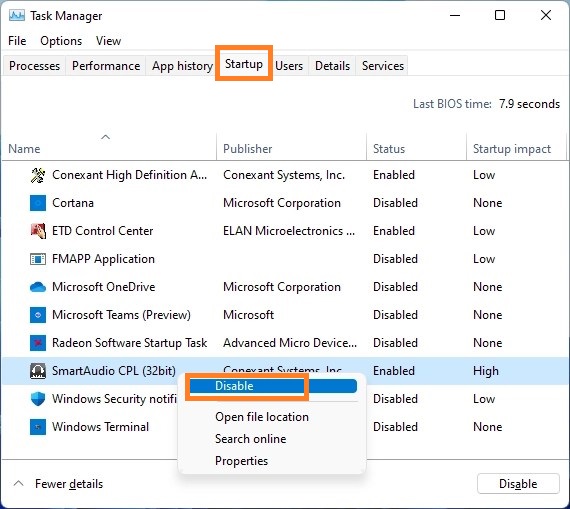
The Startup Apps and Programs start at startup and run in the background. It consumes memory and storage which leads to a slow down of Windows 11.
Enable Storage Sense
Storage Sense is a feature that monitors the storage on your Windows 11. This feature is on both Windows 10 and Windows 11. When your system needs storage it automatically deletes unwanted files including temporary system files and recycles bin items. For all this, you just have to enable the Storage Sense feature on Windows 11.
- Launch Settings screen on your Windows 11.
- Make sure you are on the System tab and then from the right side screen do tap on Storage.
- Now do the toggle ON of the Storage Sense option.
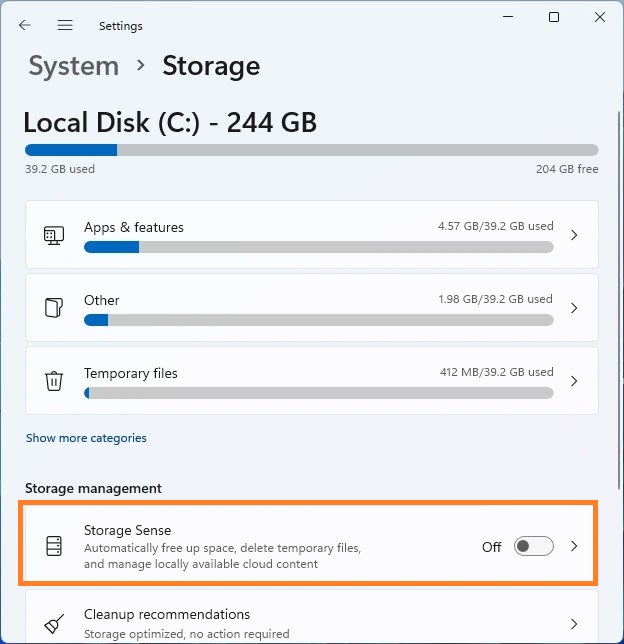
So, this is how you can make use of Storage Sense feature in order to control storage on your Windows 11. This will fix errors such as “Your PC is running out of space“.
Defragment Hard Disk
The Hard Disk needs to be Defragmented from time to time. With time it becomes fragmented and as a result, your Windows can not read and write on the hard drive. This reduces your Windows 11 performance. To fix it you have to defrag the hard disk following the below steps.
- On your Windows 11 go on the Windows search bar and search for “defragment”. From the top result tap on Defragment and Optimise Drives.
- Now it’s time to select the drive you want to defrag.
- Once you have selected the drive then hit on Optimise option for the process completion.
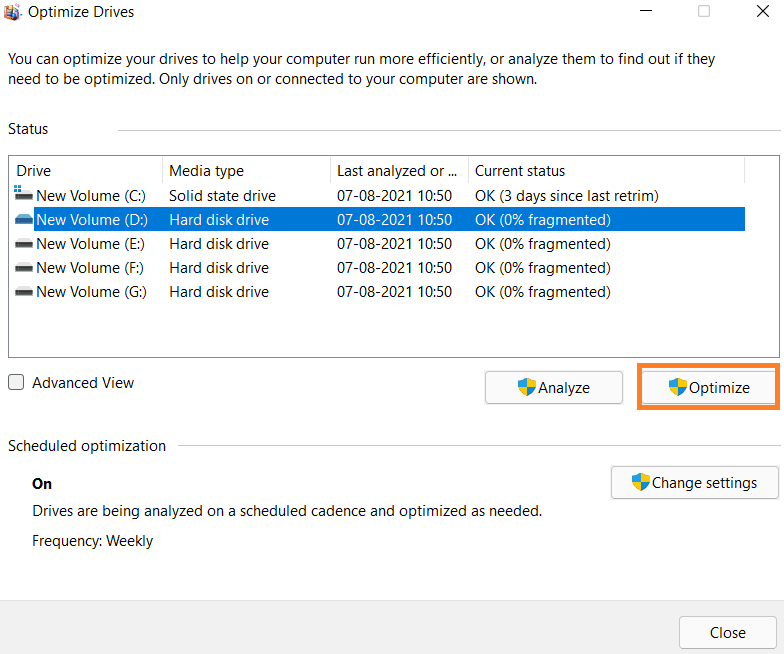
The defragmentation process runs automatically on Windows 11 PC but sometimes it won’t run due to some issues. At that time you need to run it manually applying the above steps.
Uninstall Unwanted Software
On Windows 11 there is a plethora of unwanted software and bloatware. This consumes space and makes Windows 11 sluggish and freeze. If you don’t need it then uninstalling it will be the best option.
- Do tap on the Windows icon and tap on the Settings option for the further process.
- From the left pane tap on the Apps and then click on the Apps and features option from the right side.
- Now you will have a list of apps installed on your Windows 11. Go on to the unwanted app and tap on the three dots and then select Uninstall option.
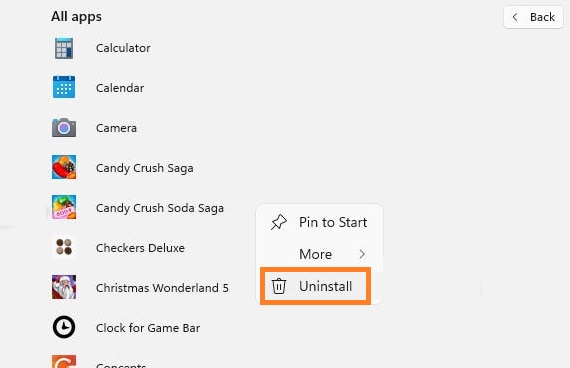
Do the same for all unwanted apps and bloatware to uninstall them.
Disable Notification and Tips – Tricks
The constant notification and tips – tricks pop-ups may slow down your Windows 11. Like Windows 10 on Windows 11 you can turn it off or we can say disable notification and tips – tricks pop-ups.
- Hold Windows + I key to launch the Settings screen.
- Now do tap on the System option and then click on Notification.
- On the screen, you will have different apps with toggles. Do the toggle off of the app whose notification you don’t want.
- Below apps, you will have two options saying “Offer suggestions on how I can set up my device” and “Get tips and suggestions when I use Windows”. Disable both options.
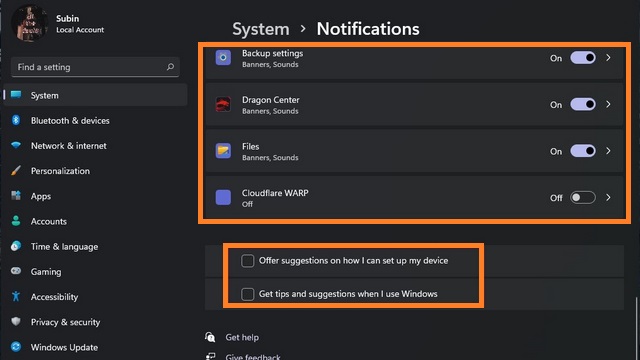
You have disabled all notifications and tips – suggestions on Windows 11.
Disable Game Mode
On Windows 11 Game Mode is enabled for better gaming performance. It uses more CPU and GPU for great performance in gaming. This causes the speed of Windows OS. If you are not interested in gaming activities then disabling it will be handy.
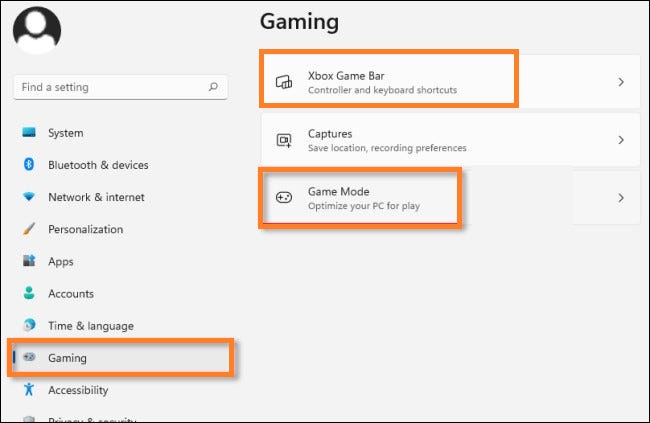
- Launch Settings screen first.
- From the left pane tap on the Gaming option and then choose Game Mode from the right side.
- Do the toggle OFF of Game Mode.
- After go back to the same screen and tap on Xbox Game Bar.
- Disable the Open Xbox Game Bar and Restart your Windows 11.
Now gaming activities will not consume high CPU and GPU on Windows 11.
Disable Start Menu Transparency
On Windows 11 PC Start Menu Transparency adds coolness to its look. When it is enabled the look of Windows 11 is better than the look that comes when it is disabled but the enabled Start Menu Transparency consumes more system resources. This, lead to a slow down of Windows 11 PC. So, try disabling Start Menu Transparency following the below steps.
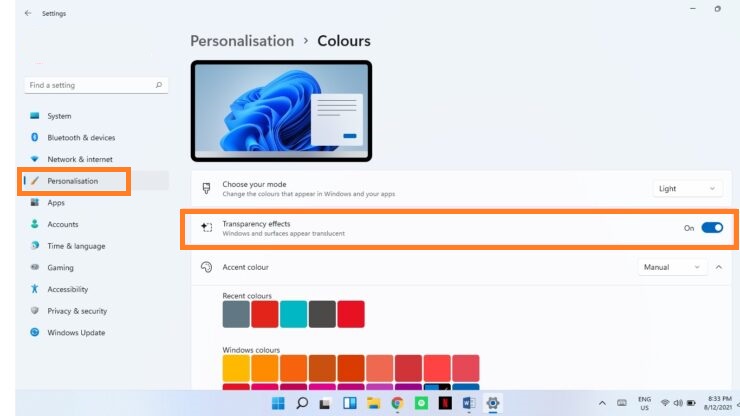
- Hold Windows + I key for the Settings screen.
- Now tap on the Personalization option for the further process.
- From the right side screen, select the color and do toggle OFF of Transparency effects.
After this Windows 11 system resources will be not consumed due to Start Menu Transparency.
Run Performance Troubleshooter
The performance troubleshooter will scan the whole system and will aware you of the problem by which the Windows 11 normal speed is affecting. The tool will also resolve the problem. To run it follow the below steps.
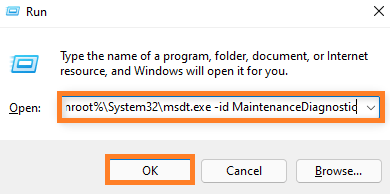
- Launch Run Dialog Box by pressing the Windows key and R key.
- In the run dialog box type the command as %systemroot%\system32\msdt .exe -id MaintenanceDiagnostic.
- After all hit on OK button.
- Now click on the Next button and then tap on “Try troubleshooting as an administrator”.
Once the process is finished then Restart your Windows 11.
If none of them seems useful for your PC then just factory reset Windows 11 to its default settings for the best performance. I hope that the above given 11 ways are enough to Speed Up your Windows 11 PC.