To sustain optimum performance, you have to learn how to maintain a normal CPU temperature of a computer. If you are witnessing your computer overheating, consider it as a warning sign and take preventive measures. Such as learning how to control the CPU fan speed on your Windows 10 computer. It will help your PC to keep running at its exemplary RPM speed.
To learn how to control the CPU fan speed on Windows 10, you need to know a few things. Such as what type of CPU fan do you have on your computer? Have you tried the inbuilt Windows 10 settings to change the fan speeds? There are, of course, fan speed control software that can control CPU fan speed along with external fan speed controllers. We will get to all of that one by one in the article.
Contents
What Kind of CPU Fan Does Your Computer Have?
Before taking any further steps in the pursuit of controlling the CPU fan speed on a Windows 10 PC or laptop, you must determine what kind of connector or CPU fan is present.
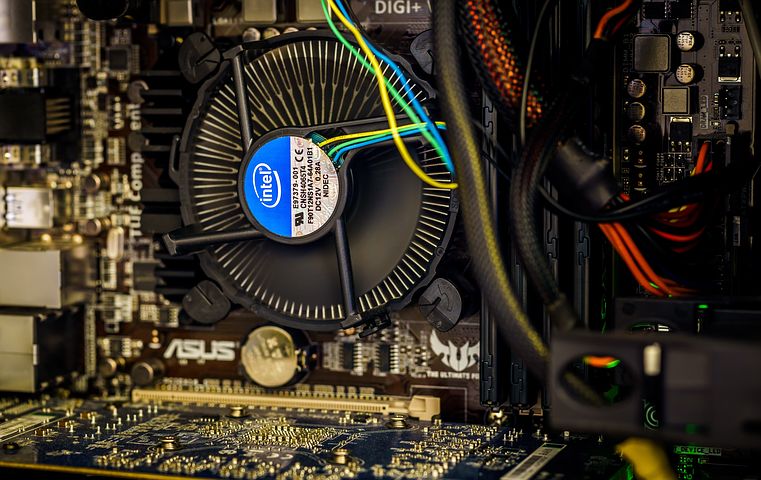
After turning off the PC, you can open the side panel and locate your CPU cooler/fan. You will find a cable attached to the side of the CPU fan, which will reveal all the details you need to know. If the fan cable has a three-pin connecter, it’s a DC fan; A PMW fan, if the cable has a female four-pin connector; a Molex if it has a two or four-pin connector.
A four-pin PMW CPU fan is exemplary in this scenario because you can easily control its speed on Windows 10 using suitable software or hardware.
Windows 10 Control Panel Fan Speed Settings
If you are anxious about using software or hardware to control the CPU fan speed on Windows 10, you should try the inbuilt control panel setting on your computer that modifies the fan speed. Here are the steps you can take to do the same;
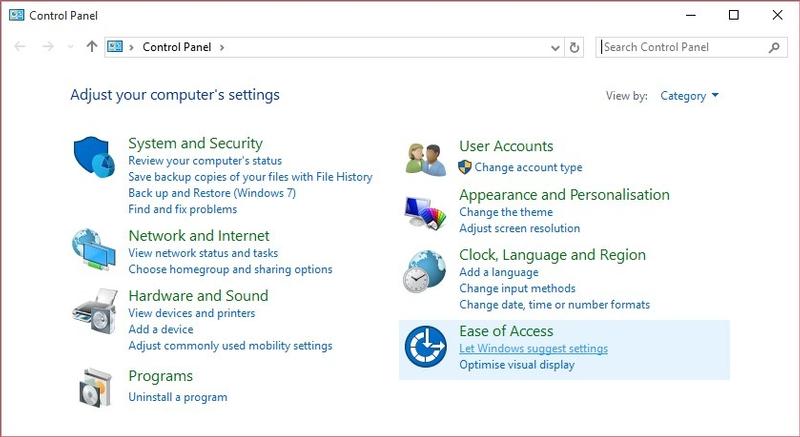
- Go to “Control Panel” on your computer and press on the tab that says “Hardware and Sound.”
- Next, go to “Power Options” and drag your mouse to click on “Change Plan Settings” on the next screen.
- Click on “Change Advanced Power Settings” and then on “Power Options.”

- Press on “Advanced Settings” then “Processor Power Management” options.
- Click on “System Cooling Policy,” which will appear as a submenu on your screen.
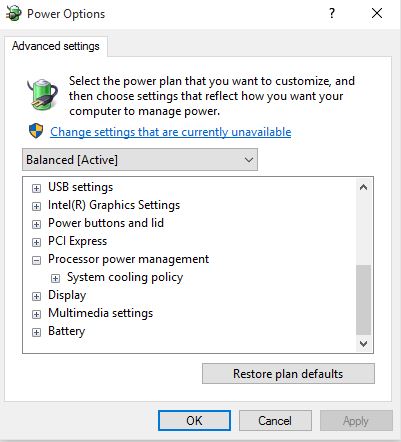
- A drop-down menu will appear on your screen from which you have to choose “Active.”
- Click on “Apply” -> “OK.”
All of these steps will increase the CPU fan speed in your computer, thereby increasing the RPM. If your computer is lagging and you suspect CPU fan speed being the reason behind the same, adjusting the inbuilt control panel function should be your first step.
How To Control the CPU Fan Speed on Windows 10 Using Controller Software?
Using third-party controller software to modify or change the CPU fan speed on Windows 10 works splendidly. You need their help if you are planning on running heavy software and video games on your computer. Or you might have already witnessed your computer lagging because of low CPU RPM, and now you want to change your CPU fan speed. The control software that we have listed is credible and does the job of changing CPU fan speed brilliantly.
SpeedFan
To use third-party controller software SpeedFan, you need to download it first. You can visit this Almico site and tap on the SpeedFan latest version link to download and install the SpeedFan software to change your CPU fan speed.
- After opening SpeedFan, navigate through the primary window of the software and locate the “Configure” tab. Click on it, and you will see a new window appear on your screen.

- Look at the top of the window, and you will notice an ‘Advanced” tab. Press on it and select your CPU from the “Chip” drop-down menu. If you do not see your CPU name among the options, search for ‘PWM’ mode records in the Property box.
- Your CPU fan entry will begin with “IT” and end with “ISA” generally. After selecting the name of PWM modes, modify it to ‘Software Controlled” in the tab below, right beside the “set to” option.
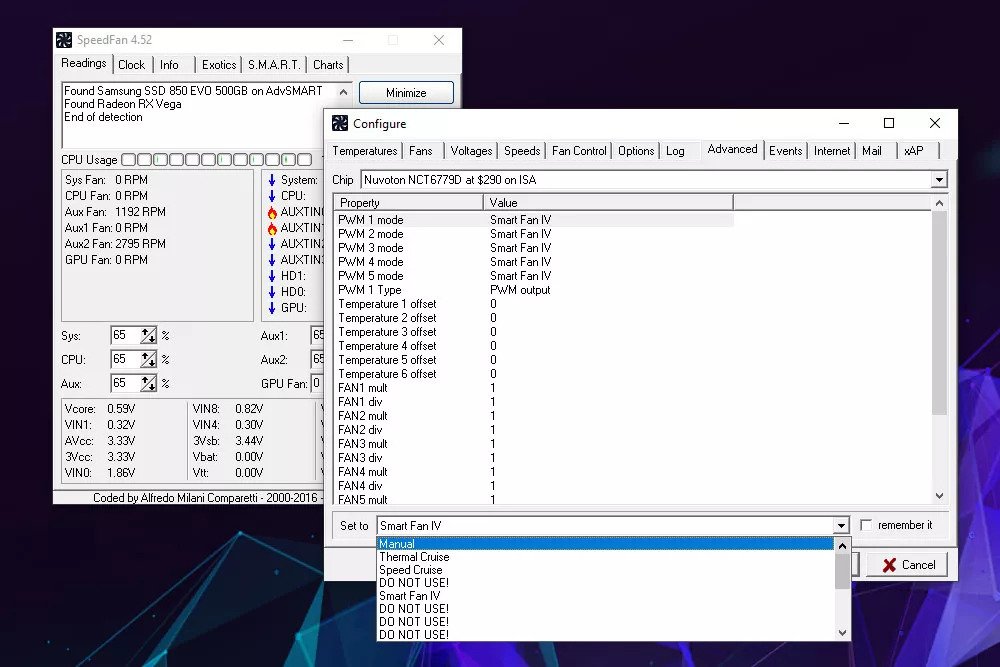
- Click “OK,” and you will be taken back to the main window of SpeedFan for Windows 10.
- According to your preference, choose the percentage of fan speed. Alongside it, you can observe the current temperatures of CPU cores.
Adjust the percentage changes of CPU fan speed on Windows 10 using third-party controller software SpeedFan with precaution. Raise or drop the percentage for each PWM to adjust the fan speeds. Make sure that temperatures on the right panel do not go too high that your computer starts overheating. Check the performance of the computer with each CPU fan speed change and decide on the best figure.
BIOS
The answer to changing the CPU fan speed on Windows 10 with BIOS begins with restarting your computer. BIOS is the most suited option because you do not need to check your CPU type and all other details before beginning to modify the speed of its fan.
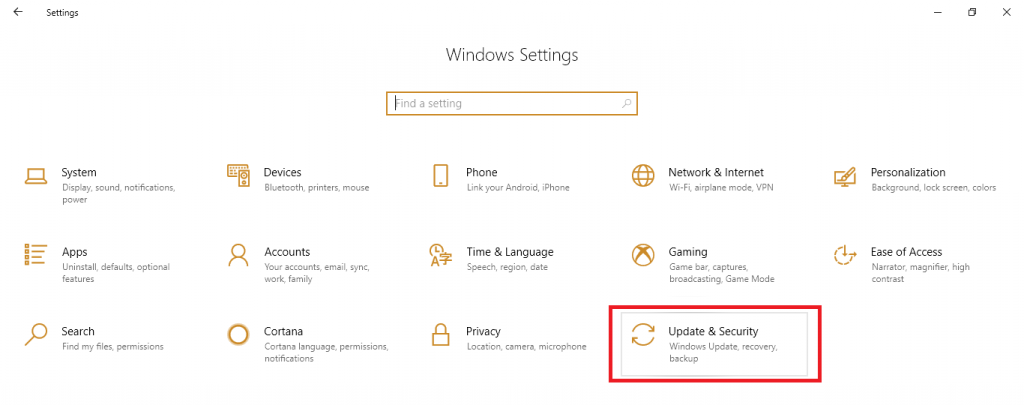
- Press Windows + I keyboard keys to open your Settings. Your Windows 10 BIOS screen will be displayed, and you have to locate the “Update & Security” option and hit the Enter key after selecting the option.
- You will see an option named “Recovery” on the computer screen. Click on it, and under “Advanced Startup”, click on “Restart Now“.

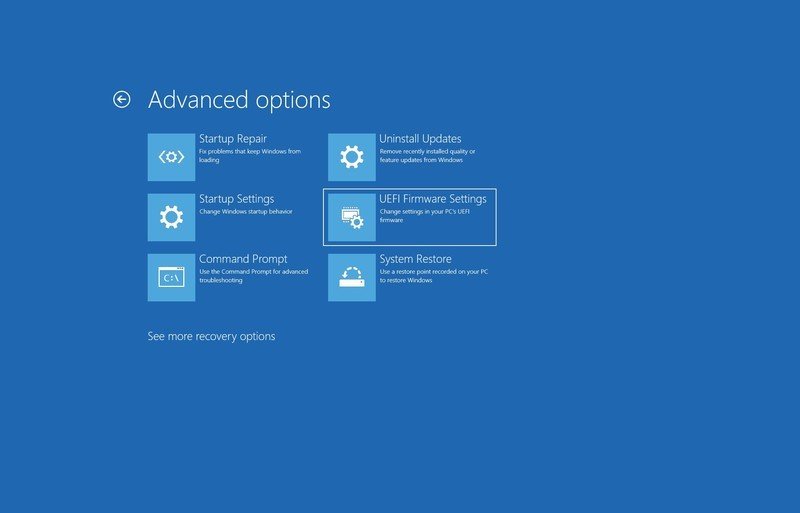
- Click on the “Troubleshoot” option and then selected the “Advanced Options”.

- Restart after selecting “UEFI Firmware settings“.
Search for the menu associated with your CPU fan and choose a suitable fan speed setting or profile, judging by its performance. Save the options you have selected for your Windows 10 CPU fan speed and exit the BIOS. You have successfully changed the CPU fan speed on Windows 10 according to your inclination. Just seconds after you press to restart your computer, press the boot-up options on your keyboard, such as the “Delete” or “F12” button to directly go to BIOS Settings.
Read Also: Fix High CPU Usage due to System Interrupts
External Fan Controller For Windows 10 Fan Speed
External fan controllers are only fit for use in the case of a desktop computer. There are different types of PC external fan controllers that you will find in the market that will suit every requirement and budget. External fan controllers are the best option if any fan control software and setting modifications fail. Especially if you are a gamer, having an ideal fan RPM is closer to utopia with an external fan controller that lets you manually regulate the CPU fan speed.

If you are the laptop owner, you can buy cooling pads that will externally control the CPU temperature. The absolute RPM speed should be around 3000 to 4000 for Windows 10 PC and laptops.
Final Words
To ensure that your computer fan runs at its ideal speed, check the RPM from time to time using the fan control software. If your PC fan starts making loud noises while running, it is probably either because of dust or bearing. Check-in with a professional if your fan speed and running problems do not subside after trying out these classic methods to control the CPU fan speed on Windows 10.