The Windows Operating System is prone to startup errors. Now and then our readers complain about several boot time errors getting their PCs stuck and not able to recover on their own. Today we will cover causes and solutions on one of such common black screen errors.
Reboot and Select proper Boot device
or Insert Boot Media in selected Boot device and press a key
The Boot device error means your device is not able to start the Windows Operating System from the selected drive. It can appear on any Windows version including Windows 10, 8, 7, XP, Vista, and even on other operating systems including Linux and Ubuntu.
This Boot error is the system-level error that has very low interference from your OS. Your BIOS settings might have changed due to the removal of the hard drive or an external attached USB during the boot time. Even your Windows system files might have corrupted.
Causes of Reboot and Select proper Boot device error:
- Faulty boot order of the storage drives attached to your computer.
- Clash of Legacy BIOS Boot with the UEFI Mode.
- Corrupted Hard Disk, SSD, or the bootable USB.
- Corrupted Windows System Files.
- BAD Sectors on the HDD or SSD.
- Disabled system drive partition.
Despite the long causes list, we have got the best solutions to fix this error and set your device in the running condition without losing your files. Apply the solutions in order from the easiest to the most advanced steps. You might need an extra USB drive or the CD in the later methods.
Contents
Change the Boot Order
Each computer or Laptop boot order is predefined from the BIOS settings. The BIOS settings are configured by the manufacturer. All the device’s motherboards come with default BIOS setup to first boot an Operating System from the Drive and later other devices can be accessed on the requirements.
You might have not changed the boot order from the BIOS then how come Windows was booting up properly earlier and all of sudden your PC is asking to select the proper Boot device. You might have attached an extra bootable USB or SSD to your PC and it might have changed the default boot order.
Boot Menu
You can also select the Boot device directly from the Boot Menu by pressing the boot menu key for your Laptop or PC. An ESC, F2, F10, and F12 are the common set of boot menu keys for most of the brands. Keep pressing the boot menu key just after turning on your PC. The specific key will launch the boot menu, select the main HDD, SSD, or USB to boot from that drive. If it boots ups then you are all good to go and also set up proper boot order from the BIOS.
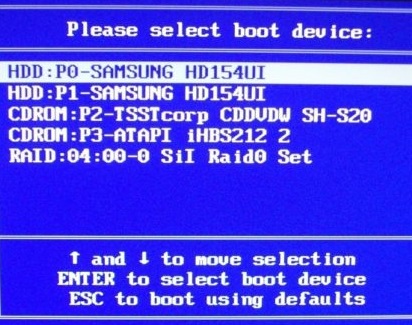
Change Boot Order from the BIOS
The BOOT Menu is also part of a BIOS but it has got a shortcut key to directly boot on the startup. Now let’s change the boot order from the BIOS settings. Keep pressing the BIOS key just after tapping the Power button to start your Laptop or Computer. BIOS key can vary from F12, F10, F2, F11, or Delete for your device. Once you see the old and traditional BIOS Screen on your screen.
Navigate to the Boot tab by pressing the left arrow key. You will see the list of possible and attached bootable devices. Remember to move using the arrow keys and change the order of a boot device using + and – keys. All the instructions will be list on the right panel. Make sure to move your desired HDD, USB, or SSD to the top and rest to the bottom. Also, make sure that your desired device is enabled by default. You can enable or disable the boot device by pressing the Shift + 1 keys.
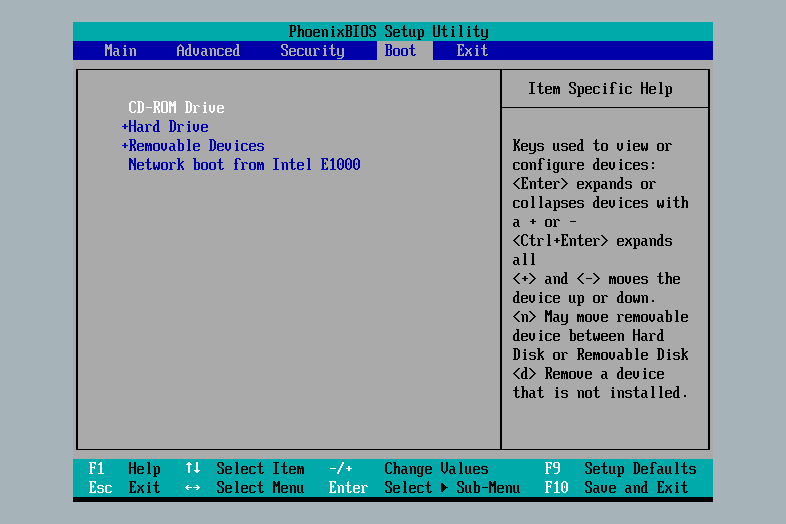
Once you have configured the boot order press F10 to save and exit the BIOS and restart your PC from the bootable drive.
Configure the UEFI & Legacy Boot Mode
Legacy Boot is an old BIOS method to boot your device, whereas the UEFI mode is an advanced and the latest firmware. Most of today’s computers and laptops are configured with the UEFI Mode for a more robust and secure environment. Legacy uses the BIOS firmware to boot your system.
Well, most of the computers have Legacy mode enabled from the BIOS settings. It isn’t that bad or useless but you can try switching the option to try out your luck on fixing the boot device error.
Visit the BIOS settings and go to Boot Options. It may be found directly on the top menu or in the System Configuration tab. Disable the Legacy Support option or change it with the UEFI mode from whatever option is listed on your BIOS. You will find the Legacy Support option in the System Configuration on the HP Laptops and UEFI/ BIOS Boot Mode in the Dell and Lenovo Laptops.
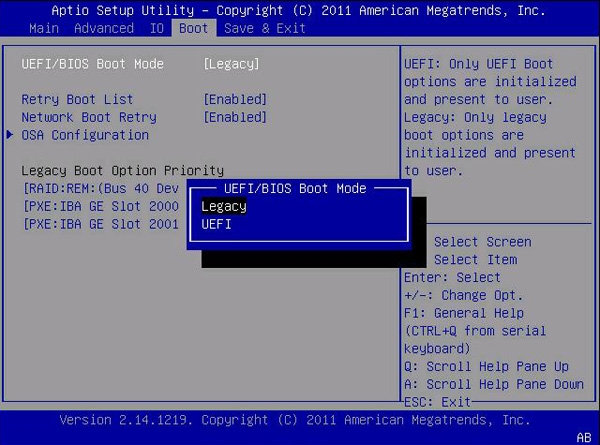
Save settings and exit the BIOS to check if the error still appears or not. Also, recheck after reverting back the changes.
Reset BIOS Settings
Let’s reset all the BIOS settings to remove all our doubts about the incorrect settings. We already tried tweaking the boot order and the UEFI Boot Mode but still, nothing might have worked on your PC. There are few more settings to configure but they will differ for most of the users. So you must apply the ultimate step to reset all BIOS settings to default.
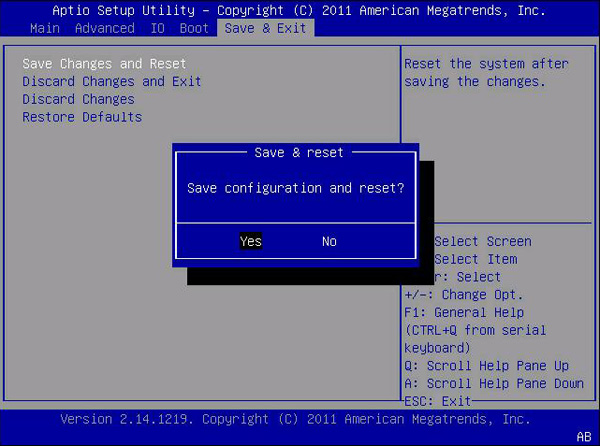
Again these options will also differ for most of the users but will be easy to navigate on your own. You can find the Reset to default settings in the Exit or the Main options. Tap on YES to Load Default Setup and Restart.
Troubleshoot with the Bootable USB or CD
You must have installed the Windows from the Installation CD/DVD or the USB. You will need it again to check for problems with the installed Windows. You won’t need the same USB with the same files but you can create the Windows 10 bootable USB from your friend or colleague’s PC. Plugin the USB and set it as the boot drive from the boot menu.
You will see the Installation Windows with a blue background. Select your Language and Repair your computer from the bottom of the box.
It will take you to the Choose an options screen with the Advanced Troubleshoot options. You can perform the Startup Repair, change the Startup Settings to try booting to the Safe Mode, Uninstall updates, and Change the UEFI firmware settings.
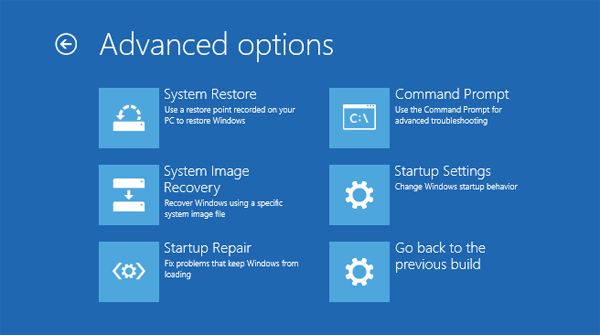
Also, launch the Command Prompt to scan your drive. You can type the cmd command as chkdsk /f /r to find the bad sectors on your drive and repair them.
Plug the Bootable HDD, SSD, or USB into another PC
If you aren’t able to boot the operating system on your PC then try booting the same drive from another PC. First of all, you need to safely detach the drive from your Laptop or Computer. You will just need a screen driver to open the back of your Laptop or the CPU. Do get familiar with the internals by searching for tutorials on your device model. Do clean your internals from the dust and also try rebooting your PC again after temporarily attaching back.
You will need an extra HDD/SSD to USB cable to attach the external drive to another PC. Once you are able to see the connected drive on another PC then it will get fixed else there might major issue with your drive. Now select your attached drive from the boot menu ad if it works then it must boot properly from your PC.