Chrome Enterprise lets your organization manage your Chrome browser settings. Chrome Enterprise is mainly available in an organization with a wide number of users. Multiple organizations like Schools, Colleges, Coaching Centers, Offices, Banks, etc manage their students and employee Chrome Browser settings. Chrome Browser settings on an enterprise level can be managed using Chrome Preferences and Chrome Policy.

Chrome Preferences: Chrome Preferences are saved in the master_preferences file in a JSON format. It consists of various Chrome Settings of bookmarks, toolbar, homepage to the advanced data validation settings. We will talk about each setting while settings up Chrome Preferences File Settings.
Chrome Policy: Chrome Policy consists of more advanced level setting enforcement on the client computers. Just the difference from the Chrome Preferences is Chrome Policy settings can’t be changed by the client. Its deployment procedure is also different than managing simple chrome settings.
Chrome Preferences
Chrome Preferences are the master settings that run when an organization user first time opens the Chrome Browser after booting the system. Later users can make changes in the default Chrome Preferences from the Chrome Settings but it will revert back to the default settings once the system is down. Admin needs to edit the master_preferences file to change the default chrome preferences. Now let’s have look at the Chrome Preferences File and Settings format.
Chrome preferences are individually saved in the user’s computers and are different for each user. Its file can be manually edited by the user themselves. Its settings will act differently as per the user’s choice. Admin cannot make these settings to be compulsorily enforced on users. Settings from the master_preferences file are only applied once, later edits in the file won’t be of any use. Chrome Preferences file location on Windows is “C:\Program Files (x86)\Google\Chrome\Application” and on MAC its location is “~/Library/Application Support/Google/Chrome/Google Chrome Master Preferences“.

Chrome Preferences file follows the JSON format of the key and value pair separated by a colon(:) and commas(,). Basically, the key is the name of the settings in double-quotes(“key”) like “homepage” and “bookmark_bar”. Corresponding Value is the actual setting again encapsulated in double-quotes. Multiple values to the single key are written as an array in the rectangular brackets with values separated by commas like [“valu_1”, “value_2”].
Chrome Preferences File looks something like this:
{

"key_1": "value_1",

"key_2": "value_2",

"key_3": ["value_3_1", "value_3_2"],

"key_4":

{"key_4_1": "value_4_1",

"key_4_2": "value_4_2"},

"key_5": "value_5"

}
Download Chrome Preferences File and make changes accordingly.
Start the Chrome start page by entering your preferred website address.
"homepage": "http://easywebfixes.com"
Make different browser setting changes in the list of browser values, like enable home button by keeping its value true.
"browser": { "show_home_button": true }
You can enable a bookmark bar on all the tabs by keeping the show_on_all_tabs option as true.
"bookmark_bar": { "show_on_all_tabs": true }
Import bookmarks from the HTML file.
"distribution": { "import_bookmarks_from_file": "bookmarks.html", "import_bookmarks": true }
Open multiple tabs with different websites on launching the Chrome Browser.
"first_run_tabs": [ "http://www.google.com", "http://welcome_page", "http://new_tab_page" ]
So these were some basic changes that you can edit in a chrome master_preferences file.
Chrome Policy
Chrome Policy is used to deploy Chrome Settings on user devices by the Admin. Using Chrome Policy Admins can also change basic Chrome Settings like homepage, start page, install extensions, websites, and many more settings. Chrome Policies can be applied to a user device in four different methods namely Device Policies, Cloud Policies, OS User Policies, and Chrome Profile Policies. Device Level Policies always have higher value and are bypasses the remaining three Cloud, OS, and Chrome Profile policies.
All four Policies are depicted in the diagram.
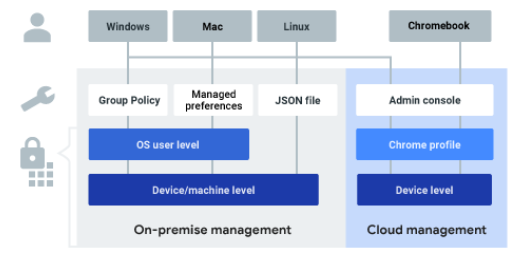
The Profile Icon on the top left corner of the diagram represents the User Devices namely Windows, MAC, Linux, and Chromebook.
The Gear Icon symbolizes the Admin Tools to access and deploy Chrome Policies and Chrome Preferences.
The third Securely Locked Icon is the actual deployment of all four level Chrome Policy on User Devices using Admin Tools.
Once Chrome is successfully installed on the user’s computer Admin can enforce Chrome Policy using the Windows Group Policy tool. You must follow Google Policy Template to setup, install, and update Policies. Chrome Policy can be strictly enforced on users that cannot be changed by users.
How to deploy Chrome Policy?
Chrome Policy can be implemented to Windows, MAC, and Linux systems. You will need Google Policy Template for installing Chrome Policy on the system. Both ADM and ADMX template formats are packed in the zip file, choose one based on your network type.
- Make sure Chrome Enterprise version is installed on your Windows, MAC, or Linux system.
- Extract ADM or ADMX template from the Google Policy Template zip file.
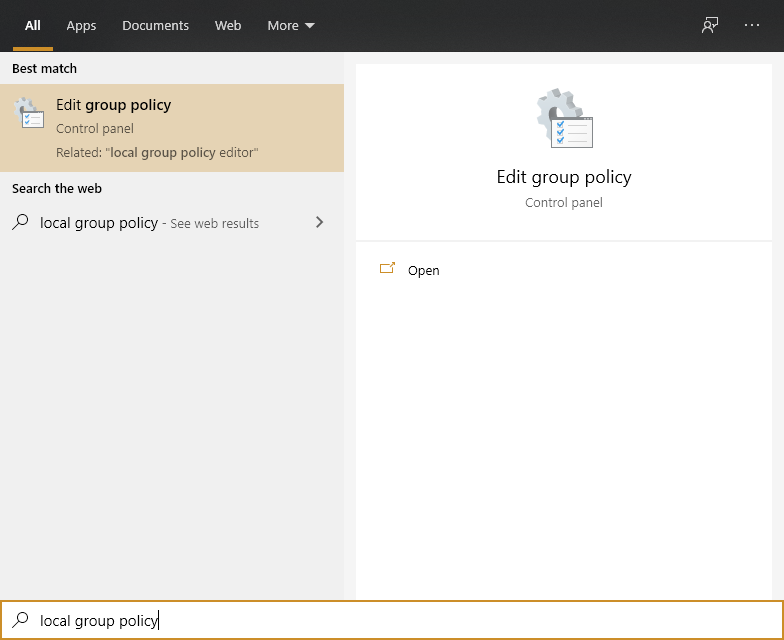
- Search for “local group policy” in the start menu and hit on the first suggestion to open the Policy Editor.
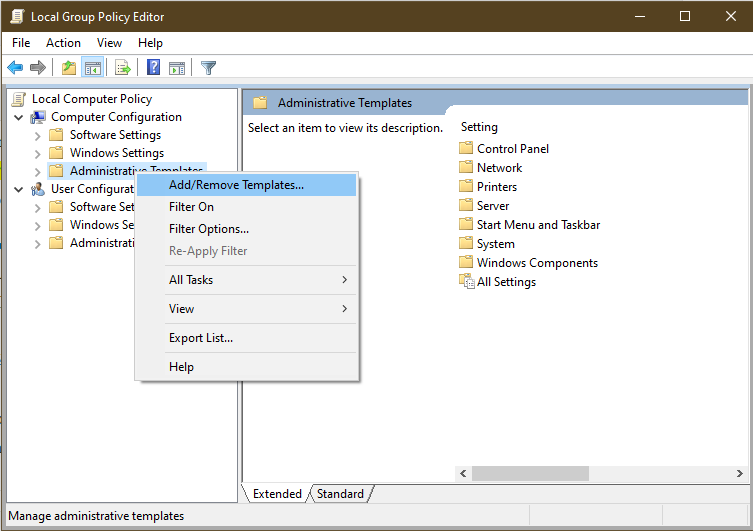
- Right-click or Select Administrative Templates to perform “Add/Remove Templates” Action from the top menu.
- Now add downloaded chrome.adm or chrome.admx template.
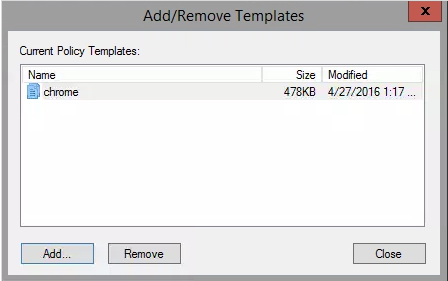
- Google Chrome Folder will be added successfully under Administrative Templates.
Start editing Chrome Policy settings by exploring the Google Chrome folder. You can turn off the auto-updates, import bookmarks, install extensions, and manage other advanced Chrome settings using Chrome Policies.