Microsoft recommended the PC Health Check App to verify the Windows 11 Compatibility for the PC. Despite the higher speed Processor, more than 4 GB of RAM, and 64 GB of storage PC Health Check App still gives an error message.
This PC can’t run Windows 11.
While this PC doesn’t meet the system requirements to run Windows 11, you’ll keep getting Windows 10 updates.
Well, later Microsoft updated their PC Health Check App to give an appropriate reason behind the error. Now users are facing denial due to TPM 2.0, Secure Boot, Processor, and the System Disk size.
Some of the reasons behind the errors are due to the old hardware disabilities but most of them including TPM 2.0, Secure Boot, RAM, Storage, and Processor can be fixed on your PC. Later you can upgrade for free to the new Windows 11.
Read Also: How to download Windows 11
Contents
This PC can’t run Windows 11
This error message mostly appears while checking for Windows 11 free upgrade or while installing. Similar solutions are applicable for both cases. We will cover all error messages by the PC Health Check app. So let’s get started.
Secure Boot
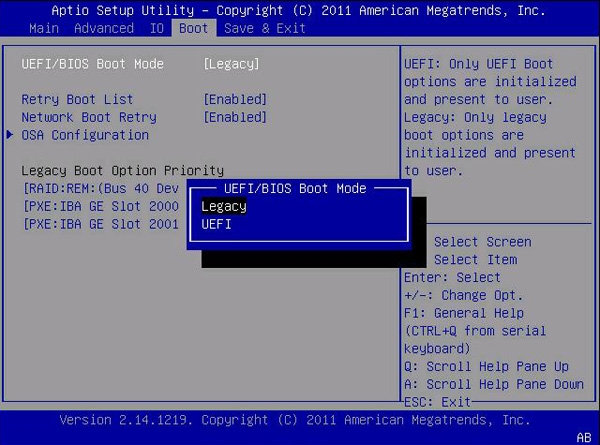
Mostly, the latest PCs are shipped with the Unified Extensible Firmware Interface (UEFI) functionality. It uses a more protective and fastens boot method to wake up your operating system. The UEFI also means the Secure Boot, in reference to Windows 11 requirements.
The UEFI uses a more secured booting process than BIOS Legacy booting. To enhance the PC boot security and the boot speed, Microsoft makes it compulsory to use the UEFI Secure Boot mode.
It is available for almost all users but in order to be backward compatible and do not lose the data you might have kept the Windows 10 on the traditional BIOS mode. It was the only feasible option in order to install the MBR bootable USB with Windows 10.
Shut down your PC and keep pressing its BIOS key to boot your device into its BIOS settings. Navigate to the Boot, Security, or System Configuration tab to locate the UEFI or Legacy Boot option and just enabled the UEFI or Secure Boot option.
TPM 2.0 for Windows 11
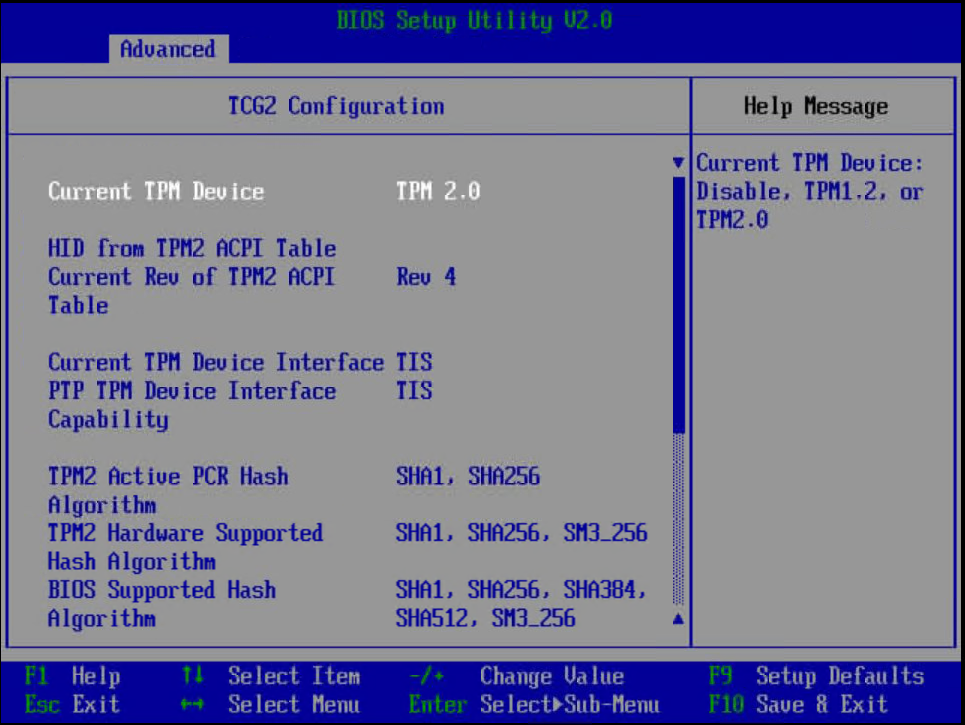
The Trusted Portable Module (TPM) is also a requirement for running Windows 11. It will only support the availability of the TPM 2.0 and not the TPM 1.2. Earlier users were confused on whether TPM 1.2 will be supported for Windows 11 or not. It’s a big no by Microsoft.
The TPM 2.0 chip is also a solid hardware-level demand to tight the firmware securities. This chip is used to create and save the authentication keys on the hardware level. It will be used for device verifications and encrypting the important data. It will also block the malicious program from harming the basic BIOS level.
Windows 11 will verify the device certificates on the new installation with the unique generated keys. This will also stop the Windows 11 piracy along with other paid programs.
The TPM 2.0 can be changed or enabled from the BIOS or UEFI settings. Go to the Advanced or Security tab and enable the TPM 2.0 or PTT (for Intel) option.
Processor isn’t Supported
Microsoft has also increased the basic Processor requirements for Windows 11. Well, the 2 core 64 bit processor with 1 GHz clock speed looks normal but later Microsoft released the list of specific Intel and AMD processors.
All the Intel processors support for Windows 11 include Atom, Celeron, Core, Pentium, and Xeon in the list. A very few Intel Atom series include x6200FE and later. The Intel Celeron G4900 and the new processors are included in the list. Microsoft also suspended the support for all the Intel Core processors below the 8th generation. The very specific Intel Pentium Gold, Silver, Bronze, and Silver are included in the list.
The AMD processors are also clearly mentioned on their portal. All the AMD Ryzen 3, 5, 7, 9, and Threadripper series are included in the list.
Our main question is how to resolve this processor isn’t supported error? Well, you have to wait until the latest announcement by Microsoft and some workaround will surely be available in a meantime. Processor upgrades only for Windows support aren’t that mandatory.
The system disk needs to be 64 GB or larger
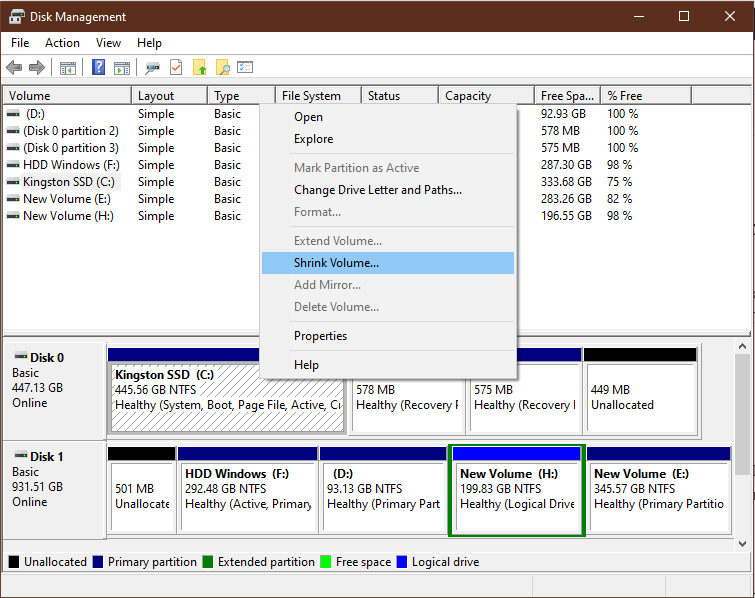
Microsoft has doubled the system disk requirements by 64 GB for the system files of Windows 11. Earlier only 32 GB was mandatory for Windows 10. It might be due to the 64 bit system apps and files.
The total system partition has to be more than 64 GB and not the total disk size. Previous Windows system partition might be less than 64 GB despite the 1 TB hard drive. Back up the files to merge all the partitions. Then go to the Disk Management, right-click on the extra partitions, and collapse them to the System Partitions.
RAM Size
Microsoft also increased the minimum RAM need to 4 GB. If you are still on less than 4 GB of RAM then right away you must upgrade to the 8 GB faster RAM. Most of the PCs and Laptops give the option to plug more than 2 sticks of RAM. Two RAM sticks of 4 GB each are faster than a single 8 GB stick.
You can check the RAM by launching the PC Information APP from the Start Menu search.
Hopefully, you have understood all the requirements and were able to turn the message into, This PC can run Windows 11. You have to wait until the beta and the stable release from the Windows Update settings.