You must have heard enough about the UEFI and Secure Boot requirements for Windows 11. Almost all the latest PCs have got the UEFI and Secure Boot feature but the question is how to exactly enable both the features? Well, the UEFI is just modern technology used in place of the Legacy BIOS and Secure Boot can be enabled from the UEFI settings.
Despite their simplicity, it can create a lot of problems with your working Windows 10 PC. So, make sure you follow the steps in order to turn on the Secure Boot option.
Both the UEFI and Secure Boot options required the GUID Partition Table (GPT ) partition type. That is, your current Windows 10 must be installed on the GPT partition and not the MBR partition. The GPT is the advanced partitioning that supports infinite partitions.
The first step is to check for the Partition Type, then convert it to the GPT type without losing the data, and finally enabling the Secure Boot from the UEFI firmware. Skip directly to the enabling process if your disk partition type is GPT.
Read Also: How to download Windows 11 Insider Preview on any PC?
Contents
Check System Partition Type
You might have remembered or faced the MBR or GPT partition conversion error on installing Windows 10. It’s better to confirm the partition type than keep assuming. It’s a simple process without any technical tweaks, so anyone can know their system disk partition type.
- Launch the Start Menu and search for Create and format hard disk partitions.
- Right-click on the System Disk to open Properties.
- Go to the Volumes tab and look for the GPT or MBR in the Partition style.
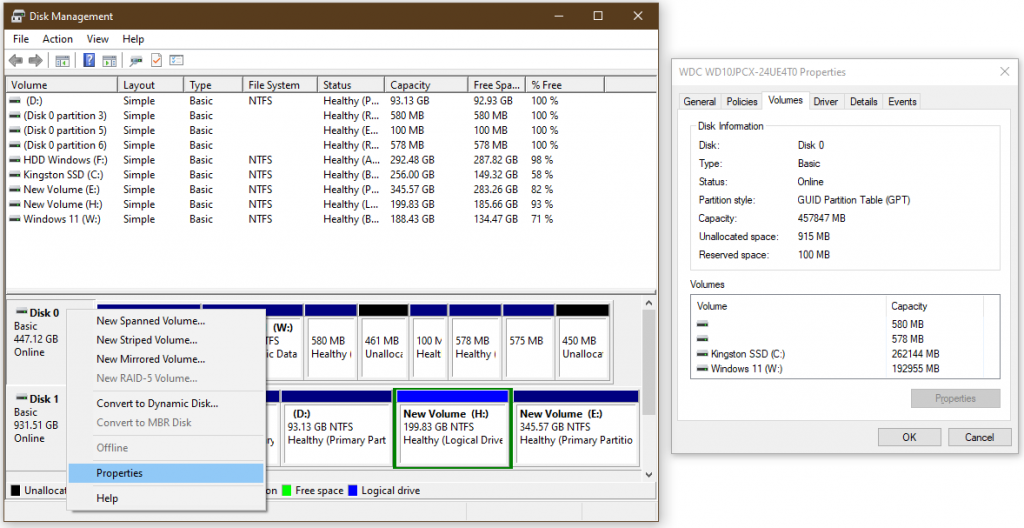
If it’s GPT then directly enable the Secure Boot from the BIOS or UEFI settings. If the partition style is MBR then convert it to MBR before enabling the Secure Boot and UEFI options.
Check the Boot Mode and Secure Boot State on the PC
Boot Mode and Secure Boot State can be easily checked from Windows even without running the PC Health Check App to validate Windows 11 system requirements.
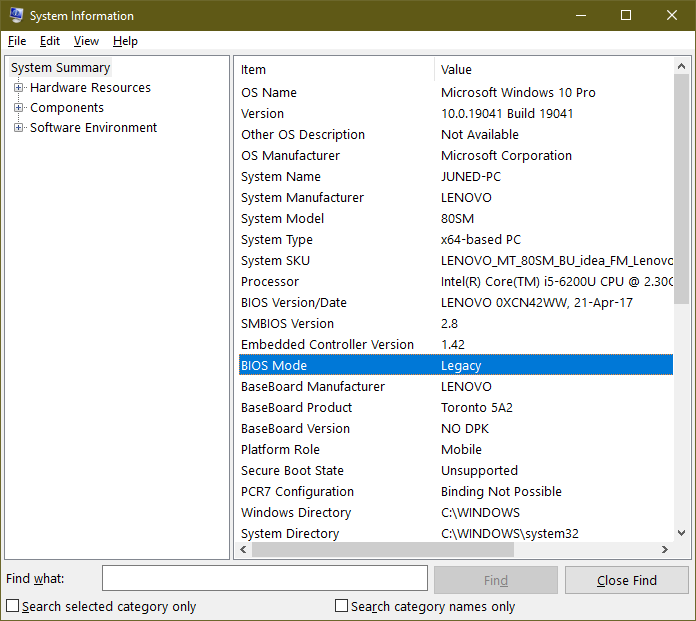
Head to the Start Menu and search from the System Information to launch the app. The Windows Information app lists all the hardware as well as software information in the form of tables. The System Summary, Hardware Resources, Components, and Software Environment tables list is on the left side and their information is listed on the right side.
The BIOS Mode and the Secure Boot State are listed on the Right Side. Find them by searching in the bottom box. Well, the BIOS Mode may be set to the Legacy and Secure Boot State may be Unsupported on your system. These options are set as per the BIOS settings and the Disk Partition Type. Both the options can be changed by following our methods.
Read Also: Fix Windows 11 can’t run on PC
Convert the Disk: MBR to GPT
Earlier it was a tough process to convert the MBR disk to the GPT type. Especially the System disks, as first you have to back up the data to format the disk, then convert the disk partition type to GPT, and again move back to the data. It was a time-consuming process but Microsoft made it a one-step easy process without losing the data on the disk.
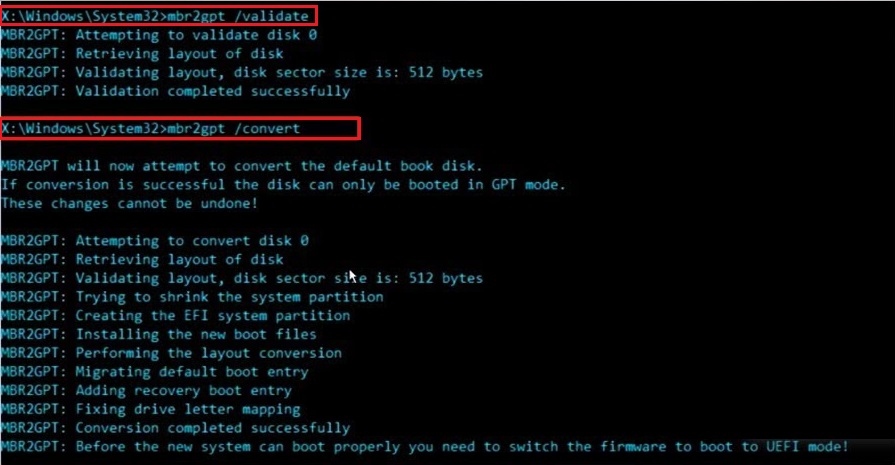
We will use Microsoft’s MBR2GPT tool from the Windows Recovery Environment. You just have to run a few commands from the Command Prompt.
Press the Windows key, tap on the power option and Restart by pressing the Shift key to launch the Windows Recovery Environment. Navigate to the Command Prompt by choosing the Troubleshoot > Advanced options path. Now enter the first as mbr2gpt /validate, to get the conversion validation. It will report an error if the disk can’t be converted. If successfully validated then run the mbr2gpt /convert command to perform the MBR to GPT conversion.
Now it’s time to change the Boot Mode to the UEFI and enable the Secure Boot from the BIOS settings.
Change BIOS Mode to UEFI and Enable Secure Boot State
The UEFI stands for Unified Extensible Firmware Interface and it’s an advanced BIOS option to boot the Operating System on Windows. Mostly, the GPT partition style runs on the UEFI Boot Mode and it might not run properly on the Legacy BIOS.
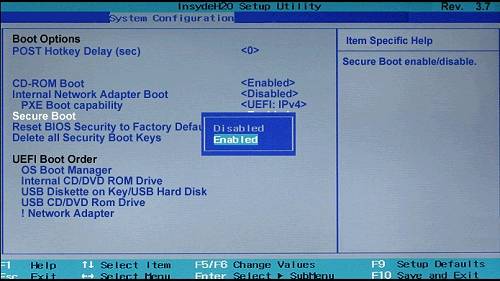
Once done with the conversion, straight away boot to the BIOS or UEFI settings of your device. Turn off your device and keep pressing the F1, F2, F10, F11, or Delete BIOS keys before booting up the OS. Change the Boot Mode to the UEFI and Enable the Secure Boot from the Boot, Security, or Advanced Bios options.
Explore all Boot, Security, and Advanced tabs on the BIOS settings. The BIOS Legacy option will mostly appear in the Boot options. Change the BIOS mode to the UEFI option. Also, look for the Secure Boot State in the Advanced or Security to Enable it for Windows 11 support.
Also, enable the TPM 2.0 settings under Advanced or Security options. The TPM 2.0 option appear with different AMD fTPM or Intel TPM name.
Save and Exit the BIOS to check for the changed settings in Windows 10. Your PC will support Windows 11, once BIOS mode is changed to the UEFI and Secure Boot is enabled from the BIOS.