It is said that Windows 10 is having advanced features than the previous version of Windows but we can’t deny the fact that in Windows 10 there are some problematic services that cause the high CPU usage and RAM usage which slows down the Windows 10. So, in this blog, you will able to know about a Service Host Superfetch which causes high cpu, ram and memory usage problem. You will able to know what is Superfetch and how to disable it if it causes the issues in Windows 10.
Contents
What is the Service Host Superfetch in Windows 10?
Superfetch is a feature that was initially introduced in Windows Vista. It was introduced or we can say launched as the successor to Prefetch. It is a service that works to launch any program or application faster and it tries to boot the speed of the responding system faster. Many users are in confusion that how does the Superfetch launch the application faster? So, you don’t need to worry you are on the right platform which will provide you beneficial information about Superfetch. Superfetch is like a Software Reporter Tool for the applications because it maintains the eyes on the application which is used more by the users and it pre-loads that application in RAM so that the application can be launched quickly. If there is no Superfetch on your system all application and programs will take somewhat time to open because that applications and programs have to call from the hard drive.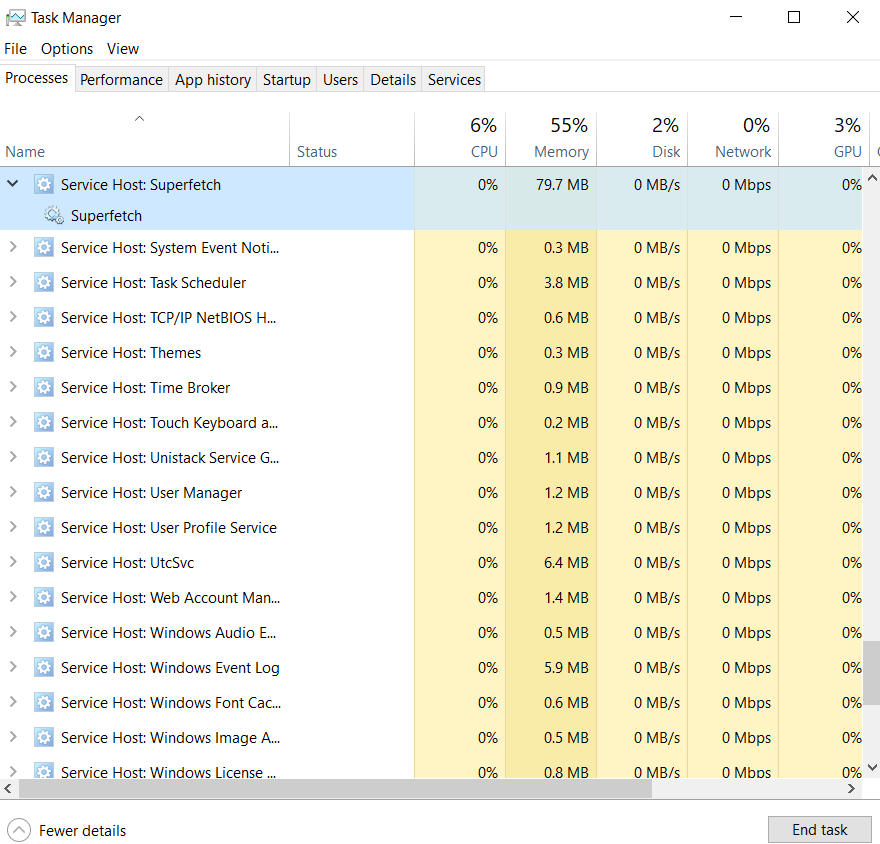
But if constantly Superfetch is enabled on your system then it will fill up the memory and most importantly causes the high CPU usage and RAM usage which will slow down your computer performance. If you want to see this feature just go on task manager you will have all the information about Superfetch like its CPU and Memory Usage. The best way to get rid of this problem is to disable Superfetch if you think that it is creating a problem on your Windows 10.
How to disable Superfetch?
As I have told you that due to the above reason you have to disable or we can say turn off Superfetch as soon as possible because it creates more problems for Windows 10. So, taking an eye on these issues we have studied the whole concept and we have come with two best tricks by which you can disable Superfetch faster. So, two tricks are as follow:
- With the help of Services App
- With the help of Command Prompt
So, above are the only tricks which will give you the idea on what to do and below are the solutions which will help you out to implement these tricks to disable Chrome Processes in Task Manager Windows 10.
Disable Superfetch from the Services App
This method is the simple and easiest method to disable Superfetch. To do so follow the below steps in sequence so that you get the expected result by applying this trick.
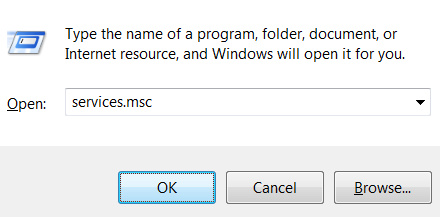
- Step 1: At first go on the Start menu and hold Windows key + R key to have run dialog box on your screen.
- Step 2: Once you have run dialog box type services.msc and hit on the OK button.
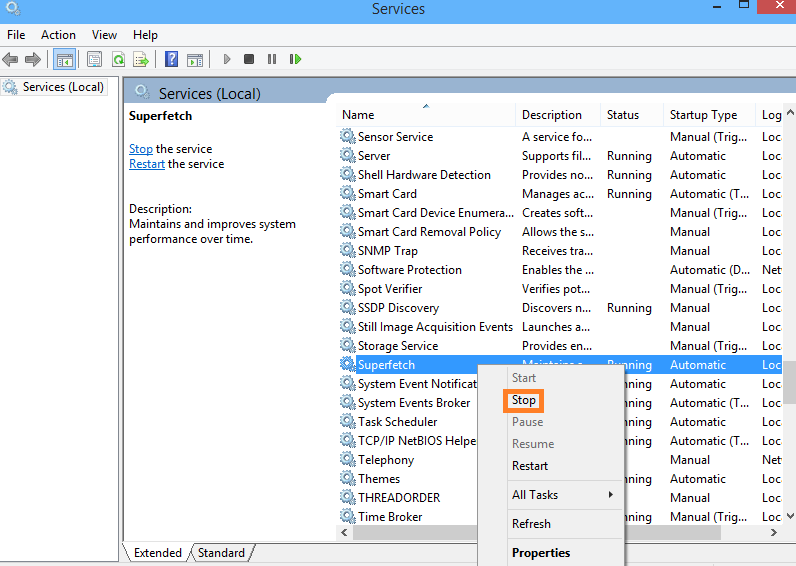
- Step 3: Now you will be navigated to the services screen to find Superfetch scroll all services until you don’t find Superfetch. Once you find it do right tap on it and hit on Stop.
- Step 4: By Clicking on Stop option the Superfetch is now disabled but sometimes it runs automatically so to overcome from it follows step 5.
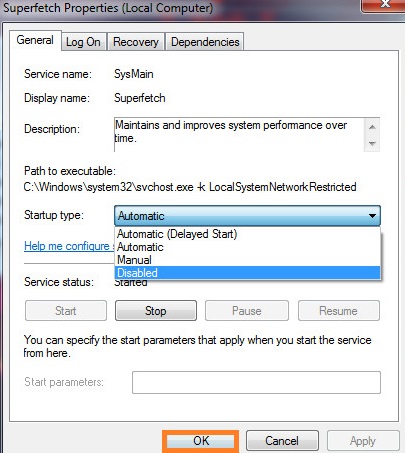
- Step 5: Once again in services screen do right tap on Superfetch and hit on Properties and go on General tab then change the Startup type from Automatic to Disabled.
So, this was step by step guide to disable Superfetch. I must say that read the steps properly so that you won’t face any problem in disabling Superfetch on Windows 10.
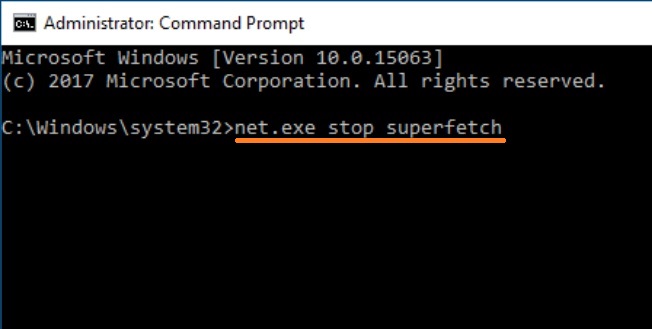
Disable Service Host Superfetch using Command Prompt
As we know that the above method is a common method but if you fail in using the above method or trick I must say that you should use this trick because this will surely help you out in disabling Superfetch easily. So, follow the steps to stop the superfetch service.
- Step 1: Go on the Start menu and hold the Windows key + R key to have a Run dialog box.
- Step 2: Once you have run dialog box type cmd and hit on the OK button.
- Step 3: Now you will be navigated on Command Prompt screen. On it write the command as net.exe stop Superfetch and hit Enter to execute the command.
- Step 4: Once again write command as sc config sysmain start=disabled and hit Enter.
Finally, your Superfetch service or we can say the feature is disabled. So, this was the simple method to disable Superfetch in an easy way.
I hope that this much information is enough to understand the concept of Superfetch and these tricks are also enough to disable Service Host Superfetch on Windows 10. If you aren’t getting the expected result from the first trick then you should go for the second trick, which will definitely prove helpful to you.