As we know that Google Chrome is a worldwide platform which provides a number of benefits to its users and clear about users doubts related to any browsing problem. Google Chrome has many features which are good and has its popularity because of its features. Apart from this chrome also allow the user to change the setting of it as per liking. So, you can do toggle off and on as per your liking. And make sure that you change the setting with enough knowledge because if you don’t know by changing particular setting what will happen then Google Chrome might not run smoothly as per your liking.
What is WebGL in Chrome?
In google chrome, there is one option name as WebGL which you can enable it with the help of this blog. Some users don’t know what is WebGL and for what it stands. So, here is your answer, WebGL is an API which gives permission to you to introduce 3D and 2D computer within your browser. The full form of WebGL is Web Graphics Library. What I like most in WebGL is that it does not need any plugin or third-party extensions to connect.
How to enable WebGL on Google Chrome?
Many users don’t know how to activate WebGL on chrome because google chrome does not have the capacity to switch on or off of webGL and even it is not a part of its common settings. To do toggle off or on of WebGL, you have to see the below whole process till last. And many users do not know where it exists. So, follow steps to enable WebGL on google chrome.
- Step 1: First and foremost step is that just open the Goggle Chrome in your device.
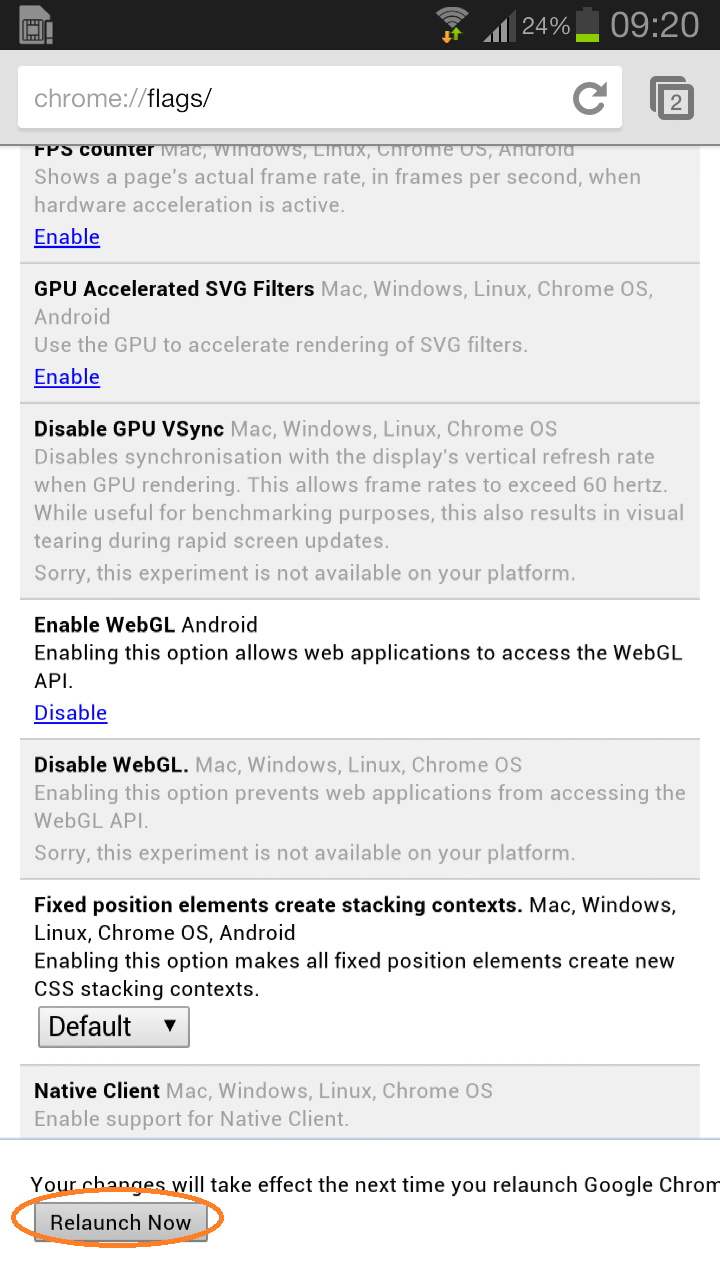
- Step 2: Now write chrome://flags/ in the Address bar and hit enter. By hitting on enter you can see experiments.

- Step 3: You will see a new interface showing Disable WebGL just scroll it and tap on Enable option. If Disable WebGL is already disabled you will know by seeing it because instead of having the disabled option you have to enable the option. It means WebGL is enabled in your google chrome.
- Step 4: Finally tap on Relaunch Now and your chrome will be restart by which all settings you made will take place. After restarting your google chrome you will see WebGL enable and Web application will easily access the WebGL API.
So, this how you can turn on WebGL option on chrome and make your problem solved related to it. Make sure you read the whole process from starting to ending so, that you can have an ultimate result.
Read Also:
So, this was the whole blog on “How to enable WebGL on Google Chrome”. With the help of this blog, you can enable WebGL on Chrome and make sure that you follow all the steps one by one so that you can have a result which you expect. I am sure if you read the whole blog and apply steps given above you won’t face WebGL errors on Chrome.