Well, the first thing we do on our Window is connecting the internet. What if you try to connect it using WiFi but it won’t work or show? You will be frustrated and confused. There are many users who have reported about Windows 11 WiFi Not Working or Showing issues. After reading WiFi not connecting or showing issues from different forums we are here with a complete guide to fix it.
In this guide, you will see causes, quick fixes, and advanced fixes of WiFi not working or showing problems. Make sure you read this whole guide till the end in order to solve it. Let’s start with causes first. There are multiple causes of the Windows 11 WiFi issue but here below are the most common causes.
- Windows 11 Misconfigured Settings.
- Outdated or Corrupted Network Drivers in Network adapter.
- If there is an app or program conflict with WiFi on your Windows 11.
- Router and ISP problems.
- Wrong IP Configuration.
- If the WiFi icon is hidden.
- If there is an issue in the recent or we can say the current version of Windows.
After reading the above causes try applying the below quick fixes.
- At first, try connecting another device. It is because it will show on which device you have a problem. If you are able to connect another device then it means that problem is with Windows 11 PC. If the connection fails then it is clear that there is a problem with the router. For it restarts your Windows 11 PC and router.
- Enable and disable Airplane Mode on your Windows 11.
- Make sure that a WiFi adapter is enabled in Windows 11.
- Maybe there is a problem with the current connection. So, try to reconnect with a WiFi connection.
- Make sure that the router is closer to the Windows 11 PC.
- Disable Windows Firewall and Metered connection.
If applying the above quick fixes won’t fix the WiFi connectivity issue then it’s high time to jump on the below-advanced fixes.
Fix: Windows 11 Blue Screen Error
Contents
Run Internet Connections Troubleshooter
In Windows 11 there is a number of troubleshooters to fix Windows errors and codes. For WiFi and internet issues we have an Internet Connection troubleshooter. This troubleshooter will identify the issue and will fix it. Follow the below steps to run the Internet Connection troubleshooter on Windows 11.
- Hold Windows key and I key to have Windows 11 Settings.
- Go to the System tab and then tap on the Troubleshoot option from the right side.
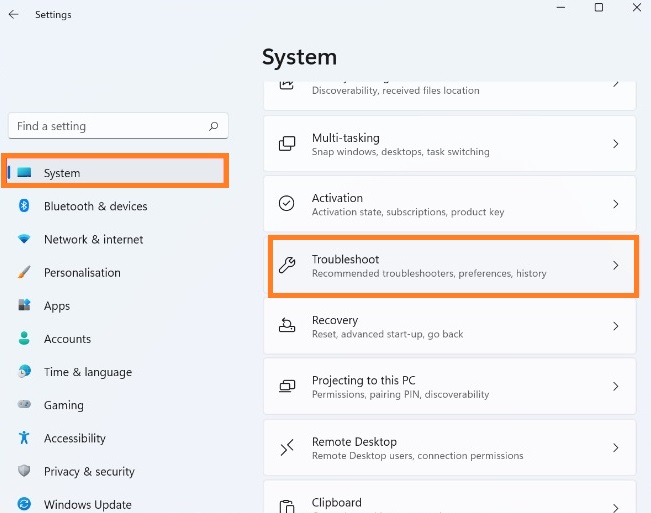
- Now tap on the Other troubleshooter option for the further process.
- After this, you will have a list of troubleshooters. In the list look for an Internet Connections troubleshooter. Once you get it then hit on Run button.
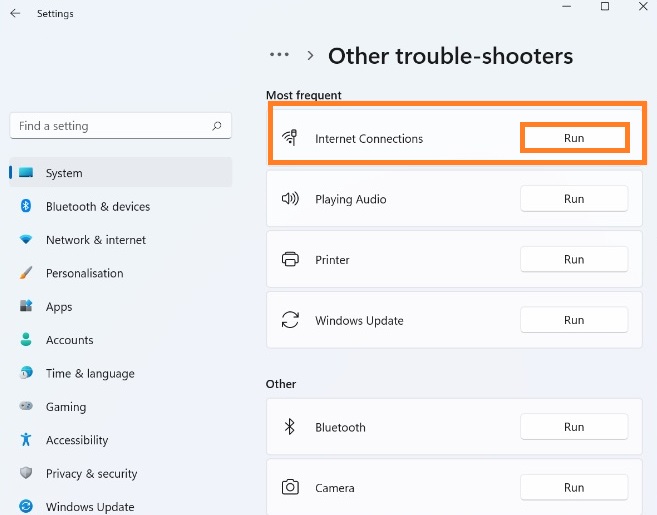
At last, you have to follow on-screen instructions in order to complete the troubleshooting process. After completion of this process check that you are able to connect to the WiFi network.
Read Also: Fix Bluetooth Not Working on Windows 11
Reinstall WiFi Drivers
As I have said above that outdated and corrupted WiFi drivers are the most common cause of Windows 11 WiFi not working or showing. You can fix these wifi drivers by reinstalling them on Windows 11. There are two ways to reinstall WiFi drivers. First, you have to uninstall drivers and then Windows will install needed drivers automatically. Second, you have to navigate to the manufacturer’s website to manually download and install needed WiFi drivers. The simplest and easiest method is the first one which is the auto method but sometimes Windows won’t install needed drivers. Here we are going with the second method so that we can download the required drivers manually.
- Launch Device Manager using the Search field of your Windows 11.
- Now do tap on the Network adapters option to expand it.
- From the downward menu do a right tap on your wireless driver and then hit on Uninstall devices option.
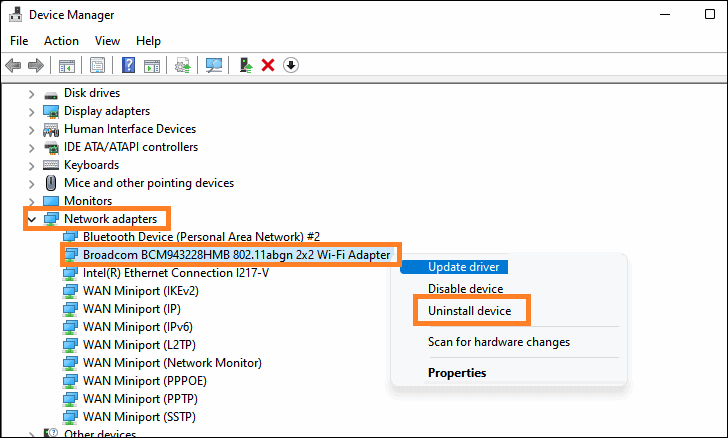
- After the uninstallation, navigate to your motherboard’s manufacturer’s official website. Download the required drivers and then install them.
After all this check that the WiFi icon is available at its place and it is working as usual on your Windows 11 OS.
Read Also: Download Windows 11 HP Laptop Driver
Reset Network Settings
As it is network related issue there may be misconfigured network settings be the main cause of this issue. To fix it you just have to reset network settings on Windows 11.
- Go to the Start menu and search for Settings. Once you get it then from the left pane tap on the Network & Internet option.
- After this click on the Advanced network settings from the prompted screen.
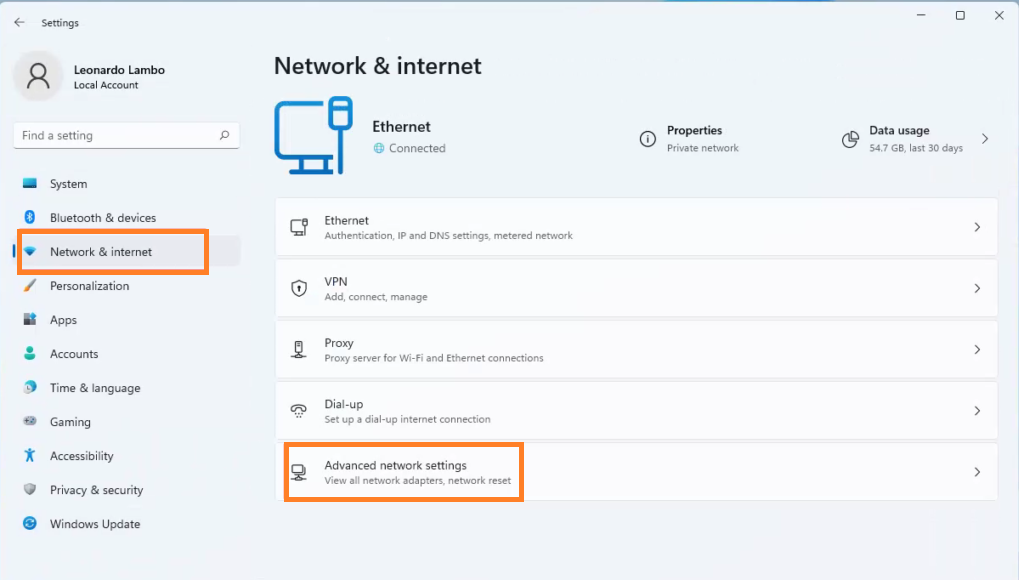
- Now tap on the Network reset option from the Advanced network settings screen.
- At last hit on the Reset now button which is at the right side of the window.
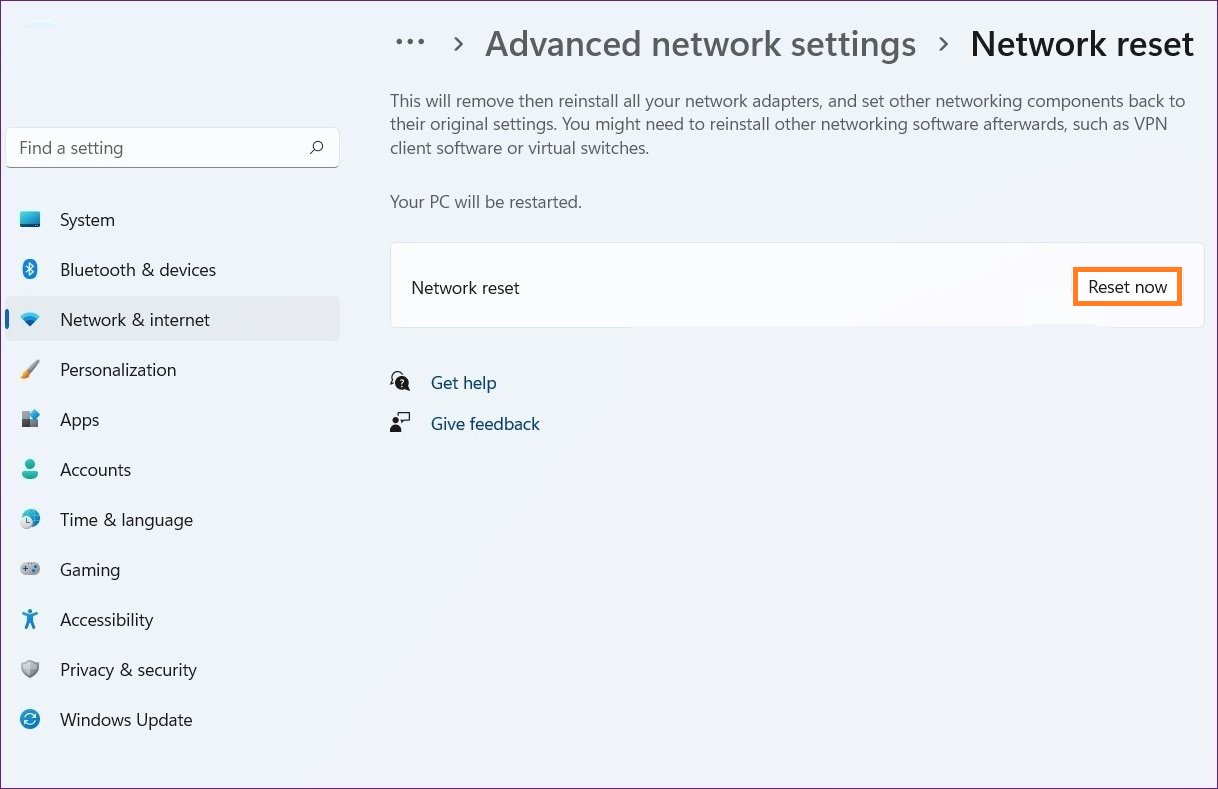
Now your Windows 11 will be restarted automatically for resetting settings. Make sure you save current work before applying the above steps because due to automatic restart all work will be deleted.
Release/Renew IP Address
The incorrect Internet Protocol can be the main cause of WiFi issues on Windows 11. To fix it you have to release the internet protocol and then you have to renew it. You can do it using Command Prompt.
- Launch Command Prompt on your Windows 11. You can open it using a Run dialog box. Hold Windows key and R key and then enter CMD in it.
- Once you have it then enter the command as ipconfig /release. This command will release the current IP address.
- After this enter the command as ipconfig /renew. This command will create a new IP address.
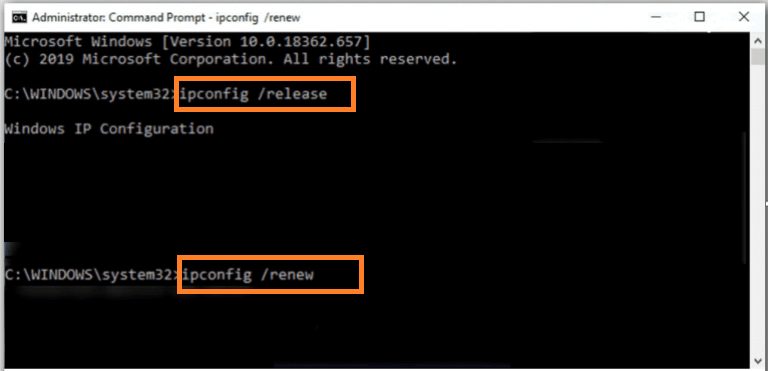
Finally, check that you have a valid IP configuration.
If applying the above fixes has not fixed the Windows 11 WiFi connectivity issue then install the latest update of Windows 11 following the path as Windows 11 Settings > Windows Update > Check for updates. If you are already on the latest update then roll back to the previous update.
I hope that now you have fixed WiFi not showing and working issue on Windows 11.