Well, in this techy world internet plays a very important role. Without the internet, you can’t have a web experience. The internet is key for every solution nowadays. For the internet in schools, colleges, institutes, business houses, organizations there is Wifi or ethernet cable. In most of the places nowadays Wifi is used because it is wireless and keeps the place neat and clean. Whereas ethernet cable has wires which creates several problems. It does not mean that Wifi does not create a problem. It has problems like short-range.
Many Windows 10 users reported that shorter Wifi range issue. There are many reasons behind this issue but some of them are common which are listed below.
- If you have recently updated Windows 10.
- If there is an outdated network driver.
- If your wireless card is not working properly.
- Your router may be problematic.
So, these were the common causes behind wifi range issues. In this article, you will see the 4 best fixes to get rid of Wifi range issues. Make sure you go with this whole blog.
Contents
Update Network Adapter Driver
Drivers are essential for the smooth working of any device. If there is something wrong with the network then it means that the network adapter driver is having a problem. Users reported that the Wifi range issue is mostly caused by an outdated network adapter driver. There are two ways to update the driver the first one is automatic and the second one is manual. In this guide, you will see the manual method.
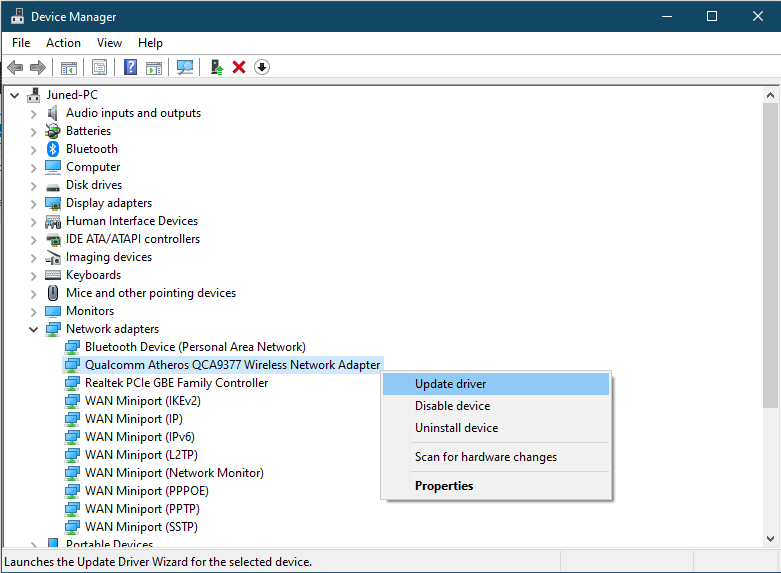
- At first launch the Device Manager. To do so search for it in the search bar.
- Once you have it then go on the Network adapters section and do a right tap on the network adapter driver.
- After this hit on the Update driver option from the open menu.
If updating won’t work then you can uninstall the driver on a temporary basis. To do so do right tap on the network driver and hit on the Uninstall device option from the open menu. At last, do restart your Windows 10.
Set Wifi adapter power settings to maximum performance
It said that wifi adapter power is by default set as a medium performance which causes wifi range problem. To solve it you have to set wifi adapter power settings to maximum performance. Doing this will surely increase the range of wifi on Windows 10. For this follow the below steps.
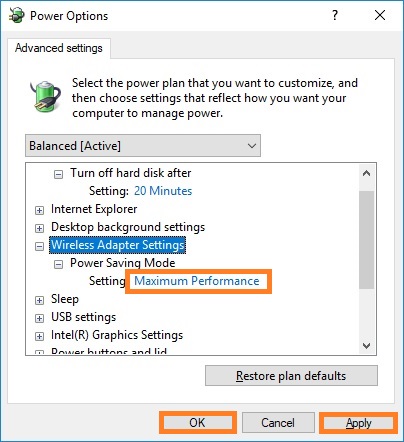
- Go on the search bar and search for the power options and then tap on the Power Options from the result below.
- Once you have the Power Options window then go on the current plan and tap on the Change plan settings.
- After this tap on the Change advanced power settings.
- Now it’s time to set Power Saving Mode to Maximum Performance so go on the Wireless Adapter Settings for it.
- Once you are done with this then tap on Apply and then hit on OK button. Doing this will save the changes.
Check that it fixes the wifi range issue on your Windows 10. If this won’t increase the wifi range then go on below fixes.
Disable Bluetooth
Bluetooth is one of the best sharing tools. If the wifi and Bluetooth both are enabled at the same time then there may be a problem because multiple signals interfere with each other. The interference of both creates the problem. If you don’t know how to disable it then go with the below steps sequence.
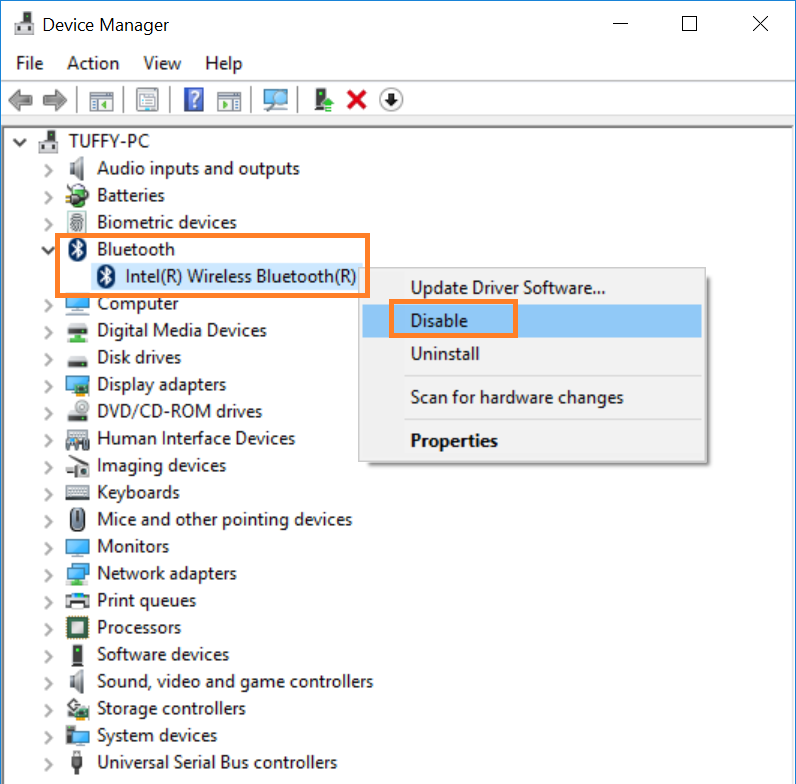
- For this, you will need a device manager to hold the Windows key and X key to have a quick access menu.
- From it tap on the Device Manager option.
- In Device manager go on the Bluetooth section and do right tap on the Bluetooth adapter.
- From the open menu tap on the Disable option.
So, this is how you can disable Bluetooth on Windows 10 using the device manager. It may increase the wifi range on your Windows 10.
Run Network Troubleshooter
In Windows 10 there are multiple troubleshooters that troubleshoot several issues. For network issues, there is a network troubleshooter. You have to run it on your Windows 10. If you don’t know how to run it then go with the below steps.
- First of all launch the Settings app.
- From it tap on the Update and Security option.
- Below the Update and Security section in the left pane tap on the Troubleshoot option.
- It will be open on the right side on the same screen. Now tap on the Network Adapter and hit on the Run the troubleshooter button.
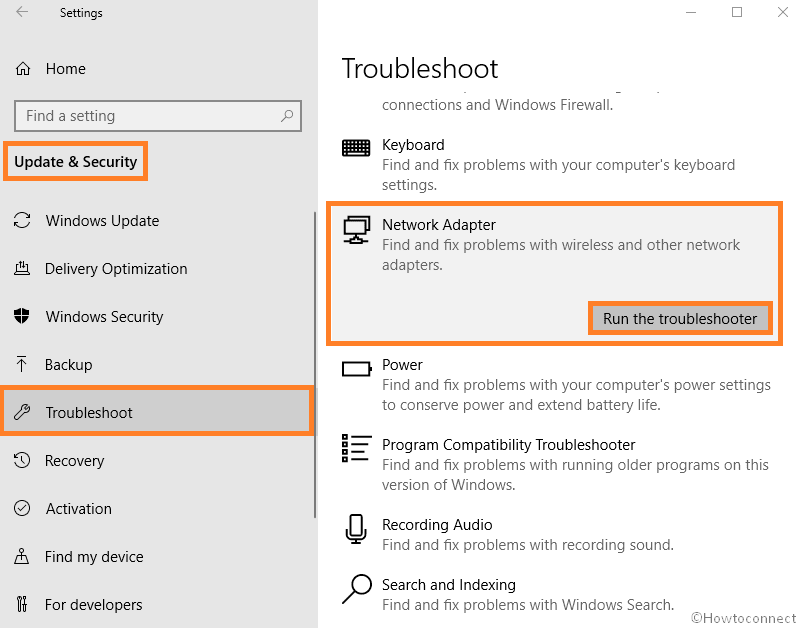
- You can also run an Internet Connections troubleshooter.
I hope running network troubleshooter on your Windows 10 has worked.
If all the above fixes have not worked then it means that there is a hardware issue. For this, you have to replace your old modem or router with a new one. Make sure you replace it from a trusted store or place. I hope this blog has been proved beneficial for you to get rid of Wifi range issues.