You might start your HP Laptop and Windows 10 directly boot to the Preparing Automatic Repair black loading screen with the Windows logo. Generally, we press the laptop power button to start the device in the sleep, hibernate, restart, or turned off state. Your Windows 10 HP Laptop might have suddenly crashed into the black screen and after the force shut down your device has booted to the automatic repair screen. There might be tens of appearances but ultimately your HP Laptop is stuck in the black screen repair loop.
Your HP Laptop might have stuck into the infinite automatic repair loops without any options. The black screen will just keep loading with the Windows 10 logo and “Preparing Automatic Repair” message. You might have no way out other than your Laptop charging goes null or you manually remove the battery. Even holding the power button will just terminate the process and again pressing the start button will flash the same repair screen on your HP Laptop.
Windows 10 Automatic Repair is its own inbuilt feature to help users to fix the Windows 10 through several options. Several options are suggested under the Windows 10 repair. You can choose from System Restore, System Image Recovery, Startup Repair, Command Prompt, Startup Settings, and Previous Build options. These options will appear after the Preparing Automatic Repair on the HP Laptop Screen. But for most HP users this black screen doesn’t go away and even if does then also the same process repeats after selecting any option. Even errors can occur while troubleshooting with the available options and operation couldn’t be performed successfully. You are on the right page to fix this automatic repair loop on any HP Laptop.
Contents
Perform Hardware Checkup on your HP Laptop
If you are using your HP Laptop or Windows 10 device for the last two years or you just purchased it before the six months then you must perform the Hardware Checkup in case of boot loop errors. It will basically check for all the input and output devices attached to your Laptop or computer. It will perform the quick tests on the Hard Disk Driver(HDD) or Solid State Drive(SSD) whichever is selected as boot drive and RAM memory. It might take some time based on your processor speed but it will immediately inform the problems if found. Some users have reported problems on Hard Drive (HDD) or SSD and they also got the warranty cover from HP but most were complaining about losing important data from the storage. So be your faith in God and let’s pray your HDD doesn’t show crashes in the below Hardware Checkup.
- Forcefully shut down your HP Laptop or PC by holding the Power button for 10 seconds.
- Press the Power button to turn on your device and keep tapping on the ESC key.
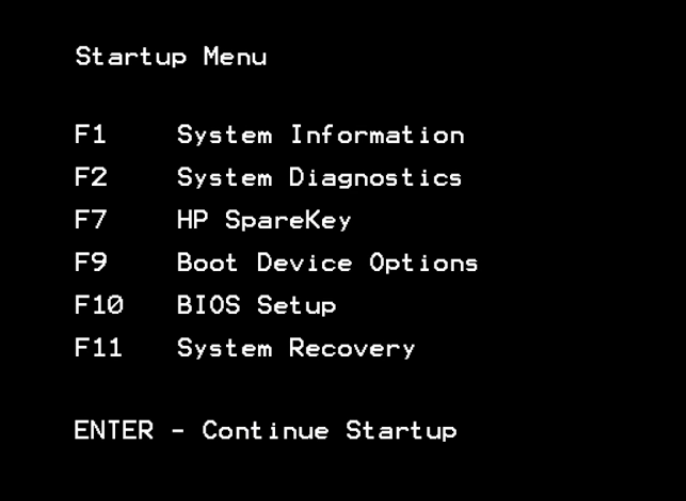
- It will launch the HP Startup Menu options. Tap on the F2 keyboard key to launch the HP Hardware System Diagnostics tool.
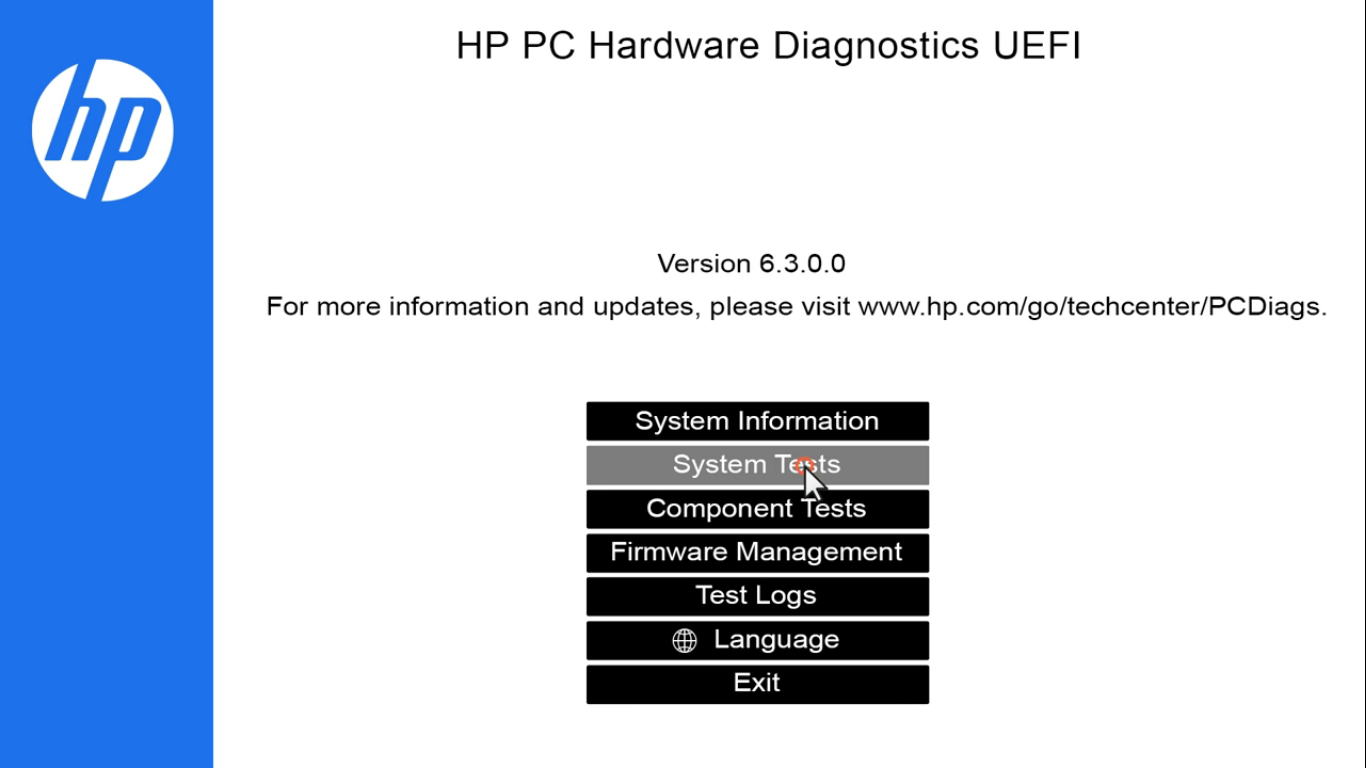
- Select the English language run the HP PC Hardware Diagnostics UEFI tool.
- We will run System Tests and Components Tests from the list of options. First, take your mouse cursor on the System Tests.
- We will RUN Fast Tests to perform the fastest checkup of your all Hardware and then based on the no error output we will also RUN the Quick Tests and Extensive Tests for the confirmation.
- Once you are done with all the System Tests then go back to the Main Menu and Perform the individual Component Tests.
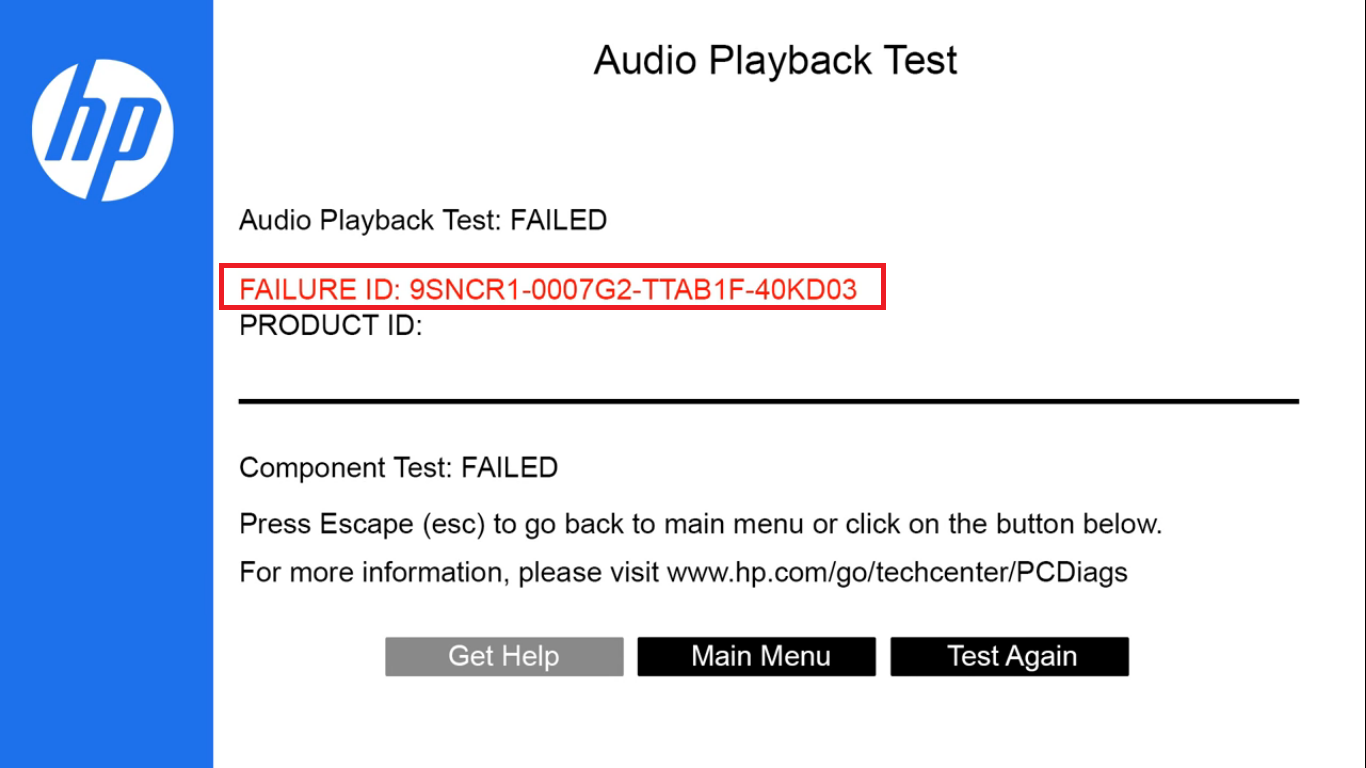
HP Diagnostic tool will immediately inform you about your Laptop components and you can also claim the warranty by contacting HP Support. If any failure is found then Failure ID will be listed on the screen, just copy and paste it notepad file.
Visit the HP Support website and select your product type from the HP Laptop, Computer, Printer, and other Products. Fill in the asked information such as your Laptop Serial number, model, and the copied failure ID. It will generate the ticket and wait for further proceedings by the HP support team.
Perform System Restore from HP Startup Menu
System Restore is an inbuilt Windows 10 feature available on all the HP Laptop and PC models. Your system must have automatically created a restore point with the past states of your system. It will include system files, settings, and install apps data and you won’t even lose any files. System restore will change your PC configuration to the past when you were not facing an automatic boot repair error. You can also create the restore point in a time but here we will are solely dependent on the automatic restore point created by your system.
You can undo the restore if you are facing more frequent errors or if you have missed very important apps data but can’t terminate the restore once you have started the process. Let the restore finishes in its time and later undo the restore. Make sure you haven’t opted for the HP system recovery because it will remove all the files and just reinstall the new Windows 10 with the inbuilt apps and drivers. Let’s perform the system restore on the HP Laptop.
- Keep tapping the F11 key after pressing the power button.
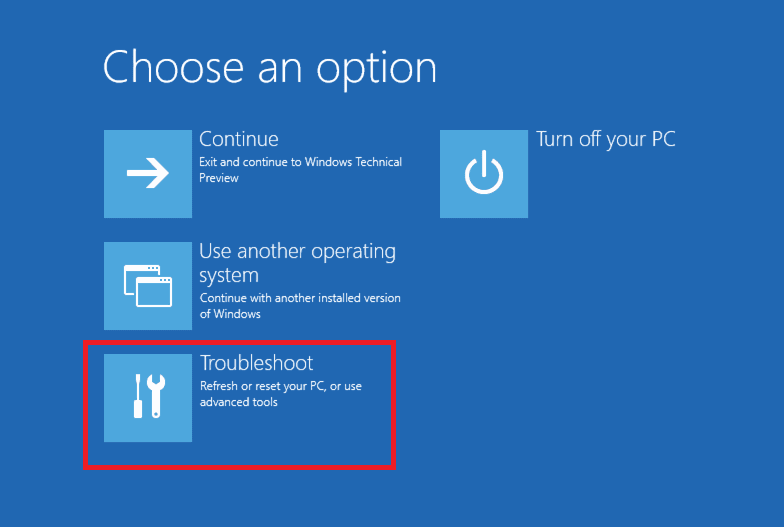
- Choose your keyboard layout and the Troubleshoot option to refresh or reset your PC.
- Navigate to the Advanced options and then to the System Restore.
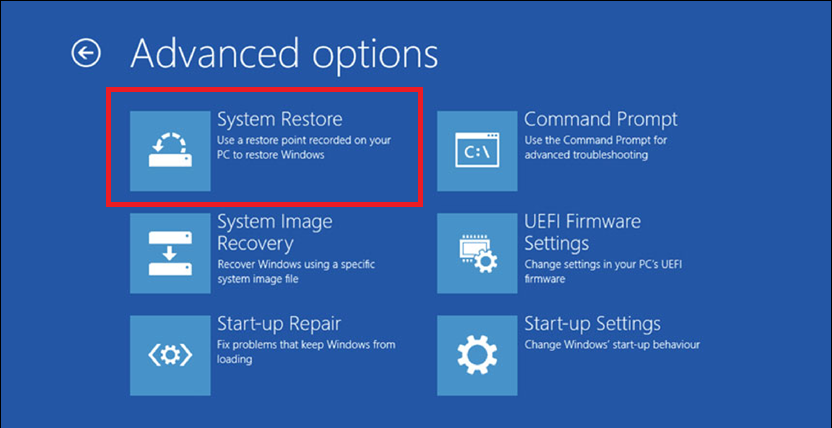
- Chose your Operating System in case of multiboot and confirm the System Restore operation.
Hopefully, Windows 10 will return to the previous state in which you weren’t facing boot errors. If you are not able to navigate to the System Restore option on your HP Laptop then also try it out from the HP Startup Menu options, by following the first two steps of the previous solution and then selecting the Recovery by clicking on the F11 key. It will also prompt you to the System Restore option.
Try Escaping to the Safe Mode
Windows 10 Safe Mode will act as a troubleshooting method to fix the “preparing automatic repair” loop on your HP Laptop. It will disable all the third-party services and only run the official Microsoft services which will reduce all the extra load from your system and give it extra room to fix the Windows 10 issues. You must also uninstall all the unwanted software once you are in the safe mode so that it doesn’t conflict once you boot your system normally. You can easily troubleshoot Windows 10 in the safe mode but first, let’s escape from the boot loop to the safe mode.
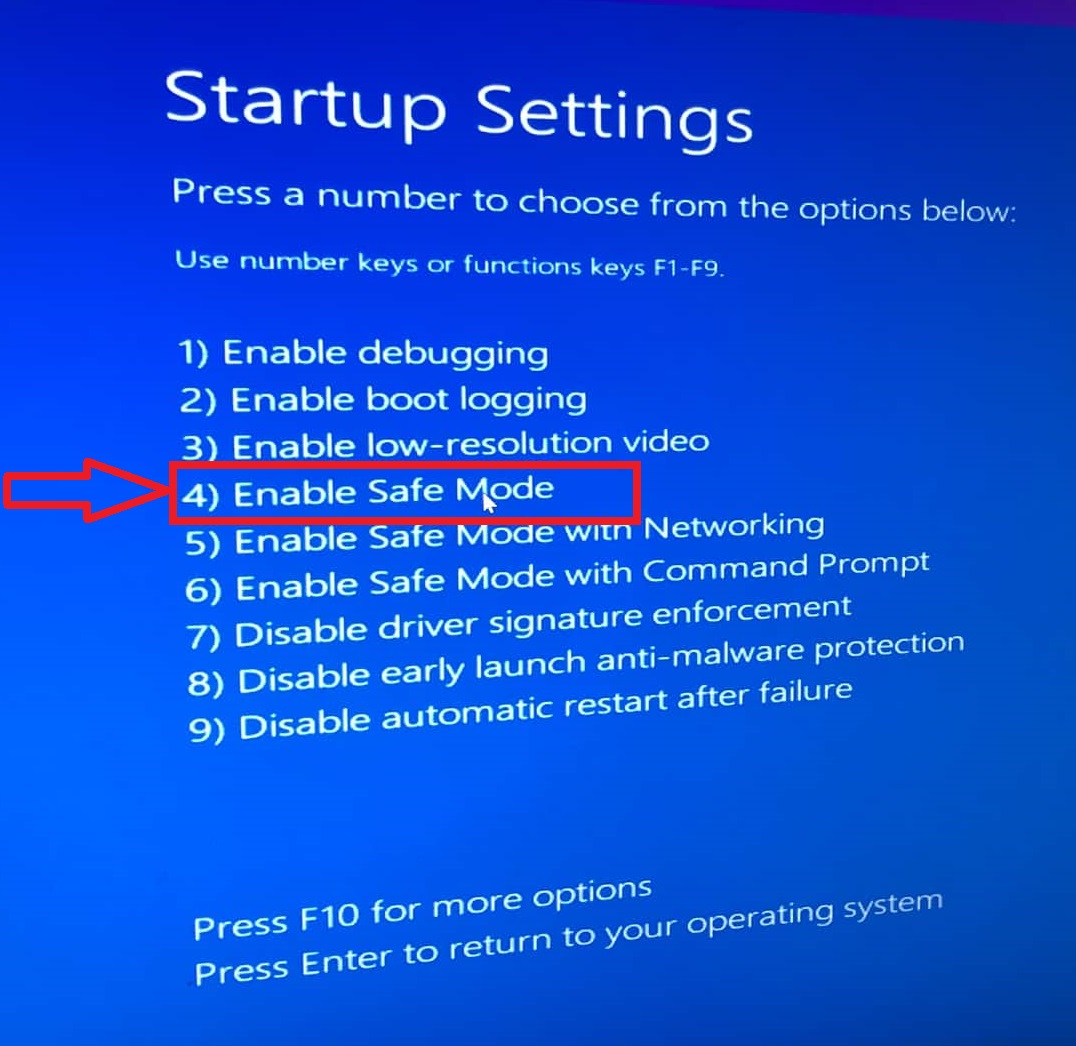
If one more blue screen with advanced screen options comes up after the black repair screen then you can easily escape to the safe mode by navigating to the Advanced options, Startup Settings, and pressing the 4 or F4 key to enable the Safe Mode.
If the black repair screen doesn’t go away then let’s try out other escapes. Completely shut down your HP Laptop, keep pressing the F8 key to launch the Windows 10 Startup menu, and select the Safe Mode from the list of options. At least try it several times before quitting this method. If the F8 key isn’t launching the Windows Startup Menu then rather try launching the HP Startup Menu by tapping on the F11 key. The F11 key works on all the HP models. Now again navigate through the same advanced options as we did previously.
Troubleshoot Windows 10 in Safe Mode
You must try out the several Safe Mode hacks to fix Windows 10 problems. First of all, uninstall recently installed software by going into Apps and features settings and Sorting Apps by install date and uninstalling all the recently installed apps. Do not uninstall recently updated apps as these apps might show first in the list.
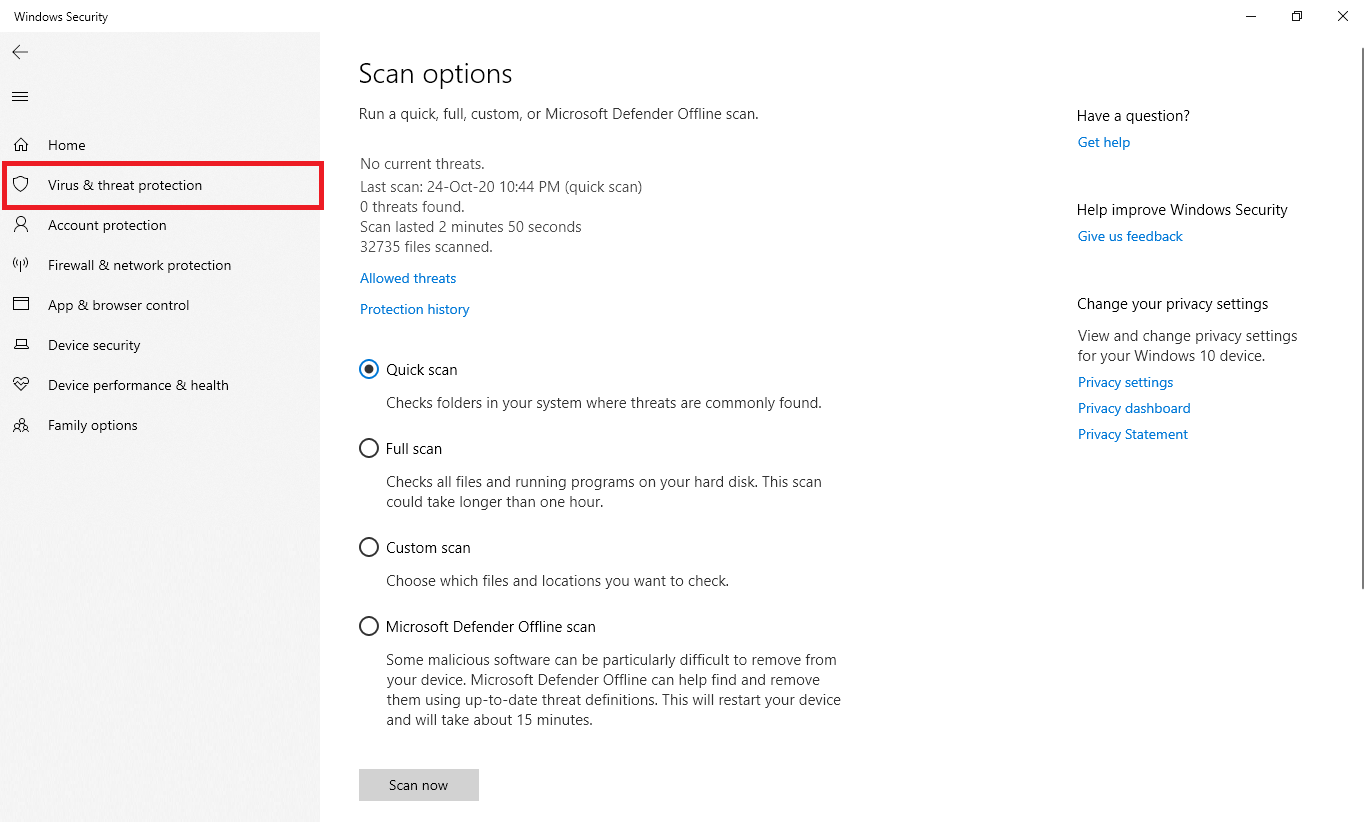
Also, scan for viruses on malware on your computer through the Windows Defender. Press the Windows button to type and launch the Windows Security. Tap on the second Virus and Threats Protection option in the left side menu and click on the Scan options link. Now, select from the Quick scan, Full scan, Microsoft Defender Offline Scan, and tap on the Scan Now button. It will scan and remove all the viruses and threats from your device and you will be able to boot back to your HP Laptop.
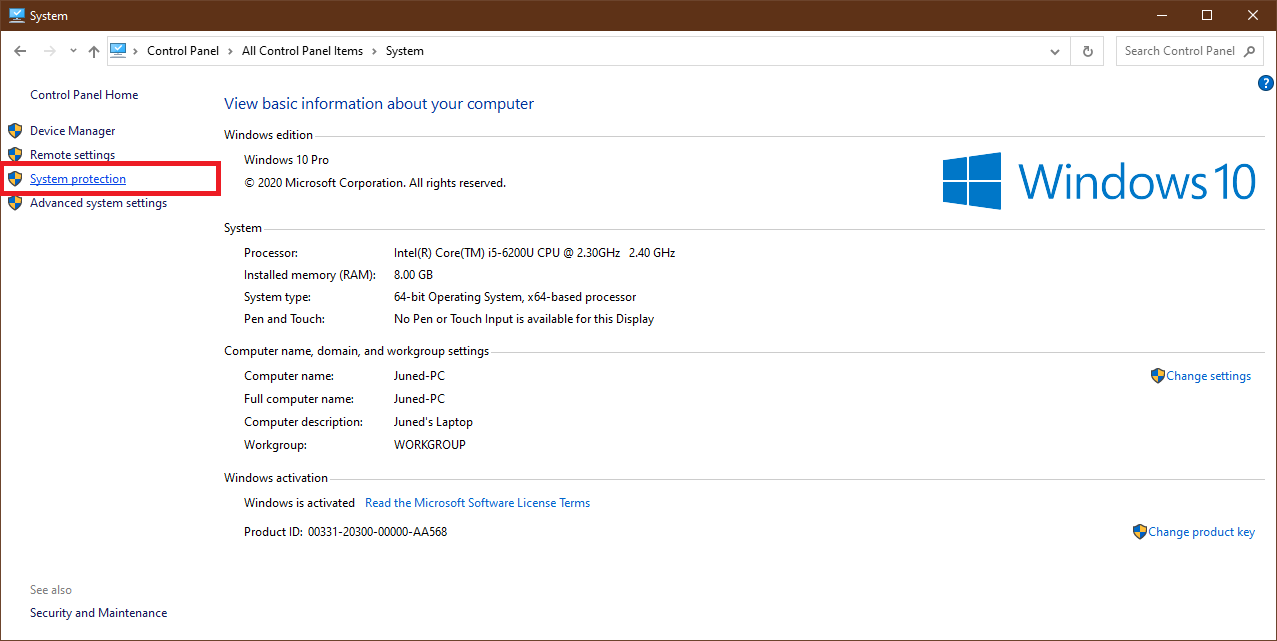
You can even try out the System Restore in an easy way by going into Control Panel, tap on the System option, choose the third System Protection from the left side menu, and continue by tapping on the System Restore button in the new window.
Do Update all the device drivers from the Device Manager.
Try out Different Startup Settings
Windows 10 Advanced Startup settings consist of different options. Safe Mode is also one of the options of Startup Settings hence until now you must know how to get to the advanced startup settings on HP Laptop. Just refer to the previous solution if you are still stuck on the automatic repair screen. Now let’s explore the different Startup Options.
Enable Debugging is an advanced troubleshooting mode especially for administration purposes. It supports up to kernel-level debugging in which your computer information is passed on to the admin computer. You must be a debugger to understand the logs of the issues on your computer and make changes accordingly on your system. It’s of no use if you don’t know about the actual log encoding, so just move on two the next option.
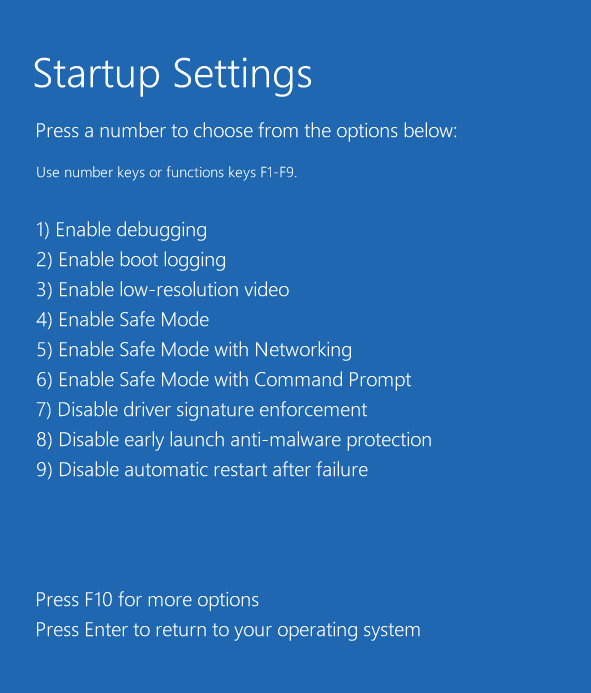
Enable boot logging option record all the drivers working in the ntbtlog.txt log file stored in the installed Windows drive. Logfile location will be mostly C:\Windows\ntbtlog.txt as most users install Windows in the C drive. You must enable this option to check if your PC drivers are not conflicting with your system. You can easily read the logs if your Windows starts normally or in the Safe mode and there is also another way around that’s through the control panel option in the advanced startup. Just enter the file location as we have mentioned previously and hit enter to read the text file.
No need to enable low-resolution video as it just reset the display settings and has no connection with the boot loop error.
We have already mentioned the Safe Mode options but you can also try it out with the Networking and the Command Prompt. Simple Safe Mode won’t initiate the internet drivers and services as a minimalist hence it is listed as a different option. You will need ethernet to connect your HP Laptop to the internet as WiFi drivers are even not loaded on Safe Mode with Networking. Safe Mode with Command Prompt will only run the Command Prompt app than the usual Windows GUI. If you want to try out several commands to fix Windows 10 then you will be good to go.
Disabling driver signature enforcement is a must-try option. Windows 10 won’t verify the drivers and will simply run as intended. Many HP Laptop users were able to boot back to Windows 10 by ditching the automatic repair screen. We also recommend keeping aside the driver interferences to let Windows 10 boot without errors.
Microsoft keeps launching antimalware for drivers to prevent them from affecting the system. You can Disable Early Launch Antimalware Protection to allow the latest diver updates with that malware. It weakens your system security but you can enable it later if it doesn’t crash your computer.
You can even disable automatic restart after failure, that is once your system boot fails then it won’t allow the system to, again and again, keep restarting on its own. The device keeps on restarting several times during the unexpected store exception blue screen error on Windows 10. This option will be handy in case of such Blue Screen Errors on Windows 10, it will simply shut down after showing you the error message.
These are Startup Settings worth trying once you see the advanced options after the spontaneous repair screen.
Reinstall Windows 10 Without Losing Data
If no option works and you are not able to log back into Windows 10 no matter what solution you apply. The 2020 year pandemic might be still on for your life, but you don’t need to overreact rather let’s ultimately fix this weirdo Windows 10 error. Reinstalling Windows 10 is the final solution, but there will be some non-recoverable cons and side effects too. You will lose all your Windows 10 settings, installed apps with their settings, and even your genuine Windows 10. You can activate Windows 10 again with the product key else let it go if it came activated with your HP Laptop.
Installing the latest and new Windows 10 is also benefits like it is a much better option than recovery and system restore. In recovery, you will move back to the previous Windows files and you have to update it to the latest version. You might even face the same boot errors again in the future.
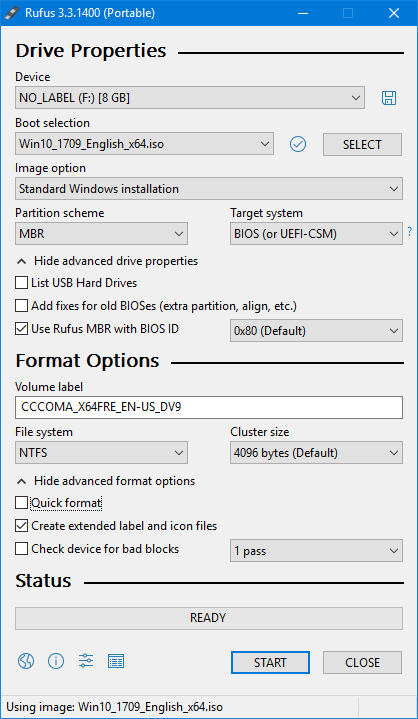
You will need your friends’ assistance to make a bootable USB drive if you do not have a working PC. We recommend the RUFUS app to make the Windows 10 bootable USB drive.
First of all, download the latest Windows 10 ISO from the Media Creation tool, download it from the Microsoft official site.

Download and launch the portable RUFUS app, select your drive, downloaded Windows 10 ISO, and start the process. It will take time-based on your friend’s PC.
Now, plug the USB drive back into your HP Laptop, enter the boot menu on HP Laptop by pressing its key, select the plugged USB drive as the boot drive and start with the new Windows 10 installation. Do not format the previous Windows 10 drive rather make the new drive on your HDD and select it for not losing any data. Even your previous Windows files will be accessible once you boot into the newly installed Windows 10. Make sure that the new OS isn’t multi-booted along with the previous OS, you can disable the multi-boot from the newly installed Windows 10 settings.
That’s it.! We are done with all the possible solutions to fix the “Preparing Automatic Repair” error loop on Windows 10 HP Laptop.
What if it keeps asking for my password before it allows me to try any of these options? Which I know it can only be one of two, but it keeps saying it’s incorrect and there seems to be no way to recover or change it 😫
When it is asking for the password, before Windows Recovery or the Windows 10 Login Page? There must be forgot password link around the screen corner. If it’s your Microsoft Account Password then also try login from the web from another device.
so what if when i try to go into power+f11 it just shows a black screen showing winpshl.exe
Force shut down (hold power button for 5-10 seconds) your laptop three times in a row to get troubleshoot options.