Windows major updates require a lot of time to download and install properly on the system. These updates are packed with the stack of security changes, quality features, and bug fixes to the previous build. Even new apps and programs are also pushed through the update. This is a feature update and everything has to be paused to install it on your system. When everything is properly installed then Windows 10 or Windows 8.1 setup the configurations by showing the blue loading screen with the “Getting Windows ready, Don’t turn off your computer” message. This error may appear on the newly upgraded Windows 10 or Windows 8.1.
This is just like setting up a new Windows 10. This error may appear on the new Installation of Windows 10 or updating it using the Windows Update Client. It may automatically start the process when you suddenly turn on your computer. Windows updates are usually downloaded in the small portions in the background and are installed when you turn ON or OFF your PC.
The message also warns to do not turn off the computer else it may break the update and even it may have to undo the changes made to your computer. It may be a separate headache to wait for reverting back the updates. You may also lose all your installed apps and their data from the storage. So, be very cautious during the process and also keep your Laptop connected with the power.
What if Getting Windows Ready keeps loading for a long? How much time you have to wait to stare at the same loading screen? Is your Windows 10 stuck? Lots of unanswered questions pop up in our mind and there is only one answer to all the questions. You must wait for at least 4-5 hours before assuming Windows 10 STUCK on the screen.
If no other option appears despite waiting for so long then you can apply our solutions to fix your Windows 10 stuck on the blue loading screen.
Contents
Forcefully Shutdown your PC
Sometimes buggy Windows System files are all responsible for freezing or stuck you indefinitely at any random screen. You might be using an app like Chrome, editing videos, playing games, or updating your system. No other option remains is more feasible than forcefully shutting down your PC.
The Shutdown Power buttons are accessible from the CPU of the computer or the laptop. You just have to hold the power button for at least 10 seconds though your pc turns off within 3 seconds. Once it’s turned off, leave it away for 10 minutes without starting. Then again press the power button to turn ON your laptop or computer and Windows 10 might boot you to its login screen without showing you any Getting Windows Ready message.

If it worked then a sudden shutdown must have reset the Windows System cache files from your RAM. Restarting it might have started the process from the beginning. You must clean the boot once you are able to sign in to Windows 10.
Safe Mode
Safe Mode is the best life savior to fix startup problems on Windows 10. It basically terminates all the extra threads to handle only important processes. The main Windows Operating System commands and operations are only included in the important processes. It will allow all the system processes to get executed one after another.
Only basic utilities and drivers can be accessed to get very basic functionalities such as access files, preview media, and use the start menu. All four corners will contain the Safe Mode watermark on the black desktop.
You can boot to the Safe Mode in tens of ways but there is only one method to start the PC into Safe Mode from being stuck on the blue screen.
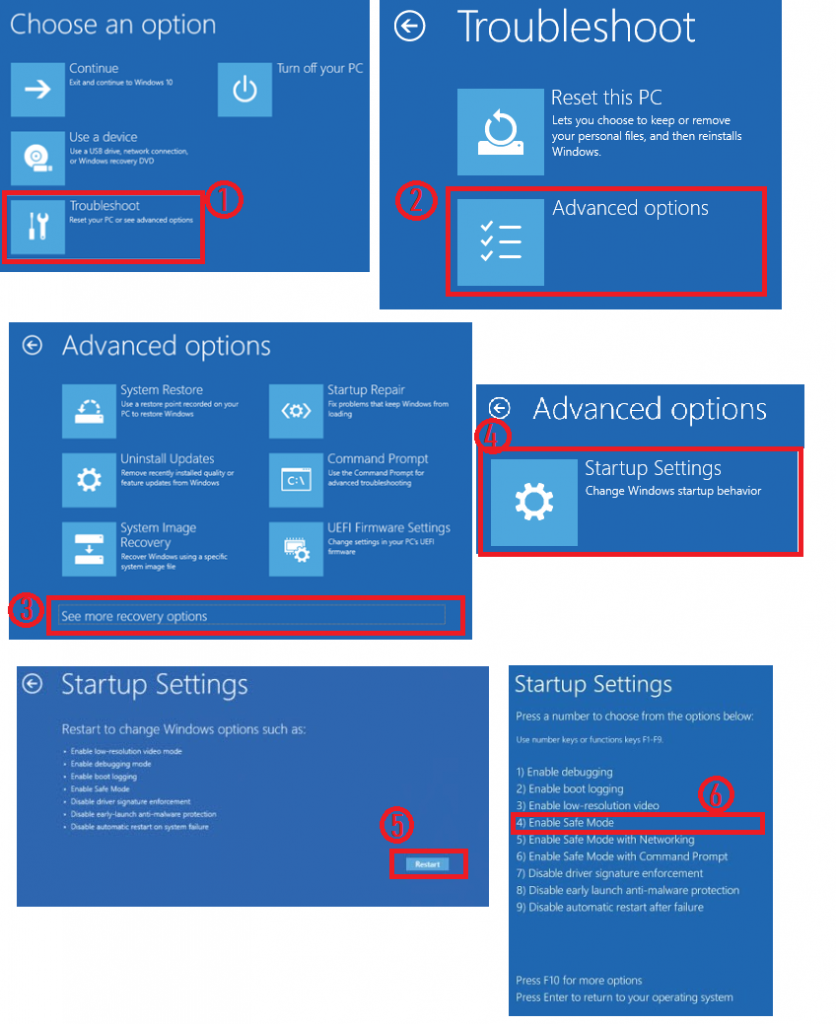
Forcefully shut down your PC by holding the power button three times in a row to let Windows launch the Recovery options. It may take a while to take you to the Choose an option screen, just be patients throughout the process. Once the options appears navigate to the Troubleshoot > Advanced options > Startup Settings > Restart. Now tap on the F4 key to enable the Safe Mode on Windows 10.
Safe Mode may take a while to load all important threads on the black screen. Once you are in the Safe Mode you will immediately realize the big desktop icons with big fonts. Explore all the available programs to spend some time with the system then do a clean boot to refresh your Operating System. You can find the Clean Boot steps in the last solution.
Startup Repair
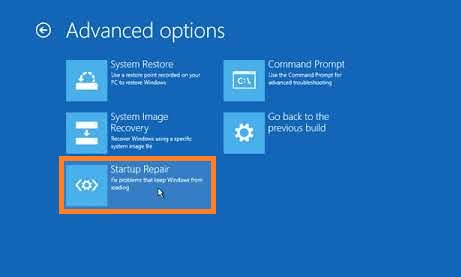
Microsoft has also included as the Startup Repair to troubleshoot the Startup problems. It scans for problems in the system files, device drivers, updates, and input-output devices. It will also indicate errors and their solutions. This is conducted on the black loading screen with all the indications.
You can launch the Startup Repair from the Windows Recovery Options in the same way as you booted your PC into safe mode. Just select the Startup Repair instead of Startup Settings from the Advanced options. It will diagnose your PC and will immediately show the login screen once the problems are fixes.
System Restore or Go back to the previous version
System Restoring and Going back to the previous version are not the same but one can help you to get rid of the Getting Windows Ready screen. System restore will remove all the changes and simply take you to the past when the restore point was created. You will lose all the latest apps and their data along with the latest Windows 10 updates.
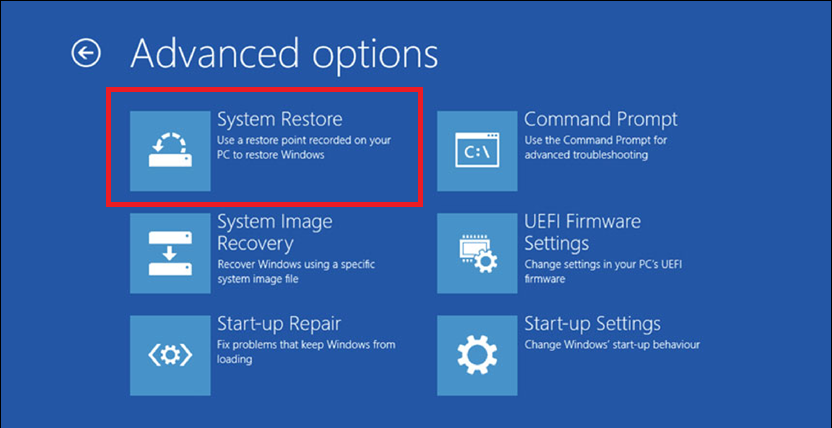
Whereas Going back to the previous version will only remove the latest Windows 10 updates and keep other files intact. You can find both options from Windows Recovery.
Clean Boot
Clean boot is just like the Safe Mode but you have to manually setup all the options from the settings. You must be able to boot normally or to the safe mode. You have to immediately apply the clean boot once you are able to get rid of the blue loading screen.
Press the Windows + R to launch the RUN and type msconfig to get the System Configuration Window. Go to the Services tab, hide all microsoft services, and Disable all. Apply the settings and close the Window.

Now launch the Task Manager and head to the Startup tab from the top menu. Sort the program status to see all the Enabled programs and Disable them all one by one.
Restart your PC to boot it in a Clean environment without a single third-party distraction. Launch your favorite apps, browse to the internet, and do reset the clean boot applied settings to default to let your PC launch normally with all the functionality.