As we know that Microsoft has developed a number of services for Windows. In this blog, we will discuss one of the Microsoft services names Windows Time Service (w32time). There are users who have reported that their windows are not showing the correct time and date.
Users also reported that they get error messages saying:
- Windows Time service keeps stopping
- Windows Time not syncing
- Windows Time service could not be started
- Windows Time service missing, not installed
If you get one of these error messages then it leads to incorrect time and date on Windows. Windows time and date totally depend on Windows Time service.
The Windows Time Service is a Microsoft Windows service. It works is to synchronize the clock on Windows as per the location. If you get an error related to the Windows Time service then you should fix it in the first place because correct time plays an important role on Windows as you have updates and reminders. The NTP (Network Time Protocol) server is important because synchronization is done through it. As this issue is on all Microsoft Windows over the world we came to know some of its causes listed below.
- If on your Windows “Windows Time service” is missing.
- If Windows Time service is faulty.
- The system file related to Windows Time service is faulty or corrupted.
Once you have read the above content then it’s time to read the actual fixes to get rid of the Windows Time service not working.
Contents
Set Windows Time Service to Automatic
The Windows Time service starts at Windows startup. It may not be started due to some interference or glitches. If this is the reason behind the incorrect time and date then try to start the Windows Time service to get rid of the synchronization issue.
- At first, launch the Run dialog box by holding the Windows key and R key.
- Once you have it then type services.msc and hit on the OK button.
- Now on the services screen look for Windows Time service and do right tap on it.
- From the open menu tap on the Properties option.
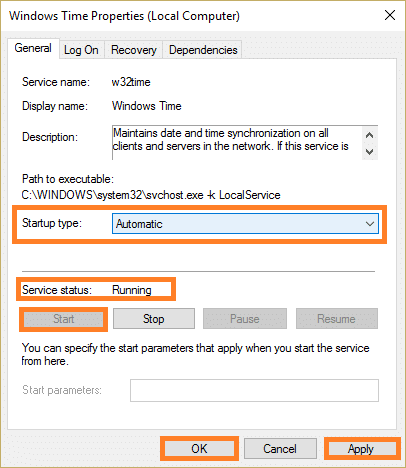
- On the Windows Time properties screen, use the Startup type drop-down menu and set it to Automatic. Make sure that service status is set to Running. If it is not running then tap on the Start option.
- At last tap on Apply and then on the OK button to save all changes you made.
Now your Windows Time service will sync the correct time and date. If this won’t work then go on to other fixes.
Run SFC and DISM Scanner
As I have told you that corrupted system files are one of the main causes of the Windows Time service not working issue. To fix this corrupted system file you have to run SFC (System File Checker) and DISM (Deployment Image Servicing and Management) scanner.
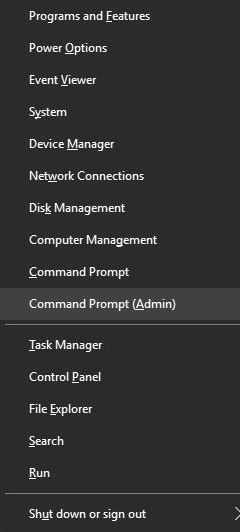
- Hold Windows key and X key to open the quick access menu.
- From it tap on Command Prompt (Admin).
- On the command prompt screen enter a command as sfc/ scannow.

The scanning process will take approximately 10 to 15 minutes. After scanning restart your Windows and check for the correct time and date. If this won’t work then run DISM following the below steps.
- Launch Command Prompt using the above steps.
- In command prompt type command line as DISM/Online /Cleanup-Image /RestoreHealth and hit on enter key.

After scanning restart your Windows and check the issue is fixed or not. If not then run the SFC scanner once again.
Use Another Time Server
If the time server is not proper or creating issues then you can change the time server to fix the Windows Time service not working issue. If you don’t know how to do it then follow the steps below.
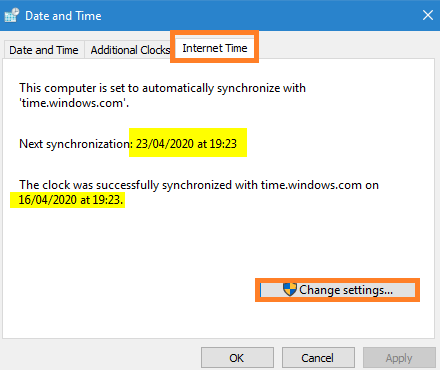
- On your Windows, launch Control Panel and tap on Date and Time.
- Now you will have multiple tabs, go on the Internet Time tab.
- In it tap on the Change settings button for the further process.
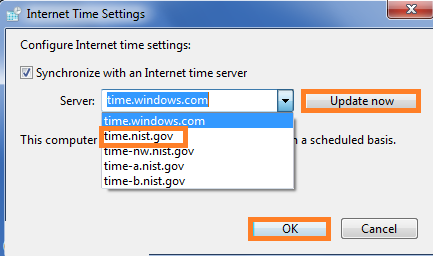
- From the server drop-down menu select time.nist.gov and hit on Update now button. You can also try another server such as pool.ntp.org.
- Once you have selected the server then hit on OK button.
After this check that the time and date are correct or incorrect. If it is correct then it means that the Windows Time service is running properly.
Start Windows Time Service using Local System Account
The Windows Time service may not start properly if you won’t use the Local System account for its startup. Follow the steps below to select a Local System account.
- Open Services window using a run dialog box. Type services.msc and hit on the Ok button.
- Look for Windows Time service and do right tap on it.
- From the open menu tap on the Properties option.
- Now switch to Log on tab, and select Local System account.
- To save changes tap on Apply and then on the OK button.
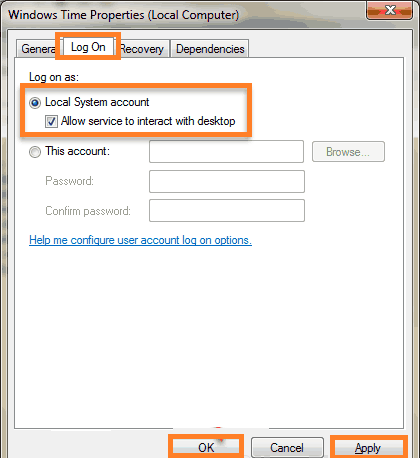
Many users have reported that using this method they have fixed Windows Time service issues on Windows 10, 8, and 7.
Enable Time Synchronization using Task Scheduler
The Task Scheduler is one of the components of Microsoft Windows. It performs a different function to run windows. On the task scheduler, you have to check that the Time Synchronization is enabled or disabled. If it is disabled then make sure to enable it.
- Go on the Start menu and search for the task scheduler. From the resulting tap on Task Scheduler.
- On the left pane follow the path as Task Scheduler Library > Microsoft > Windows.
- Now look for Time Synchronization and do twice tap on it.
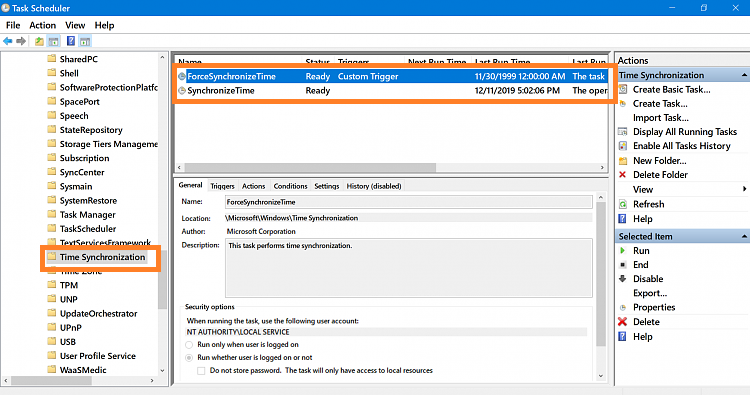
- On the screen do right tap and choose the Run option. In the place of the Run option if you have a disabled option it means that the Time Synchronization is enabled.
If you want to check the status then go on the Triggers tab. Now scroll the right pane and go on the Status section. Now you can see it is enabled or disabled.
I hope that by applying the above 5 best fixes you get rid of Windows Time Service not running properly. Make sure you select fix related to the cause of the issue.