Well, have you ever set up the router at your office or home or anywhere? If yes, then you may have seen the important setting of router name as DHCP Tease Time. The DHCP stands for Dynamic Host Configuration Protocol. As you are not an IT specialist maybe you have skipped this important setting because you don’t know What it is, How to check it, How to renew it and How to change it. It seems that you are reading this article it means you are on the right platform. Here you will get all the information related to DHCP Lease Time. At first, you should know what is DHCP Lease Time.
Contents
What is DHCP Lease Time?
In today’s world, all educational and business institutes and offices give the facility of LAN (Local Area Network). The devices name printers, laptops, Computers, Smartphones connected to the LAN must have unique IP Addresses. Before understanding the DHCP Lease Time you should know what is IP Address and who allot it to the devices. The IP (Internet Protocol) Address is a unique identity of the particular device. Without it, you can not communicate and connect over the internet. As we have an address for the home so we can deliver anything to the right place. In the same way, IP address works. The IP Address is allotted by the DHCP server automatically. If this won’t work you have to manually allot the IP Address to the devices. The IP Address allotted by the DHCP server are not permanent they are on a temporary basis.
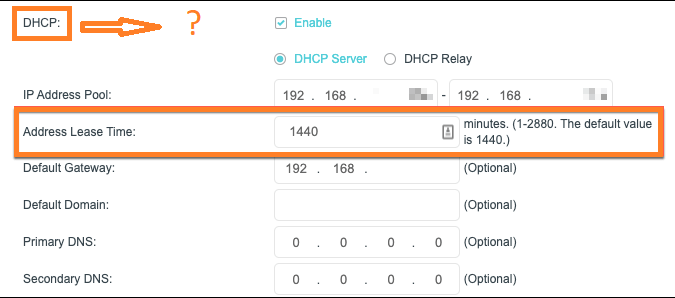
Now it’s time to understand What is DHCP Lease Time? Before understanding it theoretical let’s understand it with the practical example. A person occupies land for a period of 6 months and for it he/she pays for it. So, this 6 moth is a lease time for the tenant (A person who has occupied land from the landlord). The same theory applies to the DHCP Lease Time. As I have told you the DHCP server assigned the IP Address to the devices so they can communicate over the internet. So, that IP address is on lease. The normal DHCP Lease Time is of 24 hours. It means a device user can communicate and use the internet for 24 hours having the same IP address. After 24 hours the IP Address changes. You can also change DHCP Lease Time as per your convenience. Before changing it you should know how to check it.
How to check DHCP Lease Time on Windows 10 and macOS?
Checking the DHCP Lease Time on Windows 10 is different from macOS. In this guide, you will step for both. Make sure you apply steps correctly. Once you finish with this then you have to decide you want to renew or change it. In this blog, you will see both guides. It is on you what to choose.
For Windows 10
In Windows 10 you have to use Command Prompt to check DHCP Lease Time. For this go through the steps properly.
- First of all launch the Powershell. To have a PowerShell hold the Windows key and R key and in the Run dialog box type PowerShell and then hit on OK button.
- In it enter the command line as ipconfig /all.
- On the upcoming screen, you will have Lease Obtained and Lease Expires day, date, and time.
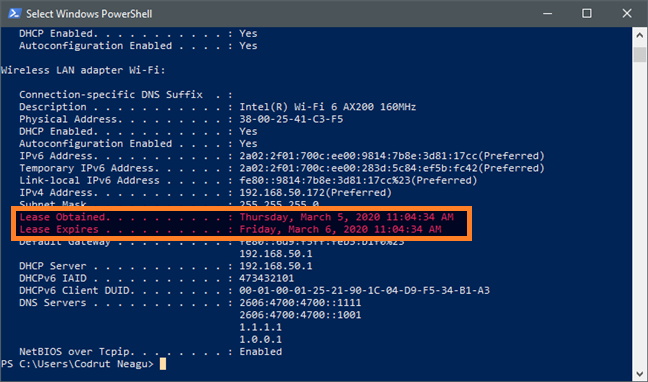
So, this is how you can check DHCP Lease Time on Windows 10.
For macOS
If you are a macOS user then you have to use the built-in Terminal app. If you don’t know how to use it then follow the below steps:
- To have Terminal you have to tap on Launchpad and then hit on the Other.
- On the screen, you will have Terminal App so tap on it to launch it.
- Now you will need the device name so in the terminal app enter the command as networksetup -listallhardwareports.
- On the screen, you will have a list of the device names and Mac addresses. Find your device name and note it.
- After this enter ipconfig getpacket device name. In the place of “device name” write your device name and hit enter.
- By doing this you will have all information related to the connection including lease time.

Likewise, you can have DHCP Lease Time information on macOS using the Terminal app.
How to Renew DHCP Lease Time?
If you have decided to renew it then this guide is for you. First and foremost launch the Command Prompt using the Run dialog box. Once you have it then it enters the command line as ipconfig /release | ipconfig /renew. As you have entered the command it will take some time to display the information related to the network adapter. Once you have it then launch PowerShell and enters the command as ipconfig /all. Doing this you will have Lease Obtained and Lease Expires information which is updated.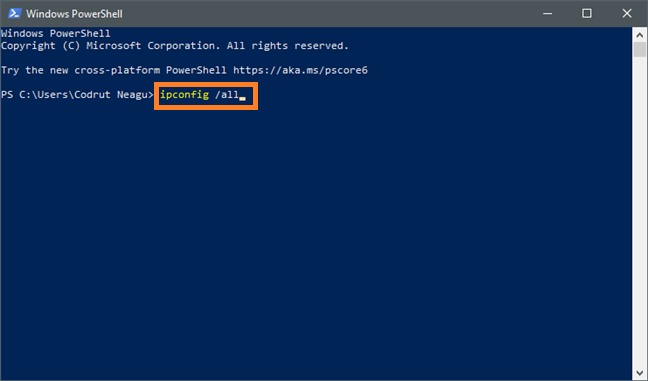
This was all about renewing DHCP Lease Time. If you want to totally change it then the below guide is for you.
How to change DHCP Lease Time?
There are two methods to change DHCP Lease Time the first is via router and the second one is via DHCP server. In this guide, you will see steps for only the second method that is via DHCP server because it is easy and simple as compared to method one that is via a router.
- Launch the Run dialog box and type dhcpmgmt.msc and then hit on OK button.
- Now do right tap on the DHCP scope of which you want to change lease time. From the list of options tap on the Properties option.
- Go under the Least duration for DHCP clients section in the General tab.
- As per your need enter the lease time in the Limited to space.
- At last hit on the Apply and then on the OK button to save the changes you made.

After all, make sure you reboot your device and then check that lease time is changed as per your need.
I hope reading the above article has been proved really helpful in having information about DHCP Lease Time such as What it is, How to check it, How to renew it and How to change it.