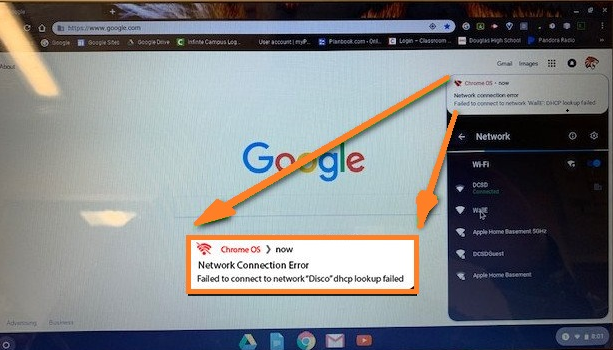
Well, the Chromebook is developed by Google and it runs on Chrome OS. As we have used and have been using the Chromebook from the first day of its launch we have seen that there are rarely some issues with it. The Chromebook is simple and easy to use. The Chromebook is a bug-free and light device. Users reported that when they try to connect to the internet connection on Chromebook they get an error message saying “Failed to connect to network DHCP lookup failed”.
The users don’t know what does this error message means. If you are one of them then here is your answer, “For the internet connection there is a separate and ideal IP address which is an identity for the Chromebook in the network. This IP address is allotted by the DHCP (Dynamic Host Configuration Protocol) server but in this case, it has not been allotted”. Without the IP address, a device can not communicate in the network. It means that the IP address is a must and important for the connection of the internet.
There are multiple reasons or we can say causes behind DHCP lookup failed error message but some of them are most common one which is listed below:
- If you have an outdated operating system.
- If the router’s firmware is corrupted.
- If the router’s table is full of old IP addresses.
- If you are using VPN.
- If the frequency used by the network is not supported.
Due to the above reasons or causes, users get DHCP lookup failed error messages. In this guide, you will see various advanced fixes to fix this error message but before it checks for small mistakes you may have done.
- Check for a strong internet connection.
- Disable and enable the Wifi network.
- Try to connect to another network. If in this you be successful then it means that the problem is with the previous router or modem. Try connecting another device to the same problematic network. By doing this you will better understand the problem.
- Contact the IT department of your organization. This is possible if you are using a network of any school, college, or office.
- Remove unnecessary electric interference such as Bluetooth.
- Make sure the network is not secure with a hidden SSID.
- If you are using VPN then disable it.
- If you are making use of the Wifi extender then remove it.
If the above small fixes won’t work then it’s time to go on the below-advanced fixes.
Contents
Restart and Reset Router/Modem
As we know that the IP address is assigned by the router. Some times router is not able to assign an IP address because the table in the router is full of previous IP addresses. This can be fixed by restarting and resetting the router on your device. At first, apply the steps for restart if in case it won’t work then only apply the steps of resetting. Resetting will also fix the corrupted firmware of your router/modem. Restarting should be your first priority because restarting fixes multiple issues.
- At first, do Power Off your Chromebook by holding the power key for at least 3 to 5 seconds.
- Turn off the router and unplug it from the power supply.
- Now it’s time to wait for 10 to 15 seconds.
- After 10 to 15 seconds plug the router back to the power supply. The router will take approximately 5 min to fully start.
At last, start your Chromebook and try to connect to the internet connection. If this time it fails then you need to reset the router. To reset the router follow the below steps:
- First of all Power on your router for the further process.
- Find the Reset button. In some routers, it is located at the bottom or beside the router.
- Once you get it then hold it for at least 30 seconds.
- After 30 seconds release the reset button. It will take approximately 30 to 60 seconds for resettings and fully power on.
So, this is how you can restart and reset your router/modem to fix the “Failed to connect to network DHCP lookup failed” error message.
Update OS on Chromebook
The outdated OS on Chromebook will create a number of issues. It is said that the “Failed to connect to network DHCP lookup failed” error message is caused due to outdated OS on Chromebook. To fix it you have to update Chrome OS on your Chromebook.
- For this, you will need an internet connection so try to have it. You can have it through an ethernet cable.
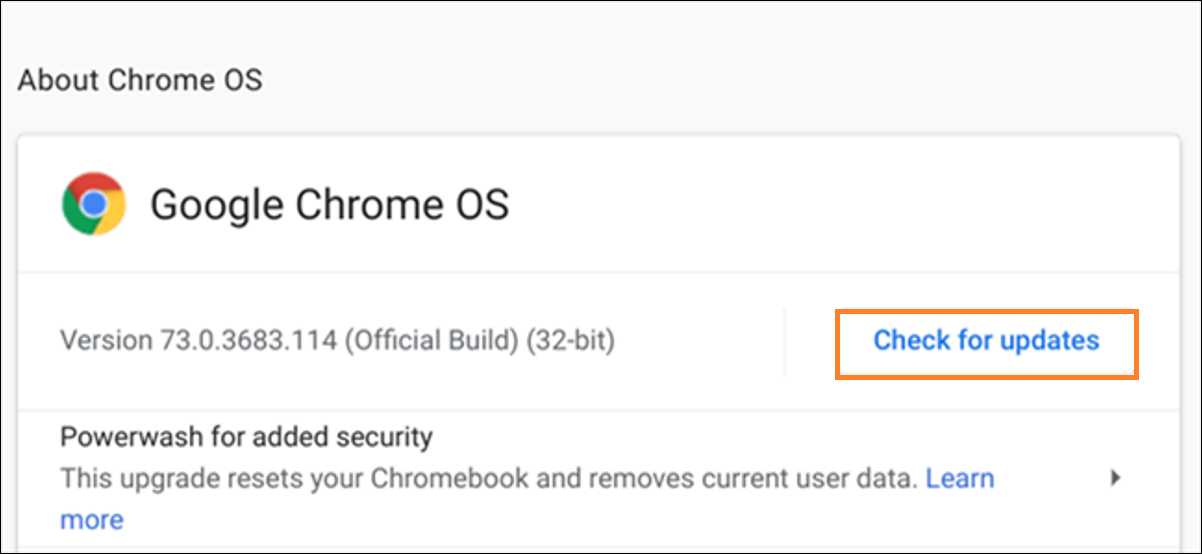
- Launch the Settings on your Chromebook for the further process.
- From the left side tap on the About Chrome OS option.
- This will be open on the right side of the same screen. From that screen tap on the Check for updates button.
- Once you have updated OS then do restart your Chromebook.
After all, try to connect to the problematic internet connection and check that you won’t get a DHCP lookup failed error message.
Match the frequency band of your Wifi network with Chromebook
There are routers capable of having a high-frequency band. If your Chromebook and router’s frequency band won’t match with each other then it creates issues such as DHCP lookup failed. To change the frequency band of your router goes through the below steps properly.
- Launch the web portal of the router and log in by entering the needed information.
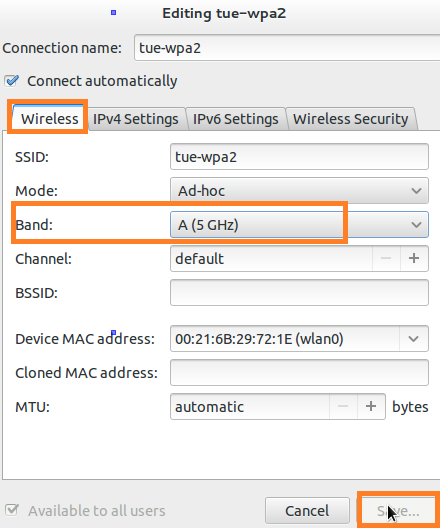
- In it go on the Wireless settings tab.
- In the Wireless settings, the tab screen changes the band. If 5 GHz is selected then select 2.4 GHz, if 2.4 GHz is selected then select 5 GHz.
- Once you are done with this then save the settings done and then exit the screen.
At last restart, the Chromebook and check that you won’t get the DHCP lookup failed error message.
The article consists of a full guide to get rid of the “Failed to connect to network DHCP lookup failed” error message. I hope reading this article you will get a result as you want.