The System File Checker (SFC) scanner is an inbuilt utility which is launched by Microsoft in Windows. SFC Scan is run to detect the corrupted file and to restore the missing file. If you feel that on your system there is a damaged file, missing file, and incorrect file. I must say that before running the system file checker you need to run Deployment Image Servicing and Management (DISM) tool. In Windows 10 you have to run this but in Windows 7 you don’t have to run it. In Windows 7 you only have to run the SFC Scan.
In this blog, you will gain knowledge on how to use Windows 10 and 7 inbuilt system file checker. So, you can run SFC on Windows 10 and 7 in two ways by using or selecting Run as administrator and selecting Recovery media. So, I will give you the steps for both the ways to run SFC Scannow and in both Windows that is in Windows 10 and in Windows 7. So, take an eye below to know about the Windows 10 system file checker inbuilt utility and then on Windows 7.
Contents
Run System File Checker on Windows 10
In Windows 10 you might be facing several problems like your Windows 10 won’t boot or system might be slower than usual performance. SFC Scan will fix file related errors on your Windows. You need to run the Deployment Image Servicing and Management (DISM) tool and then you have to run the System File Checker (SFC) scanner. However, you can run SFC Scanner in two possible ways.
- By selecting Run as administrator
- By selecting recovery media
Run CMD as an Administrator
So the first method is by selecting Run as administrator. To know how to run SFC scanner follow the below steps in sequence:
-
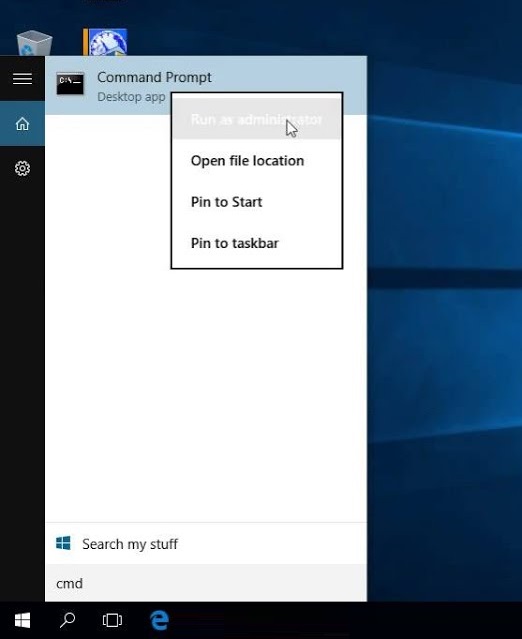
- Step 1: At first go on the start menu and search for Command Prompt and do right tap on it and choose Run as administrator.
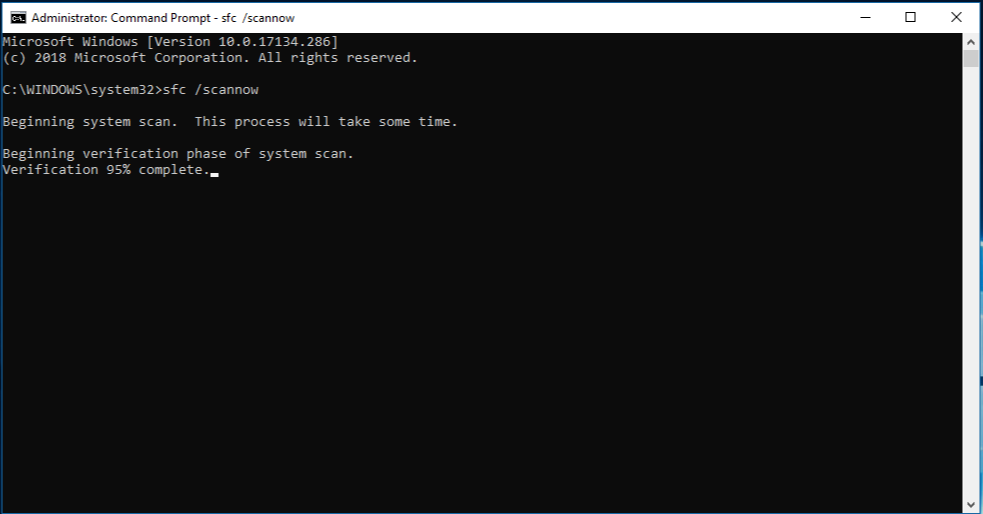
- Step 2: Once you open Command Prompt then in it type the command line as sfc /scannow and hit enter to execute the command.
- Step 3: At the moment you hit on enter from that time it starts to scan your system. Don’t worry it will take time so once the scanning process is completed do restart your computer and then check whether the corrupted file and missing file persist or not.
- Step 1: At first go on the start menu and search for Command Prompt and do right tap on it and choose Run as administrator.
So, this is how by selecting run as an administrator you can run the System File Checker (SFC) scanner. I must say that read the above steps properly and implement them.
From the Recovery Media
You can also run System File Checker (SFC) scanner by using an option name as recovery media. So, to do so follow the below steps:
- Step 1: While you are on the splash screen hit on f12 key and choose the recovery media option from the boot menu.
- Step 2: Once you tap on recovery media then you will have an option for language so tap on it and hit on the Next button.
- Step 3: Now tap on Repair your computer option for the further process.
- Step 4: Once you have Repair your computer screen then tap on troubleshoot option and lastly on Advanced Options.
- Step 4: Once you have Repair your computer screen then tap on troubleshoot option and lastly on Advanced Options.
- Step 5: Now you will have a list of options from that tap on Command Prompt.

- Step 6: Once you have a command prompt so in it type sfc /scannow /offbootdir=c:\/offwindir=c\Windows and hit on enter.

- Step 7: At a time you hit on enter then scanning will be a start and I must say that it will take time. After all, do your computer restart to make the changes save.
So, this was a lengthy method to run an SFC scanner on Windows 10.
System File Checker on Windows 7
As I have told you that in Windows 7 you don’t have to run Deployment Image Servicing and Management (DISM) tool. You have to directly run the System File Checker (SFC) scanner. I have also told you that there are to ways to run an SFC scanner. So, follow the below content to know the two methods:
From Command Prompt
To run the System File Checker (SFC) scanner by selecting Run as administrator follow the below steps properly.
- Step 1: First of all go on the Start button and in search box search for the command prompt and do right tap on cmd.exe and hit on Run as administrator.
- Step 2: Now choose Yes option when the User Account Control (UAC) appears and then type sfc /scannow command on the command prompt and hit on enter.
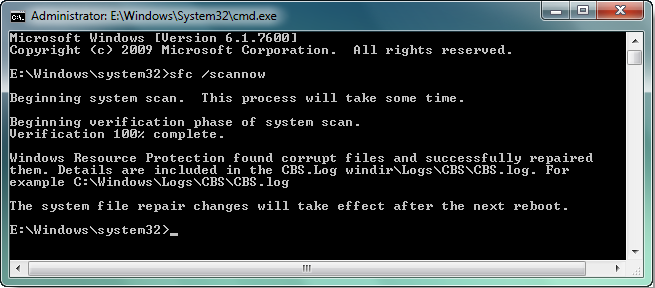
- Step 3: Once you hit on enter it starts to scan your system and detect the corrupted file and restore the missing files.
So, these were the easy and simple steps to run the SFC scanner on Windows 7 by selecting Run as administrator.
Read Also, How to download: Windows 7 Service Pack 3
By Selecting Recovery Media
We know that this method is lengthy but you can also implement this method to run a system file checker on Windows 7 but in this solution, you only have to change step 4 of Windows 10 computer. So, it means that all steps are the same which are given in the Windows 10 solution. So, change you have to make is as follows:
- Step 1: Once you have the Repair your computer screen in it you have to choose an option name as Windows installation and then hit on the Next button.
So, If you won’t understand it then go the Windows 10 solution you will have steps in detailed.
I hope that you will feel helpful in using Windows 10 and 7 System File Checker (SFC) scanner by reading the above solutions. Make sure you follow all steps in sequence so that you get an expected result from the above solution.