What is Generic PnP Monitor on Windows 10?
So, the PnP stands for Plug and Play. It is used to connect external devices like monitor and USB devices on your Windows 10. If you open the device manager and you see the word written as Generic PnP monitor which is denoted by yellow triangle error. So, it shows that Windows can’t recognize the devices. In this case, Windows install a generic monitor driver for it but sometimes it does not work because the driver is not compatible with the hardware. So, you have to apply the below tricks to fix to overcome generic PnP monitor on Windows 10.
As we know that Microsoft has given the amazing operating system to us which is Windows 10. It is amazing because of its multiple features. But at the same time when users have experienced the Windows 10 they came out with numbers of problems like the recent issue is generic PnP monitor problems on Windows 10. However, Microsoft is also giving probable solutions to these issues. On your Windows 10, you will see a message saying “failed to load hardware monitor driver” this message proves that you have generic PnP problems on Windows 10.
The main causes behind this issue is that outdated generic PnP monitor driver and insufficient hardware capacity. So, the users who have recently updated to Windows 10 will face generic PnP monitor problems. But you don’t need to worry we are here with a couple of best solutions by applying it you can make solve the generic PnP monitor problems on Windows 10.
Contents
So, above are the simple and beneficial tricks that will give you an idea and below are its detailed solutions that you can apply on your wind0ws 10 one by one so that you can have generic PnP monitor problems solved easily.
Update Generic PnP Monitor Driver
Many users have used this trick and solved the issues related to generic PnP monitor on Windows 10. I am suggesting you update generic PnP monitor driver because this problems most of the time occurs due to old and generic PnP monitor driver.
- Step 1: At first do the right tap on the Start menu and hit on Device Manager.
- Step 2: Once you open the device manager screen then tap on Monitors option and do the right tap on Generic PnP Monitor and lastly hit on Update driver.
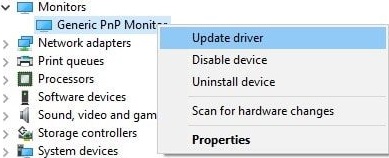
- Step 3: Once you tap on the Update driver option then you will have 2 options on the screen you have to tap on 1 option name as Search automatically for updated driver software. By tapping on it you will have an updated driver on your Windows 10.
- Step 4: At last when the driver is installed so make your computer restart so that changes you made that can be saved.
So, this was the method or we can say the process to update the generic PnP monitor driver. Make sure you follow the steps in sequence.
Reconnect the Monitor
If you find generic PnP monitor in your device manager so you can also apply this trick because sometime your system won’t recognize it. My suggestion is that you should reconnect the monitor to the computer and just do the restart.
- Step 1: At first turn off both computers as well as monitor for the further process.
- Step 2: Now remove the power cable and monitor cable and connect it back after 10 minutes.
- Step 3: Now remove video cable and connect it back after 5 minutes.
- Step 4: Finally do the restart of your computer.
If applying this solution your computer won’t recognize the external device then you should go on our next solution which will surely help you out.
Update Display Card Driver
As we know that the display card driver means a graphic card driver. If you have a problem with a graphics card driver so it may lead to the generic PnP monitor issues. So to update it follow the following steps:
- Step 1: First of all do right tap on the Start menu and hit on Device Manager.
- Step 2: Once you open the device manager screen then tap on Display adaptors to expand it.
- Step 3: In expanded option do the right tap on the graphic card and hit on Update driver.
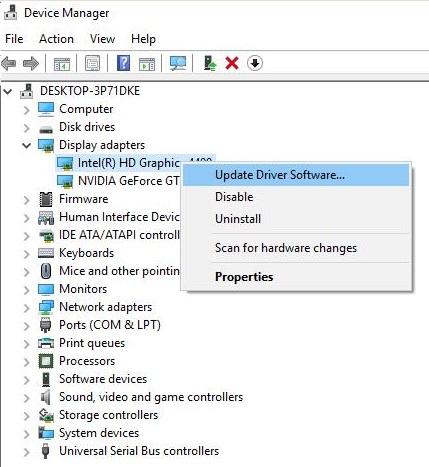
- Step 4: Once you hit on Update driver option you will have 2 options on a screen so hit on 1 option that is Search automatically for updated driver software.
- Step 5: Now, at last, do restart your computer.
So, this is how you can update the graphics card driver to fix the generic PnP monitor problems.
Run SFC scanner
After applying the above solutions then also if your problem is not solved then you should run the System File Checker (SFC) scanner which will scan your system and will detect the corrupted file and it will repair and restore it.
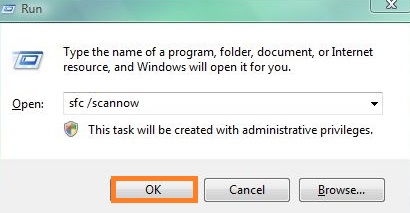
- Step 1: At first go on the start menu and search for Command Prompt and once you get it, do right tap on it and hit on Run as administrator.
- Step 2: Once you have a command prompt type sfc /scannow and hit on the OK button.
- Step 3: Now your system will be scanned and if any corrupted or missing file found then it will detect it and restore it.
But you have to wait for 15 to 20 minutes because it will take time to scan your Windows 10 system.
So, this was the whole blog containing the information about Generic PnP Monitor and its 4 best solutions by applying it you will surely get a positive outcome. I hope you have understood the whole with its solutions.