Windows 11 has come in with many exciting features that make our work easier, and one of them is the Snap Layout features. When working on your computer, you want different slides and windows to be opened to help you do the job properly. Maybe you are writing a critical appraisal of a fictional story, and you require two documents displayed on your computer screen. Both of these windows no longer need to be manually adjusted when using the snap layout functions.
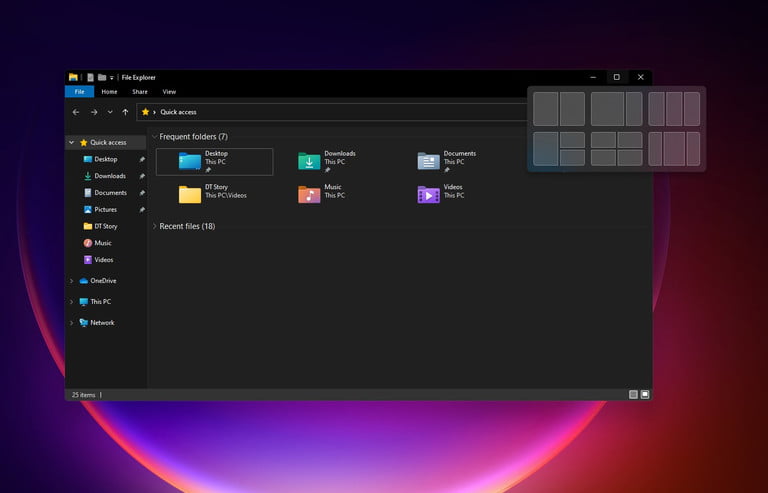
Drag your mouse to the maximize button, and upon hovering over it, it will present you with snap layout options on your Windows 11 screen. The layouts will appear like a collage on the screen and enable you to position, split the screen, and size your opened windows fast and easily.
Now, the snap layout options might not suit everyone’s choice or taste while working on the computer. That is why the Windows 11 computer system also allows us to disable the snap layout feature. The pre-fixed six snap layouts will no longer appear on your screen.
We will show you the methods by which you can enable and disable the snap layout features in Windows 11. Follow these methods step-by-step and customize the snap layout feature according to your wish.
Read Also: Enable Hibernate Windows 11
Contents
How to Enable Snap Layout Features in Windows 11
To enable the snap layout feature in Windows 11, follow these steps one by one.
- Press Windows key + I to open the Settings app on your computer. You can also go to the Start menu and select Settings from there.
- Next, on the left pane, you will notice Systems on your screen; click on it.
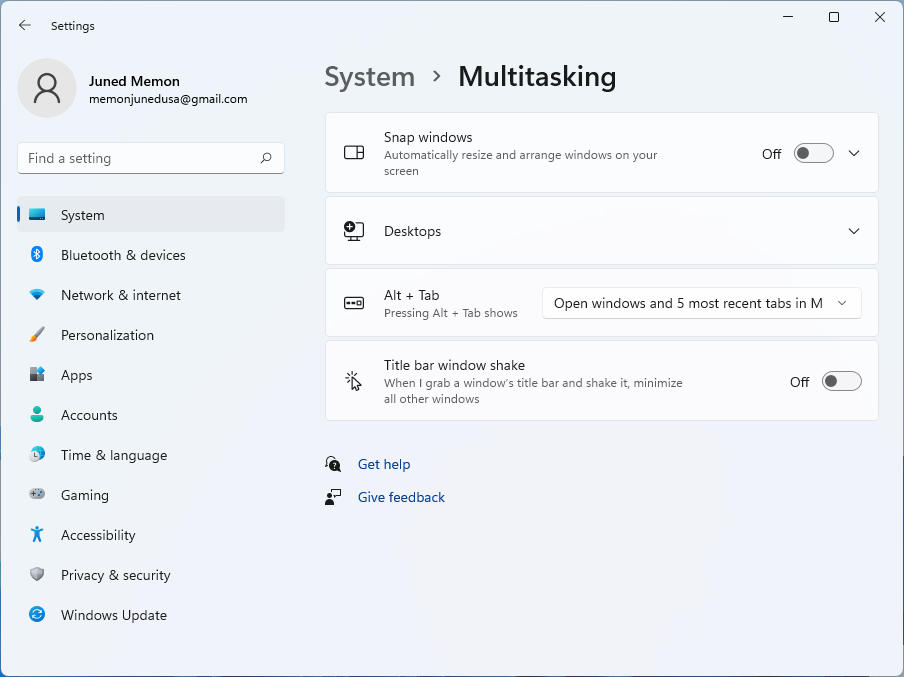
- A new window will appear that will show you Systems options. Scroll down, and you will notice an option called Multitasking. Select and navigate inside.
- Next to the Snap Windows option, you will see a toggle, which is probably turned off. You have to turn on the toggle by clicking on it to enable the snap layout features.

You can also open the Snap Windows next and checkmark any of the following options that appear on your screen. We recommend you to checkmark Show snap layouts when I hover over a window’s maximize button option because it is necessary to enable and see the snap layouts button as you want.
Now, you will be able to manage and use multiple applications faster and use them simultaneously in a quick and easy way with the snap layout feature in windows 11.
Read Also: Download Google Play Store Windows 11
How to Disable Snap Layout Features in Windows 11
Disabling the snap layout in Windows is just like enabling it. But to guide you further, we will be telling you how to do it step by step.
- Venture inside the Settings app on your Windows 11 computer. You can do so by pressing the Windows key and I on your keyboard at the same time. You can also access the Settings option from the Start menu by pressing on the icon.
- Look towards the left-pane, spot the System option, and press on it. It will take you to a new window.
- When you scroll down, you will notice an option named Multitasking. Select the same, and you are on a different screen.
- Snap windows option will appear right at the top with the toggle turned on. Turn the toggle off by clicking on it, and you will successfully disable the snap layout option.
You will no longer see the pre-set snap layout options when you hover the cursor on the minimize/maximize button. Later, when you need to use the snap layout features, you can follow the method mentioned earlier to enable it.
Read Also: Disable Windows 11 Update
Enable and Disable Snap Layout Features Using Registry Editor
There is another way to enable and disable snap layout that you can keep in mind. It involves using the Registry Editor to make the required changes you want. Follow the listed below steps to do so;
- Open the Run search box on your Windows 11 PC or Laptop by pressing Windows Key + R at the same time on your keyboard.
- Type in the command regedit and hit Enter once you are done.
- Select Yes when you see the notification text do you want to allow this app to make changes to your device?
- In the navigation bar, which you will see on the top of the window, above the editor, you have to type in the following command, which you can copy and paste from here and later hit Enter once you are done.
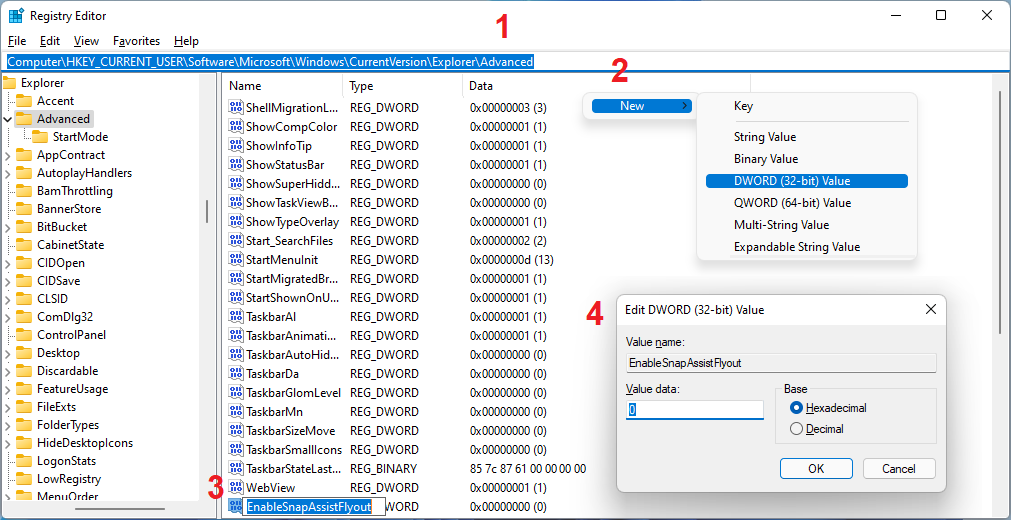
Computer\HKEY_CURRENT_USER\Software\Microsoft\Windows\CurrentVersion\Explorer\Advanced
- This step will open up loads of files and options on your screen. What you have to do next is move your cursor to the left pane, right-click on your mouse, and press on the option DWORD (32-bit) Value.
- Next, assign a name to the file as EnableSnapAssistFlyout.
- Open the DWORD by double-clicking on it. Press 1 for Enabling Snap Layouts and 0 for Disabling Snap Layout feature on the value data area.
The step-by-step methods to enable and disable snap layout features in a Windows 11 PC or Laptop will surely come into use when you need it. You can either choose to use the snap layouts when you are multitasking or choose not to, and it is completely up to you. We hope these methods and steps help you use the snap layout feature and use your Windows 11 efficiently.