Well, customizing Windows 10 is pretty simple. On Windows 10 you can customize a number of things such as Zoom in, Zoom out, desktop icon, taskbar icon, file explorer icon, background, and all. There are situations where users think of customizing desktop icons. The reason behind it may be a too-small icon or too large icon. When a user has small desktop icons they feel the difficulty in reading and recognizing. Having a small icon has one advantage that on your desktop you can set a lot many software or app shortcuts. On the other hand, when a user has a large desktop icon then it consumes the whole desktop area. It leads to a limit for setting apps shortcuts on Windows 10 desktop. In this guide, we are here to feed you by giving you the 4 best methods to Change Desktop Icon Size.
There are multiple ways to change the desktop size on Windows 10. But in this guide, we are here with the 4 best methods to change desktop icon size on Windows 10. As the desktop includes a taskbar and file explorer so, these below methods are applicable to them too.
Contents
Make use of Context Menu
Windows 10 gives you a context menu for customizing things in an easy and simple way. These settings provide you the option to choose from the three icon sizes. It depends on you which size you select.
- At first, do a right tap on the desktop. You can do it anywhere you want.
- From the Context menu tap on the View option.
- Now you will have three icon sizes name as Large icon, Medium icon, and Small icon. The choice is yours. Most Windows 10 users go for Medium icon size.
![]()
Using this setting you can increase and decrease the size of the desktop icon. If you don’t want to apply this method then go on the below other methods.
Using the Keyboard Shortcuts
If you are a keyboard user and have deep knowledge and experience of it then you can go for this guide. You just have to make keyboard shortcuts to change desktop icon size on Windows 10. Using the keyboard you will have 4 icon size options. You can go for anyone at one time.
- Press the Shift + Ctrl key.
- After this, if you want to set your desktop icon size to extra large then press 1 digit key. If you want to set your desktop icon size to large then hold 2 digit key. If you want to set your desktop icon size to medium then press 3 digit key. If you want to set your desktop icon size smaller then hold 4 digit key.
![]()
Don’t forget to hold the Shift key and Ctrl key before dealing with numbers. Make sure you use number keys that are on the top of the keyboard instead of using number pad keys because these keys won’t work in this customization.
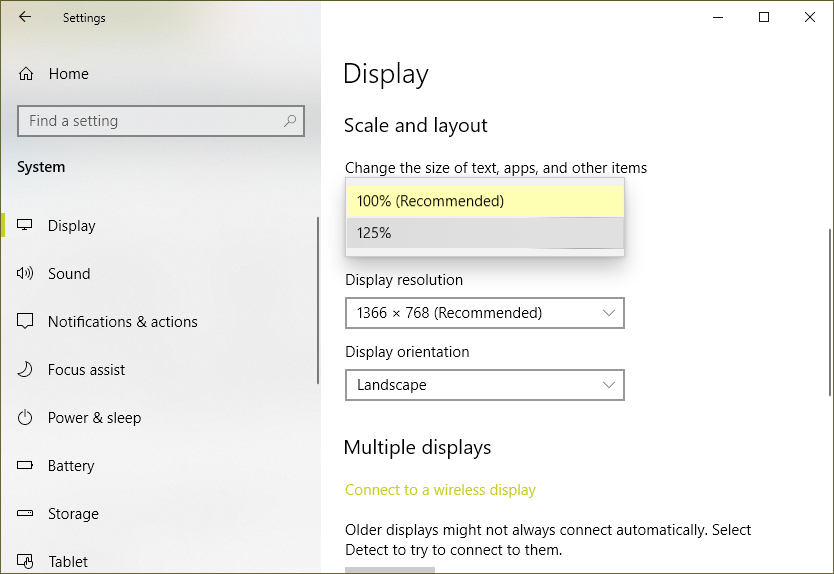
Use the Scaling and Layout option
On Windows 10 OS there is a scaling and layout option which scales the desktop icon, text, and apps. Using this option you can change Windows 10 desktop icon size. Follow the steps below to do so.
- Launch the Settings app on your Windows 10 by holding the Windows & I key.
- From the open screen tap on the System option.
- Now tap on the Display option from the left pane under the System section.
- The Display screen will be open on the same screen on the right side.
- On the screen, you will have the Scale and layout option. Now tap on the drop-down menu to Change the size of text, apps, and desktop icon. From the drop-down menu select the value. A higher value of 125% will lead to a larger desktop icon and a lower value will lead to a smaller desktop icon.
If you want to change custom scale size then tap on the Advanced scaling settings. On the screen enter the value between 100 to 500. Once you are done with it then hit on the Apply button.
Use Registry Editor
If all the above methods feel inappropriate for you then this is the last and final method. You can make changes in the registry editor entry to change the desktop icon size. Before going through the actual steps I must say that this method is risky. A small mistake in the registry editor will damage your Windows 10. If you are deciding to apply this method then make sure you follow the exact steps below.
- Open the Run dialog box by holding the Windows key and R key. Type regedit and hit on OK button.
- By doing this you will have a Registry editor window. On it follow the path as HKEY_CURRENT_USER\Software\Microsoft\Windows\Shell\Bags\1\Desktop.
- Make sure you keep this path open. Now once again open the Run dialog box by pressing the Windows key and R key. In it type cmd and hit on OK button.
- In Command prompt enter the command as taskkill /f /im explorer.exe. By executing this command your file explorer will close and your screen will go black.
- Now on the registry editor screen look for IconSize entry on the right-hand side. Once you get it then do double tap on it.

- After this do Base as Decimal and enter the Value data. If you enter 32 as value data then the desktop icons will be smaller. If you enter 48 as value data then the desktop icons will be medium. If you enter 96 as value data then a desktop icon will be larger. If you enter 256 as value data then the desktop icons will be extra larger. At last, the choice is yours.
- Once you have entered the value than tap on the OK button.
- Launch Command prompt and enter the command as start explorer.exe. This will start file explorer on your Windows 10.
All done with the registry editor. Your desktop icon size is changed to your convenience.
I hope that by applying the above method you have change desktop icon size on your Windows 10. Make sure you keep the registry editor as a last priority.