Well, on Windows 10 you can customize all things. The Windows 10 OS is on a computer, laptop, tablet, phone as well. The default font size won’t be suitable for all devices. The default font and its size is good for some of the users but there are users whose taste and preference are at another level. Some users prefer medium or some prefer large or small font. If you are reading a lengthy article on the Website then there is a need to play with font and its size.
In this article, we will see How to Change the Font and its size? and How to install a new font on Windows 10? If you have a craze to change the font and its size then make sure you stick on this blog till the end.
Contents
How to Change Font Size on Windows 10
The changing font size on Windows 10 is easy and simple. There are multiple ways to deal with it but in this guide, you will see the most appropriate methods.
Using Windows 10 Settings
Each and every Windows 10 user knew about Windows 10 settings. Making use of it you can change the font size on Windows 10.
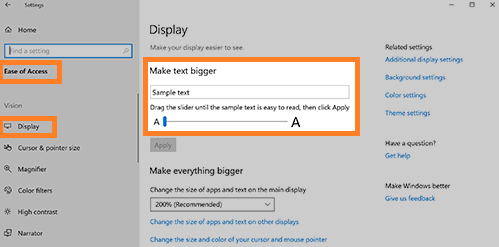
- First of all, launch Windows 10 Settings app by holding the Windows key and I key.
- From the prompted screen tap on the Ease of Access option for the further process.
- Now tap on the Display option which is at the left pane under the Ease of Access section.
- By doing this it will be open on the same screen right side. To change the font side make use of the slider which is under Make text bigger.
- You can see a preview of the font size on the same screen. Once you are done with adjusting the slider then hit on Apply button.
Now your Windows 10 font size is changed to your comfort. This will change the font size all over Windows 10.
Using Keyboard Shortcuts
Well, there are some of the applications on which you can change the font size using Windows 10 keyboard shortcuts. For this first of all select the application in which you want to change the font size. Once you are done with this then read the following points properly.
- If you want to increase the font size to font size available in the font box then hold Ctrl key + Shift key + > key.
- If you want to decrease the font size to the font size available in the font box then press Ctrl key + Shift key + < key.
- If you want to increase the font size by 1 then hold Ctrl key + Shift key + [ key.
- If you want to decrease the font size by 1 then press the Ctrl key + Shift key + ] key.
So, this is how you can change the font size on Windows 10 using keyboard shortcuts.
Use the Scaling and Layout Feature
This method is as simple as the above two methods. In this, you have to make use of the scaling and layout feature. If you don’t know how to use it then follow the steps below.
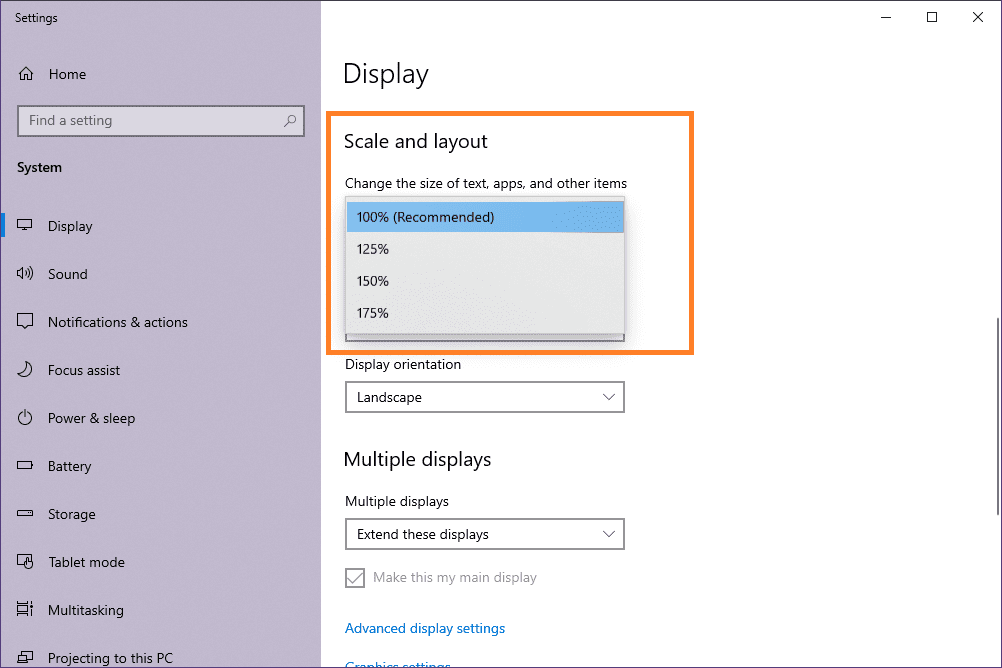
- At first do a right tap on the empty space on the desktop. From the open menu tap on the Display settings.
- On the display settings screen go on the Scale and layout section. Make use of the drop-down menu to change the font size.
- If you want the font size bigger then set it to a higher value and if you want the font size smaller then set it to a lower value.
All done with changing the font size on Windows 10. If you want to change the font itself then read the below guide with all your concentration.
How to change Font on Windows 10?
On Windows older versions such as Windows 7, it is easy and simple to change the font as in its control panel it has personalization settings. On the other hand in Windows 10 this setting has been removed due to some of the reasons. The only way to change the font on Windows 10 is to Registry Editor. You have to apply the below steps with all your focus because slide mistakes in the registry editor will lead to damage to your Windows 10. So, make sure you avoid mistakes.
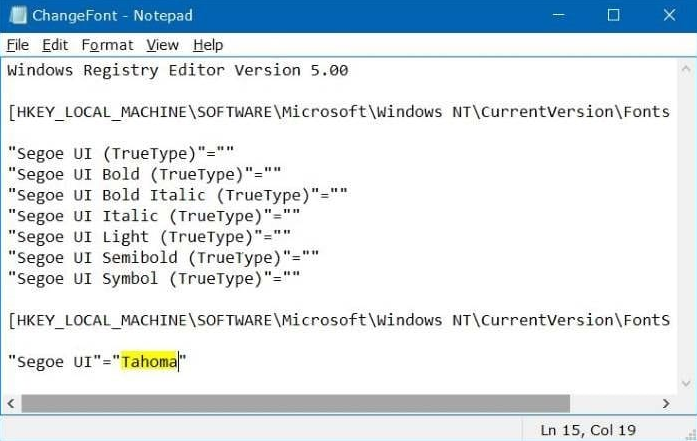
- Launch Start and go on the search bar to search for Notepad.
- From the prompted result tap on the first result. Now copy and paste the same Registry code into the file.
- Once you are done with copy and paste then open Settings and tap on the Personalization option.
- Now tap on the Fonts option from the left pane. It will be open on the right side of the same screen.
- In this, you have to select the font family. Make sure you select your favorite one. In this, we have selected “Tahoma”.
- After this type the selected font family name in place of “Tahoma” in notepad.
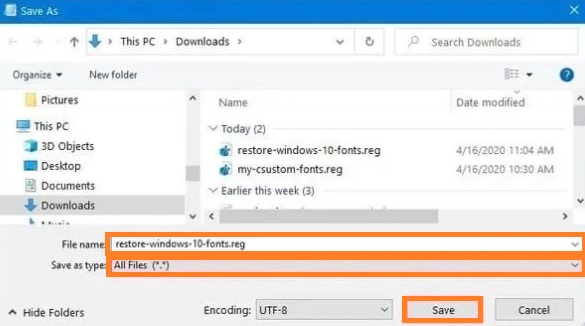
- Now tap on the File menu and tap on Save as option.
- After this make use of the Save as type drop-down menu and choose the All Files option.
- Confirm the name of the file and add the extension as “.reg” and tap on the Save button.
- Do right tap on the reg file and tap on Merge from the open menu.
- After all tap on Yes and OK button.
Once you are done with the above all steps then at last restart your Windows 10. After restarting the font of your Windows 10 system will be changed to the selected font family.
How to install New Font on Windows 10?
The New Fonts. You will get it from online platforms. There are many websites for downloading new fonts but make sure you select a trusted one as untrusted websites may contain malicious files. There is a number of users who want to install a new font on Windows 10 but they don’t know how to install them. So, this guide is for those users.
- Once you have downloaded the new font on your Windows then it’s time to install it. Make sure you have downloaded the new font file which comes with TTF and OTF format.
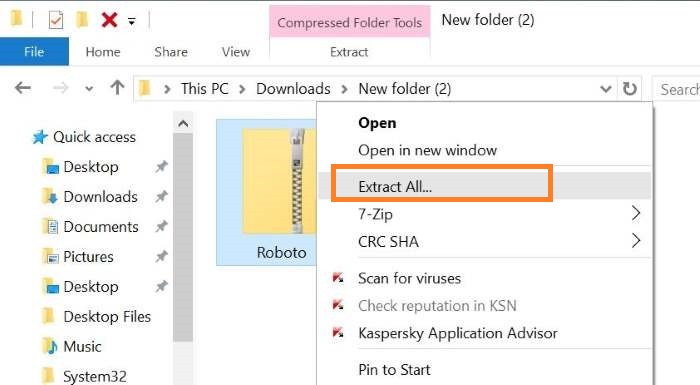
- If you have downloaded a ZIP or RAR file then it means that it contains multiple fonts. For this, you have to extract the fonts from a file. If you have a ZIP file then do double-tap and drag it to the desktop. If you have a RAR file then you will need a free extraction program installed on your Windows 10. Once you have it then do double tap on the file and drags it to the desktop.
- Now launch the Control Panel on your Windows 10 and tap on the View by menu.
- After this look for the Fonts option in it. Once you get it then tap on it. In it, you will get all currently installed fonts.

- From the desktop drag the font files into the font window for installation. The file format needed is TTF and OTF.
- Now it will ask for an Administrative password. So, enter the correct password.
All done! Now you can use a new font on your Windows 10.
I hope that by reading this blog you came to know How to Change the Font and its size? and How to install a new font on Windows 10?