If you are using windows 7 then you have faced the problems or issues of trustedinstaller.exe, at the same time there are also many advantages of this process showing in the Task Manager. This blog is solely dedicated on how to disable trustedinstaller.exe on Windows 7. The main issue or problem of this process running in the background is that it consumes more CPU usage and memory usage. Due to this problem, the computer on which this problem is running becomes slow or we can say it run slow. Now many Windows 7 users are facing this problem so if you are facing then you don’t need to worry because you are on the right platform which will provide you the fixes in detail of how to disable and how to fix trustedinstaller.exe high CPU usage or memory usage.
What is Trustedinstaller.exe?
Windows Trustedinstaller.exe is a vital and essential Windows Modules Installer Worker service that makes more use of CPU and Memory that leads to the slow down of your operating system. It is also known as one of the installer program names as a Windows Modules Installer. It has the authority to install and to remove the programs. If you want to take an eye on this service then follow the path as C:\Windows\servicing\. This service startup type should be in manual mode because it can be run as manual mode. Due to high CPU usage or memory usage its slows down the whole system. If you want to know more about its complete process then refer to our separate guide on Trustedinstaller Permission.
Disable Trustedinstaller.exe on Windows 7
After going through all the information about the trustedinstaller.exe and now below are some beneficial solutions. These will somehow disable the problem and will fix the high CPU usage or high memory usage problems on Windows 7.
Contents
Untick Windows Modules Installer Worker
The one best way to overcome the problem of trustedinstaller.exe is to stop the Windows Modules Installer Worker which runs this process. So to do this you have to untick the Windows Modules Installer. So, follow the below steps in sequence:
Step 1: At first you need a run box so to have it hold Windows + R key.
Step 2: Once you have run box then type msconfig and hit Enter or on OK button.
Step 3: Now hit on continue from the prompted screen.
Step 4: Now you will have a new window showing System Configuration so in it you will have multiple tabs but you have to go on the Services tab.
Step 5: In the Services tab you will have an option name as Windows Modules Installer so go on it and untick it to stop it.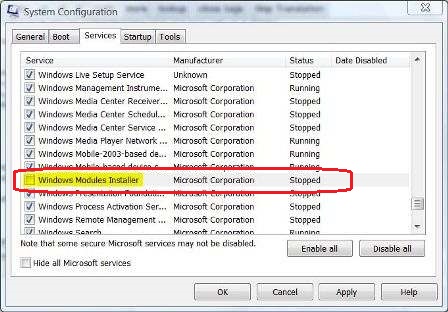
Step 6: Once you do it then on the same screen you will have the OK button so hit on it to save the changes.
Step 7: Now one more time launch the services window and then change the Windows Modules Installer Startup type to Manual.
So, by applying the above steps you can stop the Windows Modules Installer Worker which runs the trustedinstaller.exe. By doing this there will be no high CPU usage problem on Windows 7.
Remove Problematic History
If you are facing the trustedinstaller.exe high CPU usage of your system or high resources usage of your system then clear all history which is on your Windows 7 computer. So, to remove or clear the history follow the below steps:
- First of all go on the Start button and choose Control Panel.
- Now choose Problem Reports and Solutions.
- Once you finished with the above steps then tap on the Clear Solution and Problem History which located on the left side.
- Now you will have the confirmation message of removing problematic history. So, confirm it.
- At last exit the from both screen that is Control panel and Problem Reports and Solutions.
So, likewise, you can clear the problematic history from windows 7. Make sure you follow all steps in sequence.
Make Microsoft Update Startup Type as Manual
If you want to kill or disable trustedinstaller.exe then you have to change the Microsoft update startup type as manual. So to do so follow the below steps in sequence:
- At first go on the Start button and select Control Panel.
- Once you select the Control Panel then choose Administrative Tools.
- Now tap on Services and scroll it and do right tap on Microsoft Update and hit on Stop.
- Once again do right tap on Microsoft Update and choose Properties.
- Now go on the General tab and change the Startup type as Manual.
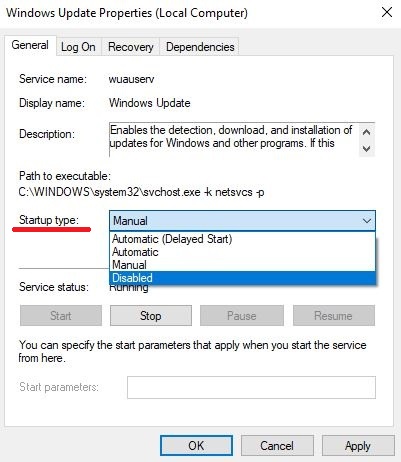
- Now go on the Recovery tab and select Take No Action.
- Once you are done with the above steps then exit the properties screen.
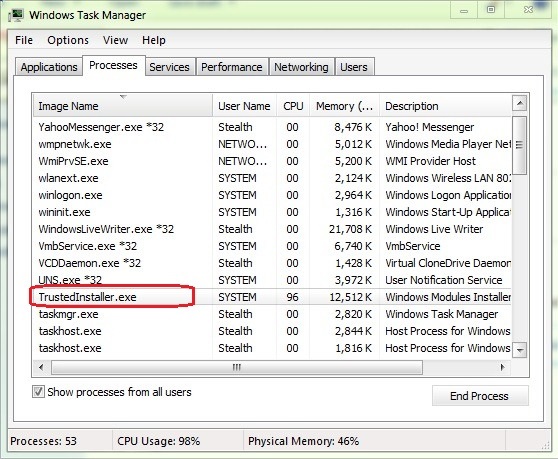
- Now all you need to do is to disable trustedinstaller.exe. So to do so open the task manager by holding Ctrl + Shift + Esc at the same time.
- In the task manager, you will have multiple tabs so go on the Process tab and scroll it and tap on trustedinstaller.exe.
- At last end the trustedinstaller.exe by clicking on the End process button.
In this blog, you have seen the problems of trustedinstaller.exe. The main issue related to this service is that it consumes high CPU usage so its system reacts slow. We have also seen the fixes to overcome this problem and to disable trustedinstaller.exe on windows 7.