Windows 10 ISO image file is like the zip file of several Windows installation components in one packed file. Windows requires hundreds of programs, driver, services, security instructions, and etc to run simultaneously on the single machine. If different programs are services are downloaded and installed one by one then it might take you days to properly get the functional PC or Laptop. Hence single ISO file concept was used to easily download and install the Windows on PCs.
First, you need to download the appropriate Windows 10 ISO file for your Laptop or Computer, then create it’s bootable USB, and later you can install Windows 10 on several machine using the same created bootable iso drive. Let’s look at the steps to create Windows 10 ISO Image.
Contents
Create Windows 10 ISO Image using the Installation Media
Microsoft have developed an official Installation Media tool to download the Windows 10 ISO file of all the versions for both 32 bit and 64 bit device. This is the best tool for the ISO files as it will always download the latest Windows 10 version and later your system won’t ask for more updates. It also ensures the trust and you won’t run into trouble of installing viruses, freeware or spyware on your system. Let’s download the latest Windows 10 ISO image file on your system.
- Visit Microsoft official site to download the Media Creation tool for the latest ISO file.
- Scroll down to the second section of Create Windows 10 Installation Media and Download tool now.
- Save it on your desktop or your desired folder.
- Double click to launch the Windows 10 setup and Accept the License Agreement.
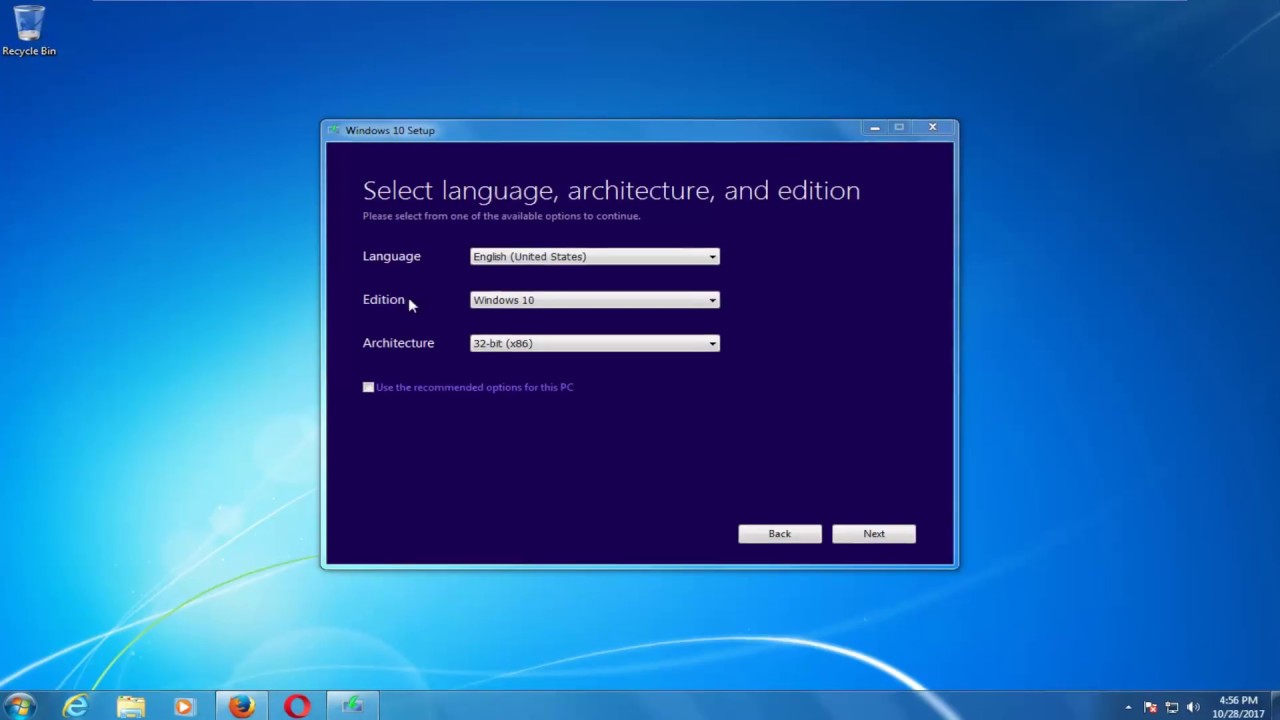
- Select your preferred language, edition from the Windows 10 Home or Pro and an Architecture from 32 bit or 64 bit device.
- Select the second option of the ISO file to download it on your device.
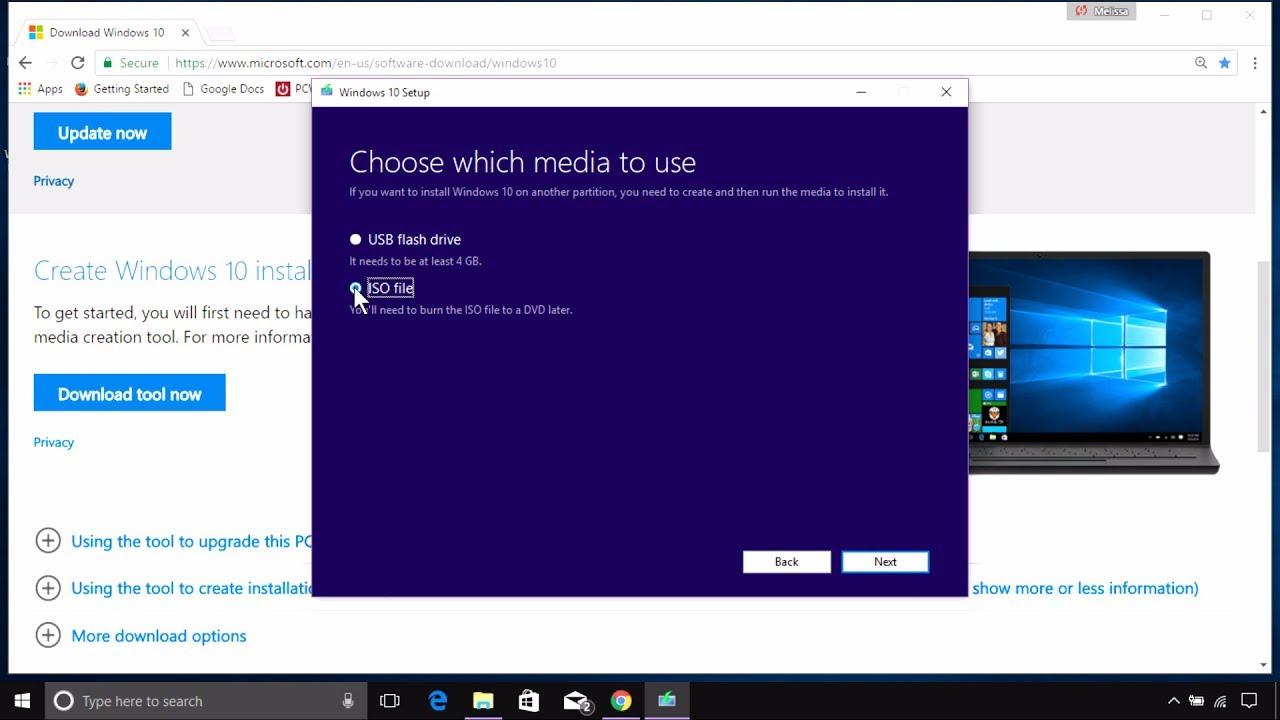
The tool will start creating Windows 10 ISO image, it will take from 30 minutes to an hour based your internet speed connection. It’s size will be around 4GB for both 32bit and 64bit editions. Created ISO file will be stored on your selected location. If you do not trust the tool to keep working until it fully download the file OR it had failed your earlier then you can also skip to the direct download links.
Direct Download Links to the Windows 10 ISO Files
Sometimes, Media Creation tool fail to accomplish the task in one shot and also waste carrier data if you aren’t on the WiFi. Creating Windows 10 ISO Image direct download links is more feasible and less time consuming. We will download it from the same Media Creation page, from the official source. You will create the download link with yourself just by tweaking few options hence no need to worry about the unauthorised temptations with the ISO file.
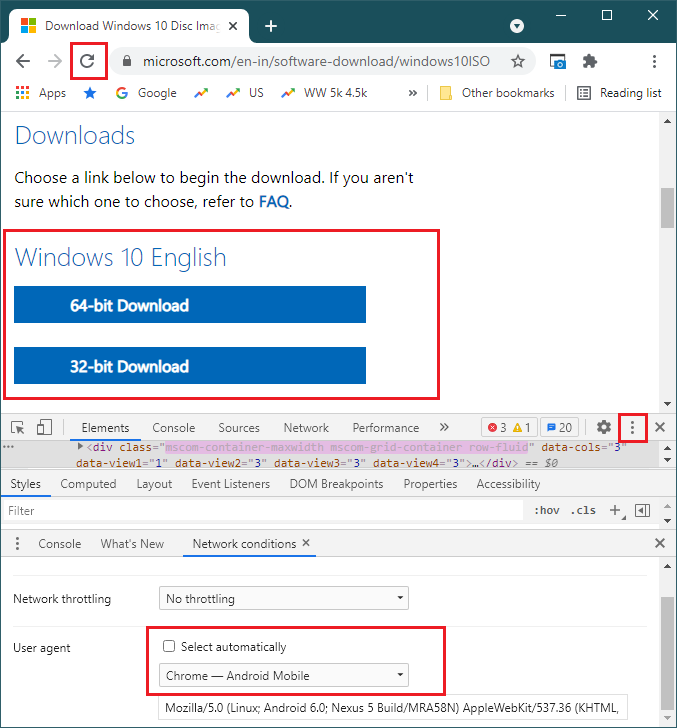
- Stay on the Media Creation Page and press F12 key to launch the Inspect Elements.
- Press Ctrl + Shift + P shortcut to Run Commands and type show network conditions and hit enter. You can manually navigate by tapping on the three vertical dots placed before the cross icon, tap on the more tools and select the Network conditions.
- Untick the Select automatically option for the User agent.
- Select Chrome – Android Mobile as Custom Agent.
- Reload the page without closing Inspect Elements.
- Now the Page will ask to select the Windows 10 edition, language, and the 32bit or 64bit Architecture.
- Windows 10 ISO Image will be start downloading on your device on selecting the 32bit or 64bit device.
Make sure to download before the generated link for the selected specification expires within 24 hours.
Create Bootable ISO USB with the Installation Media
Windows Media Creation tool also offer to create the bootable ISO USB or DVD directly from the downloaded the ISO file. Plug in the USB drive before running the downloaded tool. USB drive will be formatted, so backup its files before proceeding.
Run the tool and accept the terms by following the on screen instructions. You might have to wait a bit until the tool gets ready things for your device.
Make changes as per your desired options or Use the recommended options for your PC. Flash USB drive on the next screen to select your attached USB stick.
First, it will start downloading the the required Windows 10 ISO image and later create the bootable ISO USB drive using the same file. You can see the Progress on the Windows Setup screen. Once the tool finished creating booting the installation files on the USB then you can use it to install the Windows 10 on the other devices.
Use RUFUS to Create Bootable USB from Windows 10 ISO
Windows Media Creation tool create bootable USB after downloading the ISO file but RUFUS create it from the available ISO file. The RUFUS is portable program use for cleaning and making the live bootable drive.
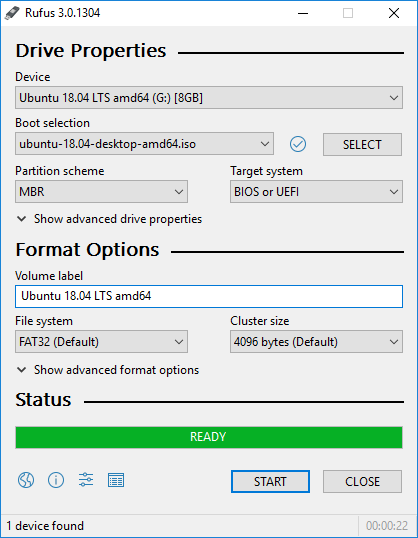
You can download it form the RUFUS official site and launch it on your system.
Attach at least 4GB of USB drive to your PC and let RUFUS detects it. Once detected you can select it as very first device option.
Choose your Windows 10 ISO file from the second Boot selection option.
Now, its time to select the device Partition scheme on which you will install the Windows. Partition scheme can be MBR or GPT based on your device. Head to the Disk Management on your Windows, Right click on the partition and open its properties. Tap on the Volumes from the top menu and check the Partition style details. It will show Master Boot Record (MBR) or GUID Partition Table. Select the same Partition scheme as of the device you are going to install the Windows. If you are not able to boot into the device then google other ways to know the partition style. But make sure you select the correct one else Windows Installation won’t complete.
Start creating the bootable drive, it will take a few minutes to complete the procedure.
Install Windows 10 from the Bootable USB
You are all ready to install new Windows 10 on your target device. Insert USB into your PC and Keep pressing the Boot Menu key just after starting the Computer. Select the inserted drive as boot device to start with Windows Installation.
Follow the onscreen instruction and choose from your desired options to keep going forward. Your PC will restart frequently during the procedure, just be patient and do not turn off your computer.
You may need to login and setup your account once the Windows 10 installation is completed. Explore new features with lots of options on your new Windows 10. Also, activate Windows 10 if you have valid keys.
Hopefully, you have started browsing your new Windows 10 installed from your own created Windows 10 ISO Image.