Speech recognition is one of the best approaches to deliver faster and clearer information sharing than typing. Voice is very important when you want to share information with your family member or gaming pather over a voice chat or call.
Fortunately, configuring a microphone on Windows is quick and straightforward. Here’s the way to configure and test the mic in Windows 10.
Contents
- 1 How to Set Microphone on Windows 10?
- 2 How to test the Connected Microphone on Windows 10?
- 3 Fix Microphone on Windows 10
- 3.1 Solution 1 – Allow all access permissions for your microphone
- 3.2 Solution 2 – Reconnect your Bluetooth microphone
- 3.3 Solution 3 – Install the right set of drives for your microphone
- 3.4 Solution 4 – Uninstall suspicious VOIP applications
- 3.5 Solution 5 – Update your Windows 10 with the latest version
- 3.6 Solution 6 – Set your microphone as your default recording device
- 3.7 Solution 7 – Uninstall microphone if it is installed as a printer or other devices
- 3.8 Solution 8 – Makes sure your microphone hardware is compatible with your computer
How to Set Microphone on Windows 10?
The first and most important step to configure a microphone is to connect it via Wired connection or using Bluetooth connectivity. The next step is to install the official drivers for your microphones.
In most cases, Windows 10 automatically installs the necessary and compatible drivers. However, in some cases advanced microphones don’t work with generic drivers. In such cases, you have to manually install the recommended driver from your manufacturer’s website.
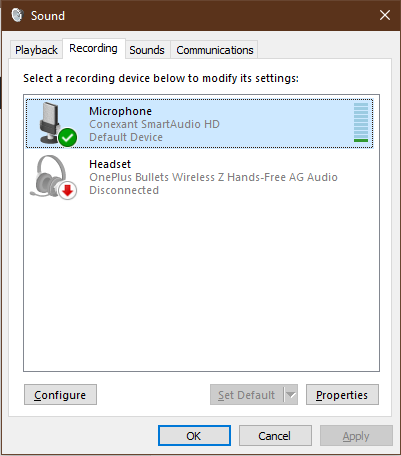
Once you are done with the official driver’s installation simply right-click on the volume icon present in the system tray. Then click on the Sounds option available in the menu.

In the sound section, you will find the Recording tab. Click on it to check all the available microphone settings. Now select the desired microphone you want to connect and use with your Windows 10 computer. After that click on the configure button-down left in the dialog box.
Next, you will find a window for configuring your speech recognition. Now you have to click on the option “Set up Microphone”. The option will help you to gear up things forward to set up speech recognition for you. Setting up the microphone will allow you better voice clarity and higher stable voice precision.
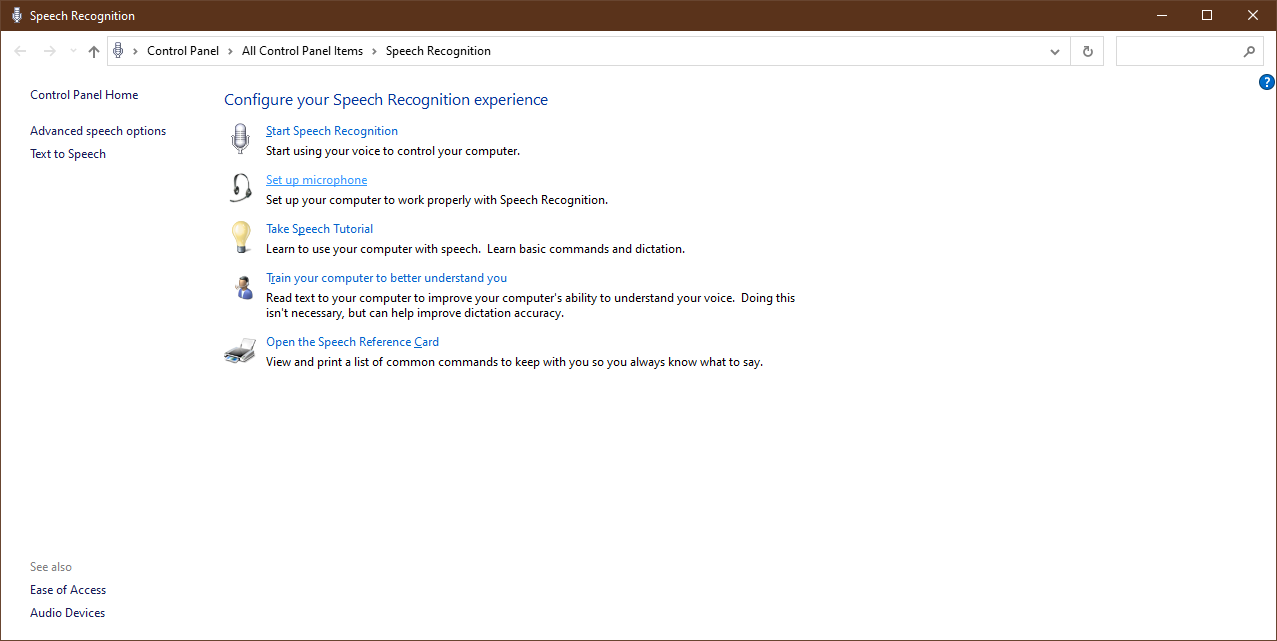
Once you are ready with your setup wizard. You have to choose the type of microphone you connected with your computer. Select the proper microphone and click on the “Next” button.
The next screen offers various information about how to use the microphone. After reading all the necessary tips click on the “Next” option. On the very next wizard window, you will have to read the given text aloud. Now proceed to the next step by clicking the “Next” button.
In case if your computer can’t hear your voice then check whether your microphone is in a mute state. Check and inspect the microphone and reconnect it with the computer once again. Follow the instructions as it can solve your microphone connectivity issues.
How to test the Connected Microphone on Windows 10?
If you have already done configuring the microphone using the above-mentioned steps. If you follow all the previous steps then you can solve all your microphone-related issues. However, it is always better to perform a quick test before beginning a voice chat or video conferencing.
Open the sounds window and right-clicking on the sound icon available in the taskbar. Next click on the “Sounds” command.
Now choose the “Recording” tab to see the list of the available devices.
Now test your voice by speaking into your microphone. Check and monitor the green bar levels it will move as your voice enters into the microphone. If the bars are rising properly with your voice then your microphone is in perfect working condition.
In case if you face the bars are rising but very minimum then you have to toggle it with settings. Try turning the levels of your microphone up. It will increase the sensitivity of your microphone and allows the hardware to pick up more sounds.
Switch to the “ Recording” tab and click on the properties option. Now select the “Levels” tab and adjust the sensitivity of your microphone. It will enhance the abilities of your microphone to grab more sound with ease.
If you still face issues with rising bars, then it’s better to reinstall the driver or update the official drivers.
Fix Microphone on Windows 10
Despite properly setting the Microphone and its drivers, Windows 10 still do not detects the connected Mic. There might be multiple reasons behind the Microphone not working on your PC, but we present you with the most common solutions to fix 90% of the problems.
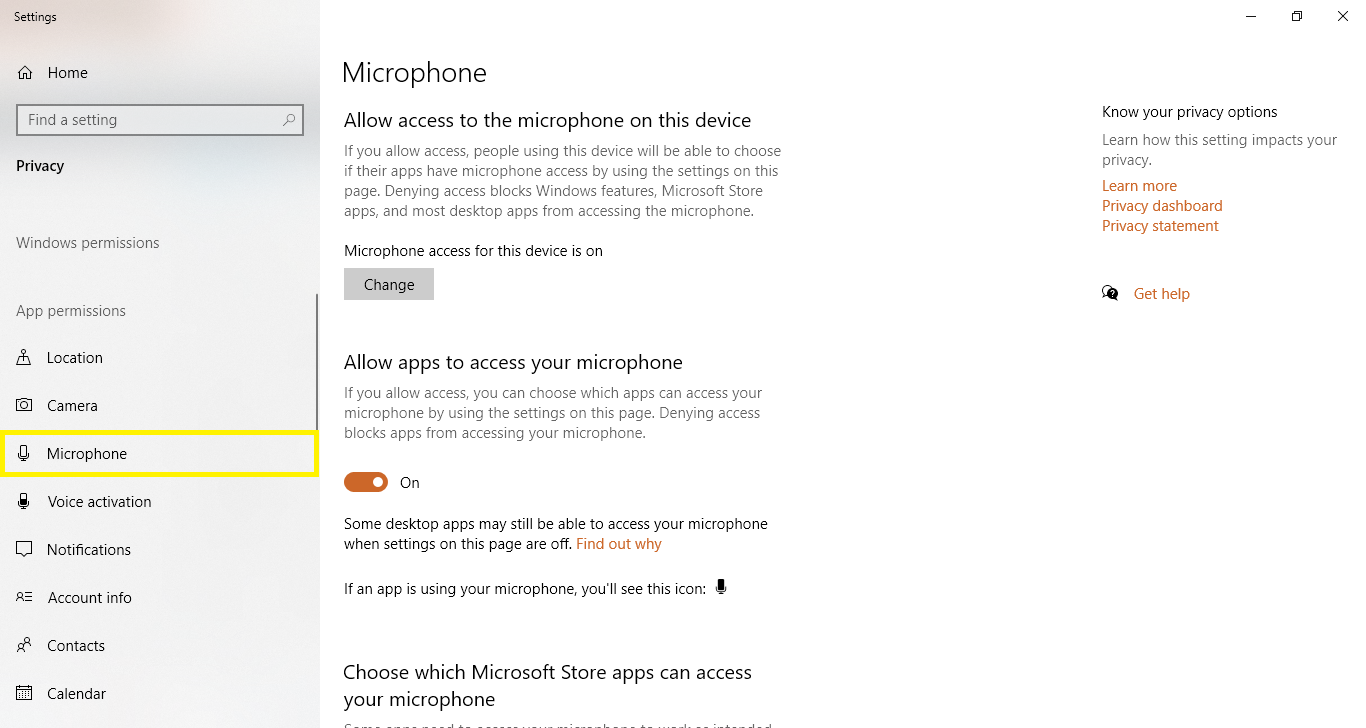
Solution 1 – Allow all access permissions for your microphone
Open the Privacy setting in windows settings. Now you will find three settings under microphone settings. If you find the access is “Off” then change the option and turn it “On”. Turning it On will allow all the applications to get access to the microphone.
Solution 2 – Reconnect your Bluetooth microphone
Sometimes we forget to set our Bluetooth microphone as our default device. Windows 10 can’t recognize it automatically. So in order to get the desired recording set the Bluetooth microphone as the default device.
Solution 3 – Install the right set of drives for your microphone
It is very important to have the perfect compatible drivers for your microphone to work. In some cases, users stick with the outdated drivers which cause audio issues. You need to update your microphone’s drives with the latest one.
Solution 4 – Uninstall suspicious VOIP applications
If your computer is full of multiple VOIP software for audio and video chats. Sometimes these applications prevent the control panel from accessing the voice inputs from the microphone. These applications need to be uninstalled in order to regain the defaults access to the microphone
Solution 5 – Update your Windows 10 with the latest version
In some cases, microphones don’t perform well due to older versions of Windows 10. So it is recommended to update windows 10 with the latest security patches and compatibility fixes. These techniques might solve your microphone issues.
Solution 6 – Set your microphone as your default recording device
You will find multiple recording devices connected to your computer. Now to set the desired microphone as your default recording device. Right-click on the desired recording devices and enable them from the menu.
Solution 7 – Uninstall microphone if it is installed as a printer or other devices
Sometimes microphones appear in the list of devices like printers. In such cases, you have to remove the devices and reconnect them. Uninstall the old drivers and install the latest drives.
Solution 8 – Makes sure your microphone hardware is compatible with your computer
There are various types of microphone connectors available in the market. However, you have to pick the perfect one which is precisely compatible with your computer’s jack.